8.8.4 Install Trade 6 from the WAS console
You are now ready to install the Trade 6 Enterprise Application Archive. We could install Trade 6 by using the script again (this time with the install option). Instead, we shall do it using the WAS console.
The reason for installing Trade6.ear using the Administrative Console rather than the .jacl script is our split-JVM environment. Using the Administrative Console allows us to deploy the Web components to the WEBcluster and the EJBs to the EJBcluster during the installation. The alternative is to install the application using the script and then change the mappings to the clusters and the EJB references afterwards.
If you do not use such an environment, you can use the .jacl script for the install process. In fact, you can then actually configure the environment and install the application at the same time - in one call of the script.
- Log on to the WAS console and click...
Applications | Install New Application
The Preparing for the application installation window is displayed.
-
First you have to specify the EAR/WAR/JAR module to upload and install. Select Browse to specify the location of the Trade.ear file, select it, and click Next to continue.
The .ear file can reside on any managed node in the cell or on the local workstation running the WAS console. Depending on where you stored it, click the Browse button next to the Local file system or Server file system path.
- On the next window you can define mappings and bindings. We do not need to change anything here, so click Next to accept all defaults.
- Click the Continue button on the Application Security Warnings window.
-
First you have to specify the EAR/WAR/JAR module to upload and install. Select Browse to specify the location of the Trade.ear file, select it, and click Next to continue.
- The upcoming window shows the first of 12 steps in the Install New Application process.
- On the Step 1 window (Select installation options), make sure the Deploy enterprise beans check box is selected. Please note that the Application Name Trade has been filled in automatically. Click Next.
- On the Step 2 window (Map modules to servers) change the default mapping so that the EJB module (TradeEJBs) is mapped to EJBcluster and the Web module is mapped to WEBcluster as well as to both Web servers.
- On the Step 3 window (Provide options to perform the EJB Deploy) you should change the Database type to the version you are using (in our case to DB2UDB_V82).
-
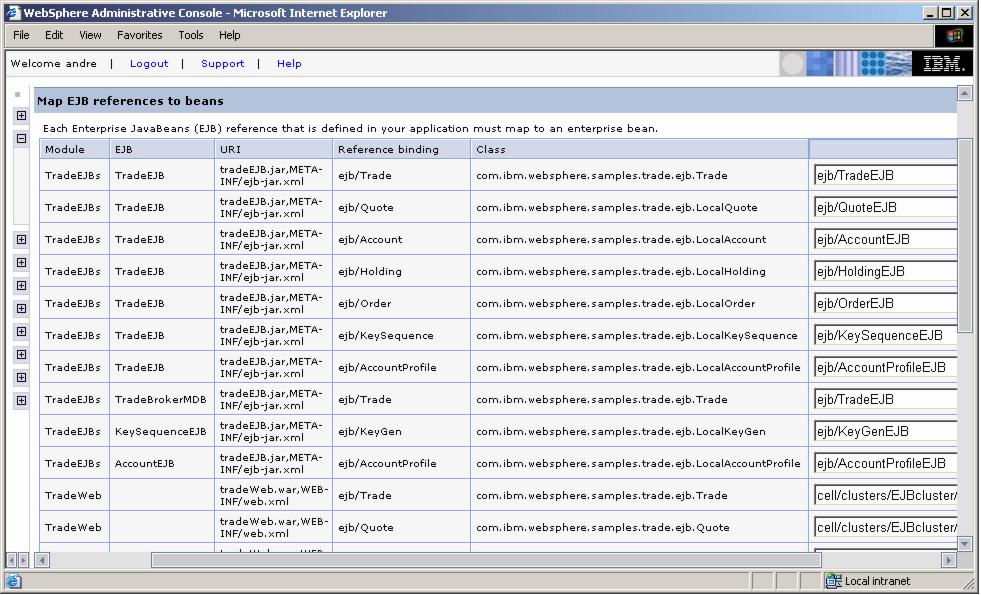
Click Step 9 (Map EJB references to beans).
-
Change the JNDI name of the ejb/Trade reference binding in the TradeWeb module to its fully qualified JNDI name:
cell/clusters/EJB_Cluster_Name/ejb/TradeEJB
In our environment, the correct fully qualified JNDI name is:
cell/clusters/EJBcluster/ejb/TradeEJB
-
Change the JNDI name of ejb/Quote reference binding in the TradeWeb module to its fully qualified JNDI name:
cell/clusters/EJB_Cluster_Name/ejb/QuoteEJB
In our environment, the correct fully qualified JNDI name is:
cell/clusters/EJBcluster/ejb/QuoteEJB
-
Change the JNDI name of the ejb/Trade reference binding in the TradeWeb module to its fully qualified JNDI name:
-
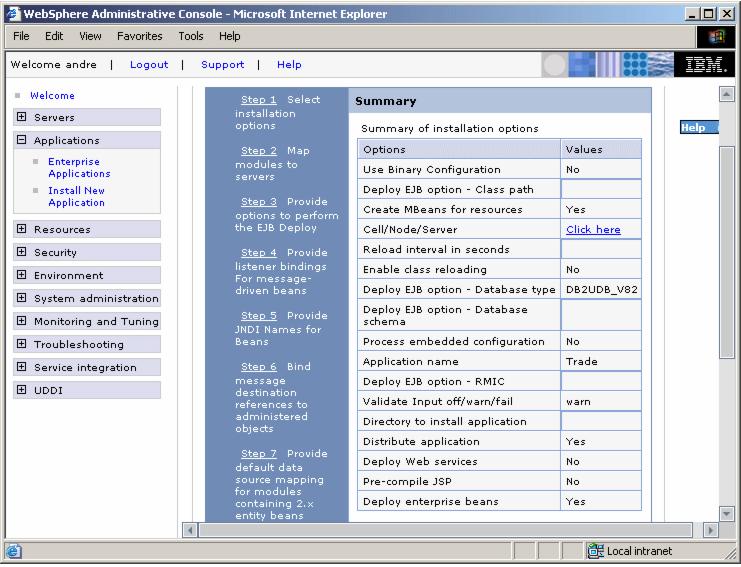
Click Step 12 (Summary). Review the options and click Finish to perform the installation. This can take a few minutes.
- Finally, after the installation has completed, save your changes to the master configuration and synchronize with the nodes.