5.5.2 Using WAS custom advisor
The WebSphere custom advisor can be used as a monitoring extension associated with each HTTP server on the cluster. The custom advisor prevents requests from being sent to a specific HTTP server when the HTTP server cannot appropriately fulfill them.
The WebSphere custom advisor is only useful in environments where you are not using the WebSphere workload management options provided by the plug-in in the Web server.
A sample custom advisor for WAS is included in...
<install_path>/servers/samples/CustomAdvisors
Two files are used to implement the advisor:
- ADV_was.java
The custom advisor code that should be compiled and executed on the Dispatcher machine.
- LBAdvisor.java.servlet
The servlet code (it must be renamed to LBAdvisor.java) that should be compiled and installed on the WAS machine.
The servlet returns the following string in case of success:
LBAdvisor/0.92 100
Thu Nov 04 10:06:59 EST 2004
The advisor parses the string to get the WebSphere status (100) and informs the Dispatcher monitor.
The custom advisor could be used, for example, if you have enabled server affinity on the Load Balancer, then forward requests from one Web server to a certain appserver and the related database. In such a configuration, the advisor can accurately mark down or lower the weight based on the full test - including the appserver and the database.
When using WebSphere plug-in workload management, as in our sample topology, monitoring the HTTP servers using the HTTP advisor is probably the best choice.
Edit the sample files and prepare the advisor and the servlet to be installed on the proper machines as follows:
- Rename the file ADV_was.java to ADV_was6.java, because was6 will be the name of the advisor.
- Modify the Java file ADV_was6.java to reflect your settings.
- To reflect the new class name, the line:
public class ADV_was extends ADV_Base implements ADV_MethodInterface {
...must be changed to:
public class ADV_was6 extends ADV_Base implements ADV_MethodInterface {
...and the line:
public ADV_was() {
...must be changed to:
public ADV_was6() {
- To reflect the new advisor name, the line:
static final String ADV_WAS_NAME = "was";
...must be changed to:
static final String ADV_WAS_NAME = "was6";
- To reflect the response of IBM HTTP Server on AIX, the line:
static final String HTTP_GOOD = "HTTP/1.1 200 ok";
...must be changed to:
static final String HTTP_GOOD = "HTTP/1.1 200 OK";
- To reflect the location, where you have deployed the LBAdvisor servlet, the line:
static final String SERVLET_LOCATION ="/servlet/LBAdvisor";
...must be changed to:
static final String SERVLET_LOCATION ="/advisor/servlet/LBAdvisor";
- To reflect the new class name, the line:
- Compile the advisor using the following command (the command must be typed on one single line):
javac -classpath /opt/ibm/edge/lb/servers/lib/ibmlb.jar:/opt/ibm/edge/lb/admin/lib/j2ee.jar ADV_was6.java
- Verify the compilation finishes without errors.
- Copy the ADV_was6.class file to the <LB_install_path>/servers/lib/ CustomAdvisors directory:
cp ADV_was6.class /opt/ibm/edge/lb/servers/lib/CustomAdvisors
The advisor is now installed, but you still need to compile and deploy the advisor servlet, which will run in the back-end appservers.
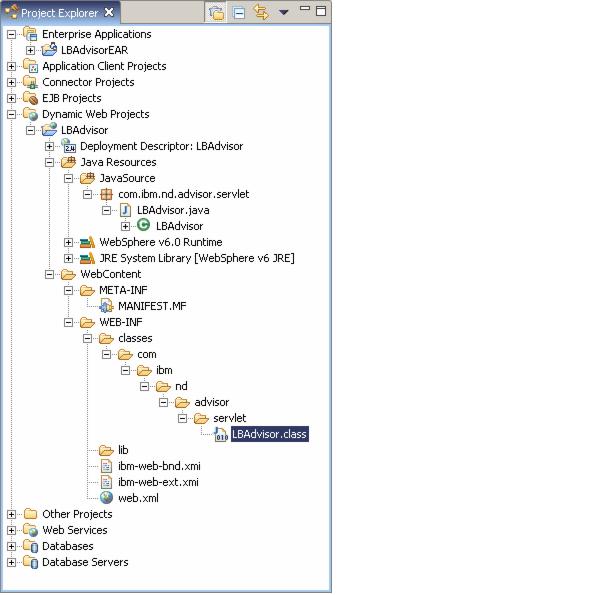
We used Application Server Toolkit (AST) to edit and compile the advisor servlet, and to create the WAR file. The structure of the application we created for the LBAdvisor is shown in Figure 5-59.
The provided sample performs a select in the sample database. In order to use this sample with our scenario (we are using the Trade 6 database for this test), we made the following changes to the servlet LBAdvisor.java using AST:
The following changes assume that you installed the tradedb with the user "Administrator", and that the database uses the schema "Administrator" for the tables. If you installed the database and created the tables with the default user (db2admin in Windows and db2inst1 in Linux/UNIX) change the code accordingly.
- Change the syntax of the sleep method call from:
try
{
    _checker.sleep(_interval * 1000);
}
catch (Exception ignore)
{ }
to:
try { Thread.sleep(_interval * 1000); } catch (Exception ignore) { } - >Change the reference to the database from:
private static String _dataSourceName = "jdbc/sample";
to:
private static String _dataSourceName = "java:comp/env/jdbc/advisordb";
- Change the database user ID from:
private static String _dbUserid = "khygh";
to the proper one in your environment. In our scenario we used:
private static String _dbUserid = "Administrator";
- Change the password of the database user ID from:
private static String _dbPassword = "one4all";
to the proper one in your environment. In our scenario we used:
private static String _dbPassword = "my_password";
- Change the database schema name from:
private static String _dbOwner = "khygh";
to:
private static String _dbOwner = "ADMINISTRATOR";
- Change the select statement from:
private static final String _query1 = "Select FirstNme from ";
private static final String _query2 = ".Employee where LASTNAME = 'PARKER'";
to:
private static final String _query1 = "Select EMAIL from ";
private static final String _query2 = ".accountprofileejb where USERID = 'uid:0'";
- Change the following lines from:
Hashtable parms = new Hashtable(2);
parms.put(Context.INITIAL_CONTEXT_FACTORY, "com.ibm.websphere.naming.WsnInitialContextFactory");
parms.put(Context.PROVIDER_URL, "iiop:///"); // local machine
Context context = new InitialContext(parms);
to:
Context context = new InitialContext();
Note that we deleted the first three lines from the original code.
- Add a servlet mapping to the Web module deployment descriptor (the web.xml file):
<servlet> <display-name> LBAdvisor</display-name> <servlet-name>LBAdvisor</servlet-name> <servlet-class> com.ibm.nd.advisor.servlet.LBAdvisor</servlet-class> </servlet> <servlet-mapping> <servlet-name>LBAdvisor</servlet-name> <url-pattern>/servlet/LBAdvisor</url-pattern> </servlet-mapping> - Add a resource reference to the Web module deployment descriptor (the web.xml file):
  <resource-ref id="ResourceRef_1099586856129">
    <res-ref-name>jdbc/advisordb</res-ref-name>
    <res-type>javax.sql.DataSource</res-type>
    <res-auth>Container</res-auth>
    <res-sharing-scope>Shareable</res-sharing-scope>
  </resource-ref>
- Change the syntax of the sleep method call from:
We then exported the application to a WAR file, and installed it on our sample topology using these steps:
| 1. | Create two appservers, Advisor1 on app1Node and Advisor2 on app2Node. For more information about creating appservers refer to WAS V6 System Management and Configuration Handbook, SG24-6451. |
| 2. | Create a new datasource with the same parameters (except for the JNDI name which should be jdbc/advisordb) as the Trade 6 TradeDataSouce for your LBAdvisor application. Use the same datasource, but we recommend creating a new one so LBAdvisor does not use resources from the Trade 6 datasource. |
Refer to the InfoCenter for more information about how to create a datasource. The InfoCenter is available at:
http://publib.boulder.ibm.com/infocenter/ws60help/index.jsp
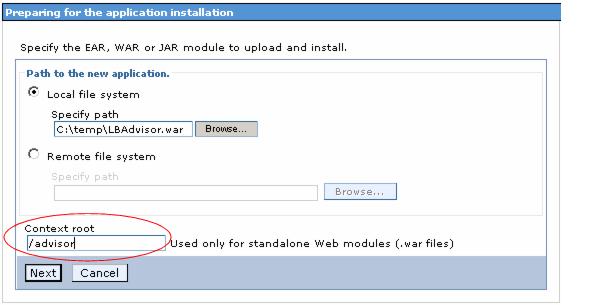
| 3. | Select Applications -> Enterprise Applications -> Install New Application. Select LBAdvisor.war (the file that was generated previously using AST) and enter /advisor in the Context root field, Click Next. |
Figure 5-60 Selecting LBAdvisor.war for installation
| 4. | In the next pane select Use the virtual host name for Web modules, enter the virtual host default_host and click Next. |
| 5. | Click Continue. In the Step 1 pane, enter LBAdvisor_war1 in the application name field and click Next. |
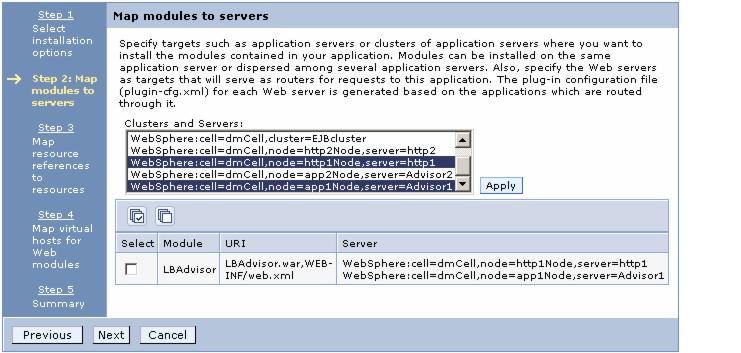
| 6. | In the Step 2 window, select the Web server http1 and the appserver Advisor1 under Clusters and Servers, select the LBAdvisor module and click Apply, Then click Next. |
Figure 5-61 Mapping the LBAdvisor module to servers
In this case, http1 will only forward requests to the appserver Advisor1. If anything fails in the application itself, or in the communication of this appserver to the database, the advisor will detect it and set its port value of http1 to -1.
| 7. | In the next pane associate the resource reference to the datasource. You can select the datasource used by Trade 6 (jdbc/TradeDataSource) or the one you created in step 2 (we named our datasource /jdbc/advisordb). |
Make sure you also map the correct authentication method (TradeDataSourceAuthData), Click Next.
Figure 5-62 Mapping resources to the LBAdvisor module
| 8. | Click Continue on the Application Resource Warnings pane, then in the Step 4 window select the virtual host default_host. Click Next. |
| 9. | Click Finish on the Summary pane. |
| 10. | Repeat steps 3 through 9. This time, however, you use LBAdvisor_war2 as the application name in step 5, and you map it to the http2 Web server and Advisor2 appserver. |
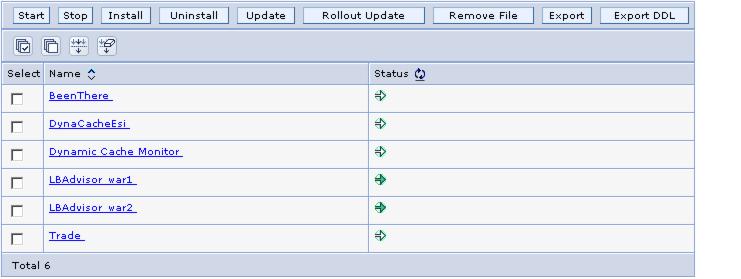
| 11. | .Save the configuration, update and propagate the Web server plug-in, then start the appservers (in case they are stopped) and the applications LBAdvisor_war1 and LBAdvisor_war2. |
Figure 5-63 LBAdvisor_war1 and LBAdvisor_war2 applications
Note that the environment we just created does not use WebSphere workload management: if either the appserver Advisor1 or the Web server http1 fails, http1 will be marked down, so all requests will be forwarded to http2. The same thing will happen if either Advisor2 or http2 fails: http2 will be marked down.
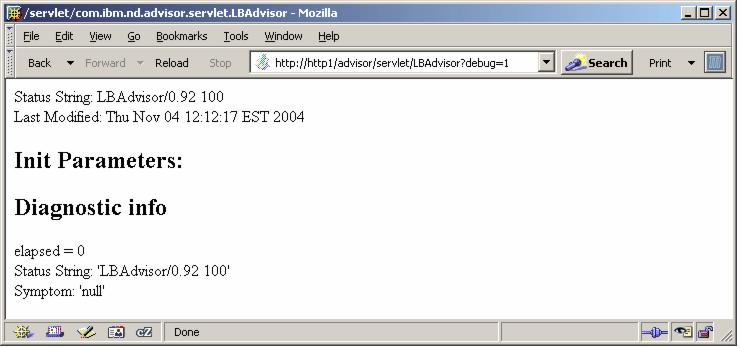
| 12. | Test if the servlet is responding using http://http1/advisor/servlet/LBAdvisor?debug=1. This URL returns a HTML/text page with some diagnostic information, |
Figure 5-64 LBAdvisor diagnostic information
| 13. | .Restart the Load Balancer server: |
dsserver stop
dsserver start
| 14. | Start the custom advisor using the command: |
dscontrol advisor start was6 80
where was6 is your custom advisor name and 80 is the port number where the advisor opens a connection with the target server.
|
Restriction: You can only start one advisor for a certain port. Therefore, if you have the default HTTP Advisor started, you first need to stop it. |
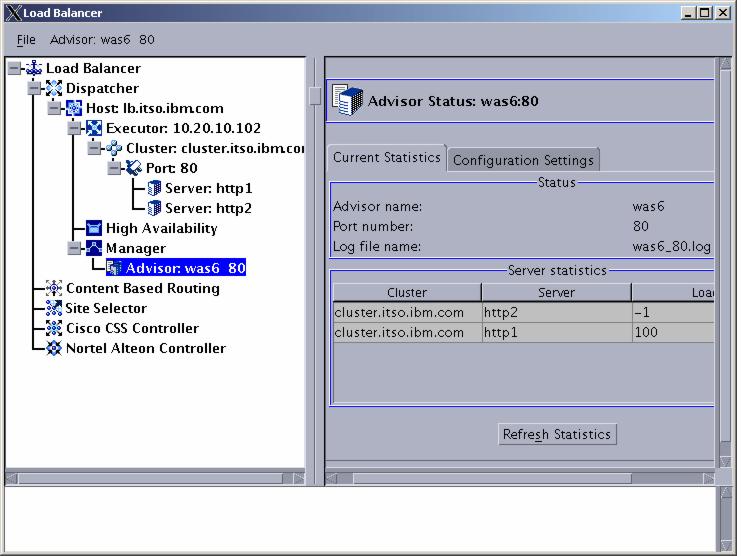
| 15. | Start the GUI of Load Balancer and select your new advisor, then select the Current Statistics tab on the right. The advisor status is displayed. Click Refresh to update the status. If the advisor is working properly, the load value is displayed. If there is no response, a status of -1 is returned. |
Figure 5-65 Advisor statistics
If there is no response, one option is to select the Configuration Settings pane and change the advisor logging level to Advanced, for example, then look at the log file at <LB_install_path>/servers/logs/dispatcher. A lot of detailed information is recorded, showing all requests and responses, which may help you locate where the problem is occurring.
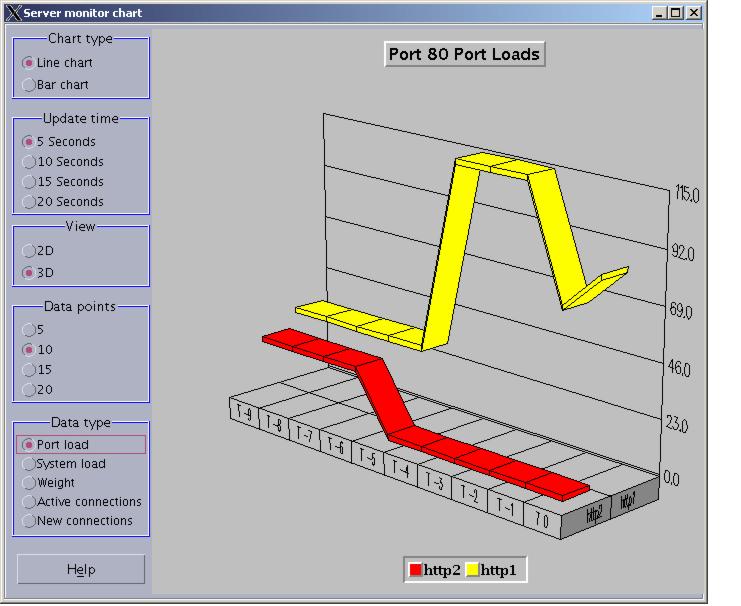
If we simulate a failure by stopping the appserver Advisor2 or causing a failure in the communication to the database server, we can see how the requests are directed to the available appserver (associated with the http1 server). We can see the graphical statistics of the traffic by selecting the Monitor option under the cluster port the advisor is associated with,
