This is probably the most common and thus most interesting update type. It can be performed on a running system for all topologies. Using the rollout update function is also an option for this type of application update if your environment allows for it.
The minimum configuration to achieve this without application downtime is a cluster on two different nodes (horizontal scaling). Each node hosts at least one cluster member. If update static content on the HTTP servers also, then we need a minimum of two HTTP servers.
In this scenario, you might not need to wait for active sessions to expire or end, as they can failover to the other, still active, cluster members. So, a bugfix update is a much faster overall process.
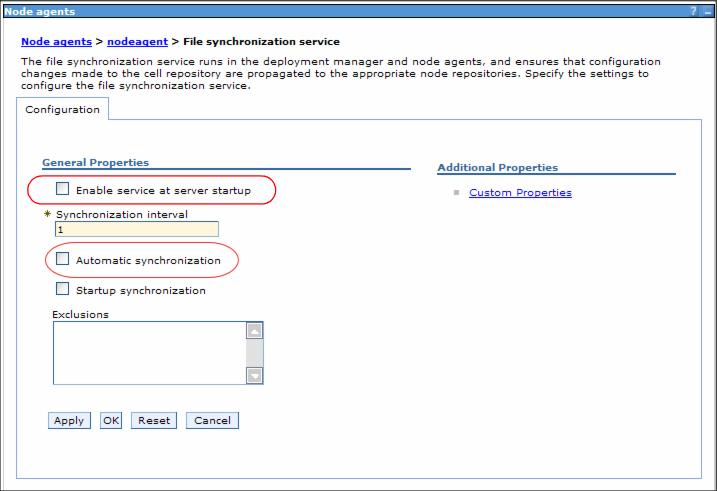
The update scenario depends on whether you also need to update static content on the HTTP servers or only the WebSphere application. In both cases, however, you first need to deactivate the automatic file synchronization service of the Node Agents. Next, you update the WebSphere application and also any static content on the HTTP servers that needs to be updated.
After deactivating the file synchronization service, follow Updating a WebSphere application only if no static content needs to be updated. Alternatively, follow Updating a WebSphere application and static content on the HTTP server to update static content on the HTTP servers.
System administration | Node agents | nodeagent | File synchronization service
If we need information about how to update a WebSphere application, see WAS V6 System Management and Configuration Handbook, SG24-6451.
Follow these steps only if no static content needs to be updated on the HTTP servers!
Follow the instructions in Updating a WebSphere application and static content on the HTTP server to update the WebSphere application as well as static content.
To update a WebSphere application:
At this point the updated application resides in the master repository on the Deployment Manager system. The nodes and thus cluster members are not aware of the new code version and continue to serve the old application version that is stored in their local configuration repository subset.
The synchronized node now serves the new application version while the other nodes continue to serve the old application version. As a precaution you can test your application on the updated node before synchronizing the other nodes.
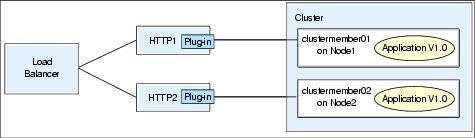
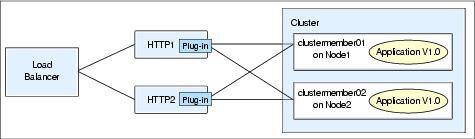
In order to update static content on the HTTP servers, be able to remove the HTTP server from the environment while updating it. This means that we need a minimum of two HTTP servers for this to work seamlessly. In most cases, all HTTP servers are associated to all cluster members and can thus forward requests to the entire cluster - this is shown in Figure 5-13. Thus, for this update scenario, first untangle the HTTP server to application mapping to make sure that each HTTP server is only associated with certain cluster members (we call this a branch again throughout this section). This situation is depicted in Figure 5-16.
|
All cluster members on a node must belong to the same branch but you could have more than one node in a branch. |
Figure 5-16 HTTP server and nodes: one-to-one assignment
|
Important: There is no failover of active requests available any more when the branches are created because the HTTP server does not know about the other appservers. Therefore make sure that there are no active sessions in the branch you wish to update. |
Follow these steps to create and update the branches:
| 1. | For the appservers of the first branch: Stop the appserver so that active requests failover to the appservers of the other branch. Alternatively you can set the appserver weights to 0 to make sure no new requests arrive and monitor for active sessions to end as described in The update steps before continuing with creating the branches. |
| 2. | Use the Administrative Console, deactivate automatic propagation of the plug-in file to the HTTP server. Click Servers | Web servers | Web_Server_Name | Plug-in properties. Deselect Automatically propagate plugin configuration file on the configuration panel shown in Figure 5-17. Click OK and save your changes. |
Do this for all HTTP servers in your environment.
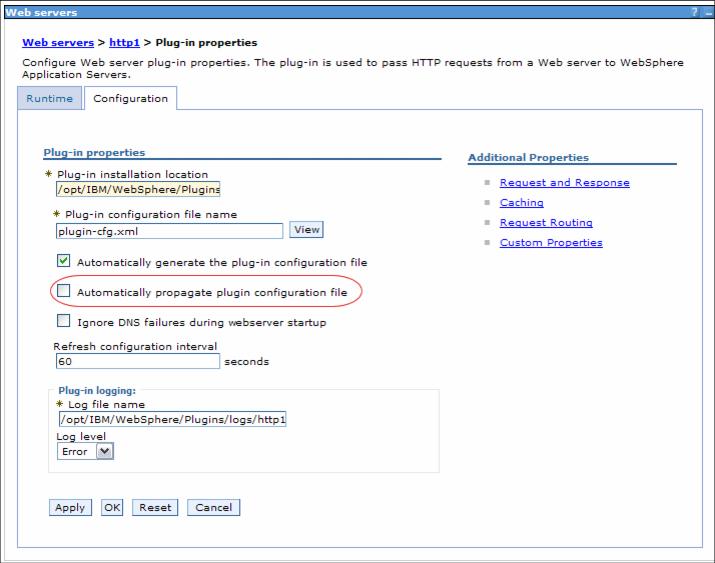
Figure 5-17 Disable automatic propagation of plug-in configuration file
| 3. | On each HTTP server machine, copy the Web server plug-in file (plugin-cfg.xml) so you have a backup file for later restoration. Then edit the original plugin-cfg.xml file. Comment out the lines for the appservers of the other branch(es) so the HTTP server only knows about the appservers of its own branch. |
|
You cannot use the Administrative Console to change this mapping as the console only allows you to change the mapping for the application itself, which means for the entire cluster and not for individual cluster members. |
Wait as long as the time specified in the RefreshInterval (at the top of the plug-in file), by default this is 60 seconds. After this time, the HTTP server reloads the plug-in file and your changes take effect.
The highlighted lines in Example 5-2 show which lines need to be commented out in the plugin-cfg.xml file. (In our example, we keep wasmember06 in the branch and remove wasmember05.)
Example 5-2 Isolate the branch by removing the server from the list of servers
...
<ServerCluster CloneSeparatorChange="false"
               LoadBalance="Round Robin"
               Name="wascluster02"
               PostSizeLimit="-1"
               RemoveSpecialHeaders="true"
               RetryInterval="60">

      <Server CloneID="10cp2mdfn"
              ConnectTimeout="0"
              ExtendedHandshake="false"
              LoadBalanceWeight="2"
              MaxConnections="-1"
              Name="wasna02_wasmember06"
              ServerIOTimeout="0"
              WaitForContinue="false">

         <Transport Hostname="wasmember06.ibmredbook.com" Port="9083" Protocol="http"/>

         <Transport Hostname="wasmember06.ibmredbook.com" Port="9446" Protocol="https">

            <Property Name="keyring" Value="/opt/IBM/WAS/Plugins/etc/plugin-key.kdb"/>
            <Property Name="stashfile" Value="/opt/IBM/WAS/Plugins/etc/plugin-key.sth"/>

         </Transport>

<!-- </Server>

      <Server CloneID="10cuccd8v"
              ConnectTimeout="0"
              ExtendedHandshake="false"
              LoadBalanceWeight="2"
              MaxConnections="-1"
              Name="wasna01_wasmember05"
              ServerIOTimeout="0"
              WaitForContinue="false">

         <Transport Hostname="wasmember05.ibmredbook.com" Port="9084" Protocol="http"/>

         <Transport Hostname="wasmember05.ibmredbook.com" Port="9447" Protocol="https">
            <Property Name="keyring" Value="/opt/IBM/WAS/Plugins/etc/plugin-key.kdb"/>
            <Property Name="stashfile" Value="/opt/IBM/WAS/Plugins/etc/plugin-key.sth"/>
         </Transport>

      </Server>
-->

      <PrimaryServers>
         <Server Name="wasna02_wasmember06"/>
<!-- <Server Name="wasna01_wasmember05"/> -->
      </PrimaryServers>

   </ServerCluster>
...
| 4. | Quiesce the HTTP server at the Load Balancer and wait for a reasonable amount of time so all affinity requests to the HTTP servers have finished or expired, then stop the HTTP server. |
For the Load Balancer, use the dscontrol manager quiesce command. The quiesce subcommand allows existing connections to complete (without being severed) and forwards only subsequent new connections from the client to the quiesced server if the connection is designated as sticky and stickytime has not expired. The quiesce subcommand disallows any other new connections to the server. You can check the number of connections to that server with the dscontrol server rep :: command. When there are no more active connections, you can safely shut the server down. See the Load Balancer Administration Guide v6 for more information about these commands.
| 5. | Update the application and save it to the master configuration. Be careful not to synchronize with the nodes during this task. |
At this point the updated application resides in the master repository on the Deployment Manager system. The nodes and thus cluster members are not aware of the new code version and all active servers continue to serve the old application version that is stored in their local configuration repository subset.
| 6. | Update the static content on the HTTP server. |
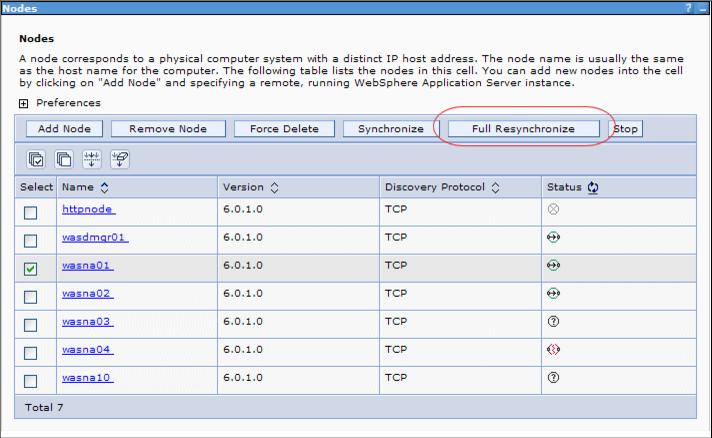
| 7. | Now you can synchronize the updated application code to the nodes of your first branch. Using the Administrative Console, go to System administration | Nodes. Select the appropriate node and click Full Resynchronize. See Figure 5-15. |
The synchronized node can now serve the new application version while the other node or nodes of the other branch or branches continue to serve the old application version.
If there is more than one node in your first branch, synchronize the other nodes accordingly. As a precaution you can test your application on the updated node before synchronizing the other node or nodes.
Figure 5-18 shows the status during the update.
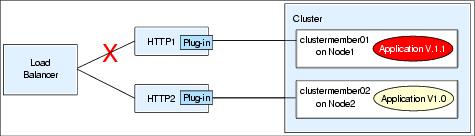
Figure 5-18 During the update
| 8. | After testing it, make the updated branch accessible again: |
| a. Start the appserver cluster. |
| b. Start the HTTP server or servers. |
Requests should now flow from the Load Balancer to all HTTP servers again. However, all requests being sent to the HTTP server of the first branch will use the new application version.
| 9. | The next step is to update the second branch. Repeat steps 1 to 8 for the second branch. |
| 10. | Restore the original plugin-cfg.xml files of the HTTP servers or remove the comment indicators from the files. This makes sure that all HTTP servers can send requests to all appservers again and that workload management and failover is available again. |
| 11. | Re-enable the file synchronization service for the Node Agents. Follow the steps described in Deactivating the automatic file synchronization service but this time check the two fields. Save your changes and do not forget to restart the Node Agents. |
| 12. | The last step is to re-enable automatic propagation of the plug-in file. Follow the steps described in step 2 and select Automatically propagate plugin configuration file. Save the changes. |