Specify content form properties
Specify the characteristics of the content form generated from the authoring template, including...
- How sections are displayed
- Sites and site areas where content can be saved
- Customized help text for the content form.
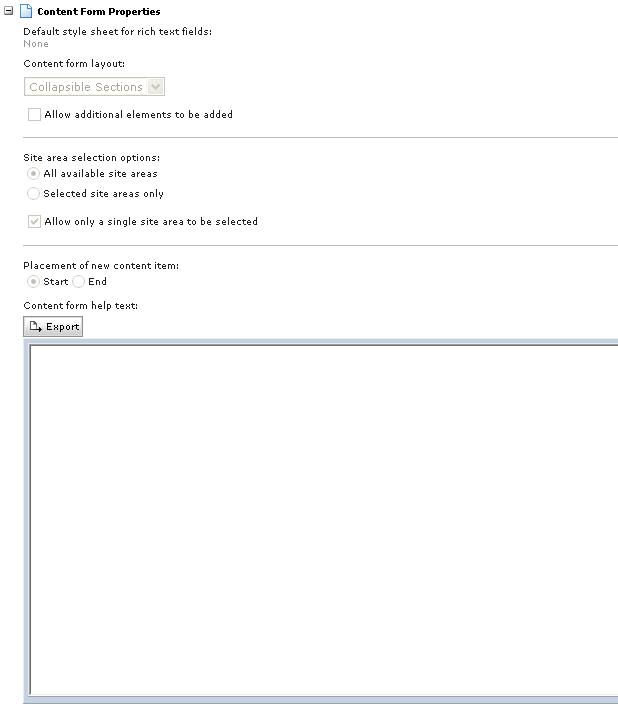
- Select whether a default style sheet component is used when rendering rich text elements in the content form.
- Click...
Select default style sheet...to render a style sheet when a style element tag is used with the parameter...
source="template"
- Select a style sheet component from the list of available style sheet components, or click None if you do not want to apply a style sheet component.
- Click OK.
- Select the general layout of the fields on the content form...
- Choose a layout option from the list in the Select content form layout field.
Labeled sections Organize sections of the content form vertically. Separate sections with a label.
Collapsible sections Organize the sections vertically. Enable the content author to expand and collapse the sections as needed.
Tabbed Organize the sections horizontally on the form. Provide access to the different sections with tab-like links.
Flat Arrange all elements on the form vertically without organization by section.
- Select...
Allow additional elements to be added...to allow content authors to add additional elements to the form when filling it out. If this field is not checked, content authors can only work with those elements defined in the authoring template.
- Indicate whether content created with this authoring template can be saved to any available site area or only to those site areas specified by the template author.
Option Description All available site areas Enable the content author to save content created from this template in any site or site area to which the author has access. To allow the content author to save the content to only one site area, select Allow only a single site area to be selected.
Selected site areas only Select specific sites and site areas where the resulting content can be displayed. To select sites and site areas, complete the following steps:
- Click Selected site areas only.
- Click Add.
- Select the site or site area you want to include. To access the site areas for a given site in the navigator, click on the site to display the list of site areas associated with it.
- Click OK.
- Select the saving option to be applied when the content author saves content created from this template:
- Allow content item to be placed under a single site area only : Causes the content author to select only one of the site areas in the list when saving content.
- Allow content to be placed under multiple site areas : Enables the content author to select one or more site areas from the list when saving content.
- No option : Content is automatically saved to the site areas in the list, and the content author is not provided a choice when the content is saved.
- Specify where new content created from this authoring template will be listed by selecting one of the following options from the Placement of new content item field. This will determine where the new content item will be displayed in indexes and navigators.
- Start
- End
- To override the default help text for the content form with help text specific to the environment, enter the help text in the Content form help text field.
The help text you create in this field applies to the entire content form. When the content author clicks the Show help link on the content form, the help text is displayed in a dedicated area of the form.
With the embedded editor provided in this field, we can input help text as HTML. We can format the HTML text using the design view, which provides tool bar buttons for common tasks, or we can work directly with the text in a source view that displays the HTML tagging. If you have previously prepared content in HTML format that we want to include in the help, we can import that content using the embedded editor.
Although link components can be selected using the insert link button, link components will not work in content form help.
Parent Topic
Create an authoring template
Previous topic
Define authoring template details
Next topic
Specify default content settings