DBChecking
The DBChecking application is a utility application that illustrates how highly available singleton services can be used to maintain some global information that needs to be accessible to all cluster members. In our scenario, the global information that is maintained by the singleton service is the status of the database. This state is propagated to the application instances running on all cluster members so that the database is not accessed by the application when it is down. The DBChecking application achieves this by using WPF for the singleton service and ObjectGrid for maintaining the database state on all cluster members.
This can be useful in a lot of scenarios. For example, if a database (datasource) is not available for some reason, the application accessing it will get an exception. The exception stacks will be written to a log file. If the application continues to access the database frequently while the database is still down, then lots of exceptions will be thrown and written to the log file. In cases where there are huge volumes of client requests, the log file size will quickly grow to huge proportions and may cause unforeseen problems. Furthermore, if the application is running on all cluster members, these exceptions will be logged in each cluster member causing unnecessary overhead.
To reduce the exception trace logging in each cluster member, we can implement a singleton that periodically checks the database state and then stores/updates the state in a cache such as an ObjectGrid map. The key of the map is the datasource name, and the value indicates the state. The singleton can use a dummy transaction to check whether a connection to a datasource is good or not. The changes of the database state are then propagated using ObjectGrid's distributed transaction propagation mechanism to other application servers. Before accessing a datasource, the application needs to check the ObjectGrid map for the state of that datasource. If the state indicates the database is down, the application can log a short one line "database is down" message in the logs and take appropriate actions to reject the request or redirect the request to a backup datasource.
Note that DBChecker is the name of the actual class or instance hereof while DBChecking is the name of the application and of the EAR file.
Figure 10-2 Using partitioning facility to provide a singleton DBChecker service
The diagram illustrates that DBChecker is hosted in partition singleton. This is the only partition running within the cluster and hence a singleton service. The ObjectGrid map is located on each cluster member and synchronized with each other via the ObjectGrid's internal distributed transaction propagation mechanism. DBChecker is now responsible for checking the database availability, updating the ObjectGrid map and logging of exceptions. This is far more desirable and reduces logging overhead and administration tasks.
If the server hosting the singleton partition fails, the partition will be activated in another running server (using the high availability features provided by the HA Manager). Thus, we can guarantee the availability of the database state checking behavior. In the DBChecking scenario, the WPF singleton partition is responsible for checking the database states and updating the ObjectGrid map.
Figure 10-3 Partition failover scenario
This kind of state maintenance generally has a performance overhead in clustered applications. For example, a standard J2EE application can have a dedicated thread that does this database checking periodically and this thread would exist in all application instances (on all the cluster members). This would result in a larger performance overhead on the overall application performance and will not have any guarantees on its availability. Furthermore, if there are multiple applications that require access to the database, each one will have to write its own DBChecking thread. Using the DBChecking utility application, applications need not write this functionality over and over again. With the DBChecking application, they can use the database state with minimal performance overhead (because the DBChecking partition runs on only one of the cluster members), minimal application redesign (because applications just need to access the ObjectGrid entry to fetch the database state) and guaranteed high availability (becauses the partition is HA-managed).
Set up the environment for the DBChecking application
In order to run this sample, we first need to create a sample database with the name testdb and then create a datasource using the WebSphere Extended Deployment Administrative Console. After that we need to create the timer manager using the WebSphere Extended Deployment Administrative Console. The application is then deployed into a newly created static cluster. While deploying the application, we need to bind the J2EE resource references specified in the application to their actual WebSphere counterparts. These steps are summarized below.
Creating the sample database
To create the sample database, follow these steps:
- We used DB2 version 8.1 (DB2 UDB 8.1) as our database. We created a database called testdb by logging in as the db2 instance owner (db2inst1 for example) and running the following command:
db2 create database testdb- We then created a table with the name testtable in the database testdb. The table testtable has a single column called NUMBER which holds data of type smallint. We also inserted a sample record into the table.
db2 connect to testdb db2 create table testtable (NUMBER smallint)
db2 insert into testtable values (100)
Creating the datasource
To create the datasource...
- In the Administrative Console, go to...
Resources | JDBC ProvidersVerify that the scope is set to cell scope.
- Click DB2 Universal JDBC Driver Provider (XA) | Data sources and click New.
- Enter testDS as the name and jdbc/testDS as the JNDI name.
- Specify an authentication alias for the Component managed authentication alias.
If we need to create an authentication alias first, go to...
Security | Global security | JAAS Configuration | J2C Authentication data | New...to create a new authentication alias.
- Specify the name of the DB2 database (testdb ), the driver type (4), the host where DB2 is running and the port number where the DB2 service is listening (by default it is 50000 in DB2).
- Save our changes.
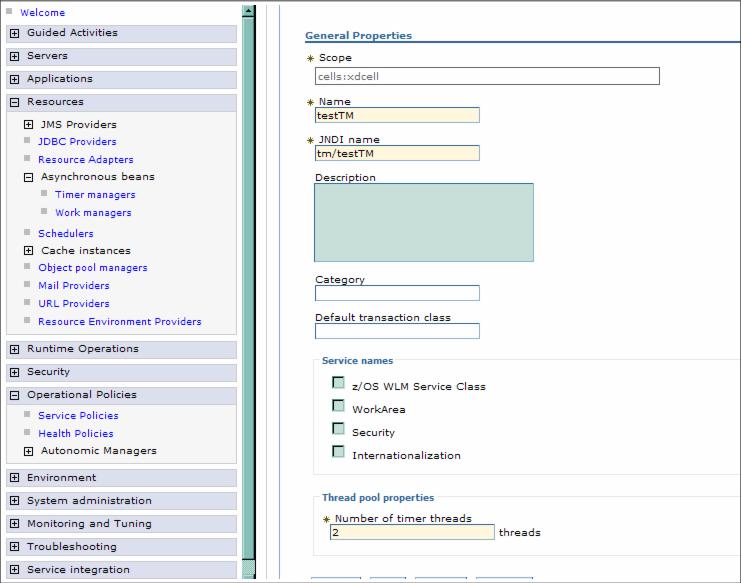
Creating the timer manager
To create the timer manager, follow these steps:
- In the Administrative Console select Resources | Asynchronous beans | Timer managers. Verify that the scope is set to cell scope.
- Click New and enter testTM as the timer manager name and tm/testTM as the JNDI name.
- Save our changes.
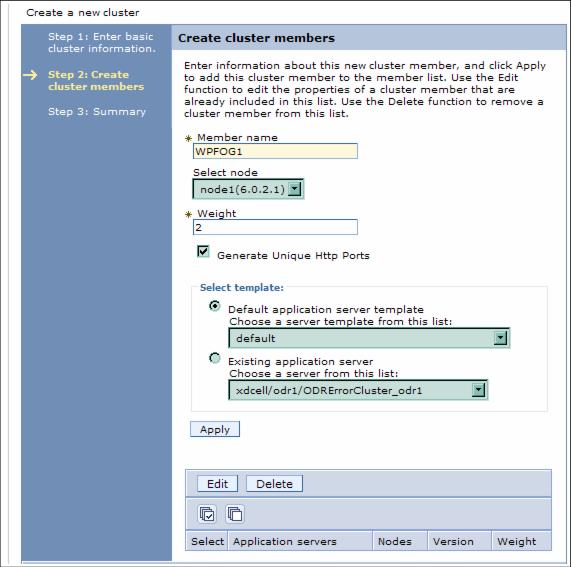
Creating the static cluster
WPF and ObjectGrid are available only for static clusters. The DBChecking application can thus be installed only on a static cluster. For DBChecking, we created a static cluster with the name RedbookClusterWPFOG and with three members: WPFOG1, WPFOG2 and WPFOG3.
- To create a new static cluster, select Servers | Clusters and click New.
- On the basic cluster information panel, enter the name of the cluster and click Next.
- Enter the name of the first cluster member and select the appropriate node for this member. Accept all other default settings and click Apply.
- Repeat step 3 to add all other cluster members.
- Click Next and then Finish. Save our changes.
Obtaining and installing the DBChecking application
The application can be downloaded from this redbooks' additional material repository.
DBChecking.ear can be installed either using the Administrative Console or by using the wsadmin shell. To install it using the console follow these steps:
- Select Applications | Install New Application.
- Specify the path to the DBChecking.ear file and enter /DBChecking as the Context root. Click Next.
- Accept the defaults on the mappings and bindings panel and click Next.
- Accept the defaults on the Step 1: Select installation options panel and click Next.
- On the Map modules to servers panel, make sure that we select the correct cluster where we want to install the DBChecking application (RedbookClusterWPFOG in our case). Select both the DBCheckingEJB and DBCheckingWeb modules and click Apply. Click Next.
- Select the correct database type (DB2UDB_V82 in our case) on the Provide options to perform the EJB Deploy panel and leave all other fields blank. Click Next again.
- Accept the default JNDI names for the beans on the following panel by clicking Next.
- On the Map resource references to resources panel, accept the default JNDI names for the TimerManager (tm/testTM ) and the datasource (jdbc/testDS).
Select Use default method for the authentication method and select the correct authentication alias from the drop down list.
Verify that both DBCheckingPartition and DBAccess EJBs are selected and click Apply. Click Next.
- We might see some warnings. Ignore them and click Continue.
- Accept the defaults on the next two panels by directly selecting the Step8: Summary link. Click Finish on the Summary panel.
- Verify that the application was installed successfully and save our changes.
DBChecking application design
As discussed in Chapter 8, WebSphere Partitioning Facility, the DBChecking application consists of two EJBs:
- The Partitioned Stateless Session Bean (PSSB) - DBCheckingPartitionBean that periodically checks the database state (using another class - DBChecker that implements a timer) and stores that state in the ObjectGrid map.
- The DBAccessBean that represents a sample application that first accesses the ObjectGrid map to fetch the state of the database before performing its business operation (which in this case is just fetching the number of records in the database).
DBCheckingPartitionBean
The DBCheckingPartitionBean is a stateless session with PartitionHandlerLocal as the local interface. This makes it a Partitioned Stateless Session Bean (PSSB). When the application is started in the EJB container, the bean is analyzed and the PartitionHandlerLocal interface methods are called, which when implemented with the PartitionManager API will submit requests to the HA Manager coordinator to create and activate partitions based upon the current policy. The PartitionHandlerLocal interface defines callback methods that enable our application to receive specific partition life cycle events from the WPF run time. There are 4 methods on this interface:
- PartitionHandlerLocal#getPartitions
- PartitionHandlerLocal#partitionLoadEvent
- PartitionHandlerLocal#partitionUnloadEvent
- PartitionHandlerLocal#isPartitionAlive
PartitionHandlerLocal#getPartitions
The getPartitions method is called when the application is started in a cluster member. This method is called once on every cluster member every time the application starts. This method signature is:
PartitionDefinition[] getPartitions()The method should return an array of PartitionDefinition objects. There should be exactly one PartitionDefinition for every partition the application can host in this cluster member. A cluster member can only be a candidate for a partition when that partition has been returned from getPartitions.
It's recommended that the application always returns the same set of partitions on each cluster member.
HA Manager policies can be used to limit the partition to activation on certain cluster members or even pin a partition to a particular cluster member.
public PartitionDefinition[] getPartitions()
{
    if (og == null)
    {
         System.out.println("DBCheckingPartitionBean["+this.hashCode()+"]Initialize the ObjectGrid");
        initObjectGrid();
    }

    // Create one partition called "singleton".
    return new PartitionDefinition[] {                     ivManager.createPartitionDefinition("singleton") };
}
Because this is the first method that is called on the DBCheckingPartition, the task of creating and initializing the ObjectGrid map is also done here by making a call to the initObjectGrid method. DBCheckingPartition first creates a singleton ObjectGridManager that it then uses to create the ObjectGrid itself. It also creates BackingMap that is contained in the ObjectGrid. It then creates a TranPropListener and adds it to the ObjectGrid instance for propagating transaction changes to ObjectGrid instances with the same name in all the other cluster members.
private synchronized void initObjectGrid()
{
    System.out.println(" ** initialize ObjectGrid " + OG_NAME);
    try
    {
        og = ObjectGridManagerFactory.getObjectGridManager().createObjectGrid(OG_NAME, true);
        og.defineMap(MAP_NAME);
        og.initialize();
    }
    catch (ObjectGridException ex)
    {
        System.err.println("Object Grid Creation failed. "+ex);
        return;
    }
    TranPropListener tpl = new TranPropListener();
    tpl.setPropagateMode(Constants.OBJECTGRID_TRAN_PROPAGATION_MODE_DEFAULT_KEY);
    og.addEventListener(tpl);
}
PartitionHandlerLocal#partitionLoadEvent
The HA Manager calls the partitionLoadEvent when a partition is activated on a cluster member. This gives the application the opportunity to perform any required initialization prior to receiving IIOP requests for the specified partition (the partition name is provided as a string parameter). The partitionLoadEvent method signature is:
boolean partitionLoadEvent(String partitionName)The method should return true if the cluster member is ready to accept work for the specified partition. Once the method returns, the IIOP routing tables are updated and incoming IIOP requests will be delivered to this cluster member for the specified partition. DBCheckingPartition just makes a call to the method startCheckingTimer in this method.
public boolean partitionLoadEvent(String partitionName)
{
    System.out.println("DBCheckingPartitionBean["+this.hashCode()+"]Partition " + partitionName + " loads.");

    startCheckingTimer();
    return true;
}
Method startCheckingTime looks up the JNDI reference for the TimerManager for setting up a timer. It then creates a new instance of the DBChecker class that implements the TimerListener and is the actual class that does the task of testing the database connection. The DBChecker instance is passed the name of the datasource, the ObjectGrid instance reference, the BackingMap instance reference and the test SQL query to run for testing the database connection. The TimerManager instance is then used to schedule a timer with the DBChecker instance as the listener for a time period of 10 seconds (10000 milliseconds).
private synchronized void startCheckingTimer()
{
    try
    {
        InitialContext ic = new InitialContext();
        System.out.println("  ** Look up TimerManager java:comp/env/tm/myTM.");
        tm = (TimerManager) ic.lookup("java:comp/env/tm/myTM");


        /* og can be null as partitionLoadEvent and getPartitions can be called by
         * two different
         * threads on two different instances of the bean
         */

        if(og==null)
        {
            System.out.println("DBCheckingPartitionBean["+this.hashCode()+"]::startCheckingTimer - ObjectGrid instance is null. Getting the instance from ObjectGrigManager.");
            og = ObjectGridManagerFactory.getObjectGridManager().getObjectGrid(OG_NAME);
        }
        DBChecker listener = new DBChecker("java:comp/env/jdbc/myDS", og, MAP_NAME);
        listener.setTestSQL("select 1 from testtable");

        tm.schedule(listener, 0, 10000);
    }catch (NamingException e) {
        throw new EJBException(e);
    }
}
PartitionHandlerLocal#partitionUnloadEvent
The HA Manager calls this method when a partition is deactivated. The event tells the application to stop processing requests for the specified partition. The WebSphere Partitioning Facility run time updates the IIOP routing table for this cluster member prior to invoking this callback. The method has the following signature:
void partitionUnloadEvent(String partitionName)If an application is using messaging to accept incoming requests (as opposed to direct IIOP routing) then it should unsubscribe to the topics/queues on which those requests arrive. The HA Manager will not activate a replacement cluster member until this method returns. In the DBCheckingPartition, the partitionUnloadEvent stops the timer by calling stop() on the TimerManager instance.
public void partitionUnloadEvent(String partitionName)
{
    System.out.println("Partition " + partitionName + " unloads.");
    tm.stop();
}
PartitionHandlerLocal#isPartitionAlive
This method is only called when the policy controlling the partition has the isAlive attribute set to true in the CoreGroup policy in effect for this partition set.
The default WPF partition policies disable this call back, as for many partitions, the overall cluster performance can be affected. For very tightly managed environments, they might want to manage this attribute in an active manner.
When the HA Manager policy isAlive attribute is true, this method is called every X seconds (also set in the policy) while a partition is activating/active or deactivating. The interval is in seconds and is specified using a different attribute on the controlling policy. The isPartitionAlive method is never called when the isAlive policy attribute is set to false. The method signature is:
boolean isPartitionAlive(String partitionName)If the method returns false then the JVM is `panicked' (the JVM is halted) and another cluster member is chosen to host the partition. The application can use this method to verify that the partition is operating correctly, perhaps by asking a peer cluster member to invoke a partition method to perform a ping type operation or sanity check from a remote JVM. If the result of this operation is not successful then the JVM knows that something is wrong.
The DBCheckingPartition always returns true in this method.
public boolean isPartitionAlive(String partitionName)
{
    return true;
}
DBChecker class
The DBChecker class implements the TimerListener interface and does the task of periodically checking the database connection and storing that state in the ObjectGrid map. The method that gets called periodically by the TimerManager and does the above task is the timerExpired method.
public void timerExpired(Timer arg0)
{
    System.out.println(" ** TimerExpired");
    if (ds == null) {
        lookupDS();
    }

    boolean isGood = true;
    try {
        testConnection();
    }
    catch (SQLException sqle) {
        // TODO log the exception
        System.out.println("DBChecker::timerExpired - got an exception while connecting to the database ");
        isGood = false;
    }

    storeInMap(new Boolean(isGood));
The lookupDS() method does a look up on the JNDI initial context to get a reference to the datasource. The testConnection() method checks the state of the database connection using the testSQL statement (which in this case is select 1 from testtable where testtable is the name of a table).
Example 10-8 Testing the database connection in DBChecker
private void testConnection() throws SQLException {
    Connection conn = null;
    Statement stmt = null;
    try {
        conn = ds.getConnection();
        stmt = conn.createStatement();
        stmt.execute(testSQL);
    }
    finally {
        if (stmt != null) {
            try {
                stmt.close();
            }
            catch (SQLException e) {
                // ignore
            }
        }
        if (conn != null) {
            try {
                conn.close();
            }
            catch (SQLException e) {
                // ignore
            }
        }
    }
}
The state of the database connection is then stored in the ObjectGrid map using the datasource name as the key and the state of the database connection as the value. The value object is a Boolean object where true indicates that database is up (the connection is good) and false indicates that the database is down. This is done in the method storeInMap()
private void storeInMap(Boolean state)
{
    Session session = null;
    try
    {
        if(null == objectGrid)
        {
            System.out.println("DBChecker::storeInMap - objectGrid is null");
            return;
        }
        else
            session = objectGrid.getSession();

        ObjectMap map = session.getMap(dbStateMapName);

        if(map.containsKey(jndiName))
            map.update(jndiName, state);
        else
            map.insert(jndiName, state);
    }
    catch (ObjectGridException e)
    {
        throw new RuntimeException(e.getMessage());
    }
}
DBAccess Bean
The DBAccess bean is a session bean and represents an application that makes use of the DBChecking utility while implementing its business function. This is given here for the purpose of illustration and demonstrates how users can change their applications to make use of the DBChecking utility. The business function that the DBAccess bean implements is to get the number of records in the database. Before accessing the database to get the number of records, it checks the database state from the ObjectGrid map by making a call to the method isDBUp(). If the call to the method isDBUp returns true then it goes ahead with fetching the number of records, otherwise it throws an exception which states that the database is down.
if (!isDBUp())
{
    throw new EJBException("The database is down.");
}
The isDBUp() method is shown below...
private boolean isDBUp()
{
    try
    {
        if (og == null)
        {
            og = ObjectGridManagerFactory.getObjectGridManager().getObjectGrid(
                DBCheckingPartitionBean.OG_NAME);
        }

        if(og==null)
        {
            System.out.println("ObjectGrid instance is null");
            return true;
        }

        Session sess = og.getSession();
        sess.begin();
        ObjectMap map = sess.getMap(DBCheckingPartitionBean.MAP_NAME);
        Boolean state = (Boolean) map.get(JNDI_NAME);
        sess.commit();

        if(state.equals(Boolean.FALSE))
            System.out.println("DBAccessBean::isDBDown - database state is false");
        else
            System.out.println("DBAccessBean::isDBDown - database state is true");

        if (state == null || state.equals(Boolean.FALSE))
        {
            return false;
        }
        else
        {
            return true;
        }
    }
    catch (ObjectGridException e)
    {
        throw new EJBException(e);
    }
}
Using the DBChecking application
The DBChecking.ear was installed onto the RedbookClusterWPFOG cluster with three cluster members, WPFOG1, WPFOG2, and WPFOG3.
Although DBChecker is installed on all cluster members, only the active partition for DBChecker is highlighted for clarity.
Starting the cluster
In the WebSphere Extended Deployment Administrative Console, select the RedbookClusterWPFOG cluster that contains the partitioned DB2Checker application, and start it:
- Select Servers | Clusters in the console navigation tree.
- Select RedbookClusterWPFOG in the Server Cluster pane.
- Click the Start button. It can take a while to start all cluster members.