Although the WebSphere Application Server HTTP plugin runs as a part of Web server's process, detached from WebSphere, it is an integral part of the application server and security.
Secure the Web server plugin for WebSphere
This section documents the configuration necessary to instantiate a secure connection between the Web server plug-in and the embedded HTTP server in the WebSphere Web container. By default, this connection is not secure, even when Global Security is enabled. The documentation will cover the configuration for IBM HTTP Server, but the Web server related configuration in this situation is not specific to any Web server.
Set the authentication mechanism as client-certificate
The following steps are mandatory for generating the certificates for SSL communication between the two peers.
- Create a self-signed certificate for the Web server HTTP plug-in.
- Create a self-signed certificate for the WebSphere Web Container.
- Exchange the public keys between the two peers.
- Modify the Web server plugin-cfg.xml file to use SSL/HTTPS
- Create a new SSL repertoire (or modify an existing one)
- Modify the WebSphere embedded HTTP Server (Web Container) to use SSL/HTTPS.
Create a self-signed certificate for the Web server HTTP plug-in
Create a CMS type key store, for example: WAS6PluginCertificates.kdb under the C:\IBM Http Server\conf\keys\ directory. Create a self-signed certificate.
For more details about creating and extracting a self-signed certificate, see the IBM Redpaper Security Basics for WebSphere, REDP3944.
Create a self-signed certificate for the WebSphere Web Container
Create a JKS type key store, for example: WAS6WebContainerCertificates.jks under the C:\WebSphere\Appserver\etc directory. Create a self-signed certificate.
Exchange the public keys between the two peers
Exchange the public certificates from the self-signed certificated between the two key stores: WAS6PluginCertificates.kdb, WAS6WebContainerCertificates.jks.
Create a new SSL entry
Within the WebSphere configuration, an SSL entry represents a set of SSL properties which can be used with different WebSphere resources. For this section, we created a new SSL entry.
- Start the WebSphere Administration Console, then after login, select Security | SSL.
- Click New JSSE Repertoire to create a SSL repertoire. Provide the following values to fill out the form:
- Alias: Web Container SSL
- Key File Name: C:\WebSphere\Appserver\etc\WAS6WebContainerCertificates.jks
- Key File Password: passw0rd
- Key File Format: JKS
- Trust File Name: c:\WebSphere\Appserver\etc\WAS6WebContainerCertificates.jks
- Trust File Password: passw0rd
- Trust File Format: JKS
- Client Authentication: not selected
- Security Level: HIGH
Leave other options as default and click OK when you have finished.
The client authentication option is to set whether the Web container also expects to get a client certificate either trusted by a well-known CA, or self-signed with the imported public key. If we enable this option for an SSL entry which will be used for HTTP plugin to Web container transport protection, then we also need a client certificate in the HTTP plugin key database and the Web container must be able to recognize that certificate.
Per above, we left this option as unchecked; if we need client authentication within this scope, refer to Configuring SSL certificate based client authentication method for IBM HTTP Server to see how to set a client certificate onto a CMS key database needed for the HTTP plugin and also refer to Configuring SSL certificate based client authentication method for WebSphere Application Server to see how to set the SSL entry and Web container configuration for client authentication.
Note: If you want mutual SSL between the two parties, select the Client Authentication check-box.
- Save the configuration for WebSphere.
Modify the Web Container configuration to support SSL
To complete the configuration between Web server HTTP plug-in and Web Container, the WebSphere Web Container must be modified to use the previously created self-signed certificates.
The following steps document the required Web Container modifications.
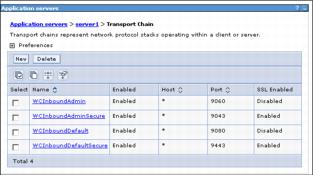
- Select Servers | Application Servers, then click the server you want to work with, in this case: server1.
- In the Configuration tab, go to Container Settings section and click Web container transport chain.
- A default secured transport chain called WCInboundDefaultSecure is already defined. Web Container listens on the TCP port 9443 for this chain. We will modify this chain to use it in this section. We could also create another transport chain and configure it as follows.
- Click WCInboundDefaultSecure (or on the new transport channel that you might have been created). Make sure that the Enabled check box is selected.
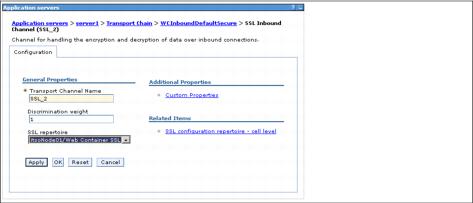
- Click SSL Inbound Channel (SSL 2) then go to the SSL repertoire section and select Web Container SSL from the list. Thus we specify a previously created SSL repertoire to be used with this transport channel.
- Click OK, then save the configuration for WebSphere.
- Regenerate and propagate the Web server plug-in.
Note: The application server must be restarted in order for the Web Container configuration changes to become effective.
Modify the Web server plug-in file
The plug-in config file must be modified to reference the plug-in keyring and the password stash file. This allows the transport protocol to be changed from HTTP to HTTPS, using the certificates stored in the keyring.
With WebSphere Application Server V6, more than one Web Server definition is possible and each has its own set of HTTP plug-in properties. Also by default, there is a separate installation directory of HTTP plug-in binaries and within this directory there are separate plug-in configuration directories for each Web Server/plug-in definition. For this section we will use the Web Server definition, named webserver1; in our case its configuration is under C:\Websphere\Plugins\config\webserver1.
If you are unsure which HTTP plugin configuration file is the right one, open the Web server's configuration file and check which file name is used when defining HTTP plugin module configuration.
Follow the steps below.
- Open the HTTP plugin configuration file, plugin-cfg.xml, for editing. A standard non-secure HTTP connection in the configuration looks like this:
<Transport Hostname="w2ksrvvm01.itso.ibm.com" Port="9080" Protocol="http"/>By default, there is also secured connection entry, which looks like this: <Transport Hostname="w2ksrvvm01.itso.ibm.com" Port="9443" Protocol="https"> <Property name="keyring" value="C:\WebSphere\Plugins\etc\WASplugin.kdb"/> <Property name="stashfile" value="C:\WebSphere\Plugins\etc\WASplugin.sth"/> </Transport>
Note that the w2ksrvvm01.itso.ibm.com is the hostname for the application server.
- Comment out or delete the non-secure HTTP part as follows:
<!-- <Transport Hostname=w2ksrvvm01.itso.ibm.com" Port="9080" Protocol="http"/> -->- Modify the default secure sections and specify your key database instead of the default:
<Transport Hostname="w2ksrvvm01.itso.ibm.com" Port="9443" Protocol="https"> <Property name="keyring" value="C:\WebSphere\Plugins\etc\WAS6PluginCertificates.kdb"/> <Property name="stashfile" value="C:\WebSphere\Plugins\etc\WAS6PluginCertificates.sth"/> </Transport>- Set the log level to Trace.
<Log LogLevel="Trace" Name="C:\WebSphere\Plugins/logs/webserver1/http_plugin.log"/>- Save the plugin-cfg.xml file and restart the Web server.
Testing the secure connection
For this section, we assume that your Web server is not SSL-enabled, and that the connection between the browser and Web server is plain HTTP. However, the behavior should not be different if you use an SSL-enabled Web server. After setting the HTTP plugin and restarting the Web server, take the following steps:
- Open a new browser window. Make sure that the Web server, WebSphere and the default application are running.
- Enter the following URL to access the Snoop servlet: http://webserver01.redbook.net/snoop, where webserver01.redbook.net is the hostname for the Web server.
- Since security is enabled in WebSphere, you will get a Basic authentication pop-up window. Enter a valid user name and password and you will get the Snoop servlet output.
Because we commented out the HTTP transport in the plugin configuration, leaving only the HTTPS option available, we left no choice to the plugin, so it must use HTTPS transport to connect to WebSphere.
We called Snoop via the Web server using plain HTTP; the Web server passed the request to the HTTP plugin and the plugin contacted WebSphere through HTTPS.
Open the plugin trace file, http_plugin.log, and you will find something similar to what is shown below. The SSL connection has been used to connect to WebSphere. Furthermore, it shows that WebSphere issued the basic authentication challenge before serving the Snoop servlet response.
ws_common: websphereFindTransport: Finding the transport
ws_common: websphereFindTransport: Setting the transport(case 4): w2ksrvvm01.itso.ibm.com on port 9443
ws_common: websphereExecute: Executing the transaction with the app server
ws_common: websphereGetStream: Getting the stream to the app server
ws_transport: transportStreamDequeue: Checking for existing stream from the queue
ws_common: websphereGetStream: socket 7792 connected to w2ksrvvm01.itso.ibm.com:9443
lib_stream: openStream: Opening the stream
lib_stream: openStream: Stream is SSL
ws_common: websphereGetStream: Created a new stream; queue was empty, socket = 7792
lib_htrequest: htrequestWrite: Writing the request:
   GET /snoop HTTP/1.1
   Accept: image/gif, image/x-xbitmap, image/jpeg, image/pjpeg, */*
   Accept-Language: en-us
   Accept-Encoding: gzip, deflate
   User-Agent: Mozilla/4.0 (compatible; MSIE 6.0; Windows NT 5.0; .NET CLR 1.1.4322)
   Host: webserver01.redbook.net
   Connection: Keep-Alive
   $WSIS: false
   $WSSC: http
   $WSPR: HTTP/1.1
   $WSRA: 127.0.0.1
   $WSRH: 127.0.0.1
   $WSSN: localhost
   $WSSP: 80
   Surrogate-Capability: WS-ESI="ESI/1.0+"
lib_htrequest: htrequestWrite: Writing the request content
ws_common: websphereExecute: Wrote the request; reading the response
lib_htresponse: htresponseRead: Reading the response: c2976c
   HTTP/1.1 401 Unauthorized
   WWW-Authenticate: Basic realm="Default Realm"
Content-Language: en-US
Content-Length: 0
lib_htresponse: htresponseSetContentLength: Setting the content length |0|