Use the Postcard applications to verify a local installation
To verify that the local installation is working, we can use the Postcard applications. These applications allow you to create two postcards on the same machine and send messages between them, verifying that WebSphere MQ messaging is working correctly on the machine.
Use the MQI Postcard as shown below to verify that WebSphere MQ is successfully installed and the associated communication links are working properly. To use the Java Messaging feature of WebSphere MQ carry out the following instructions again, using the JMS Postcard.
TCP/IP must be already installed on the machine, and a queue manager that can be used as a mailbox must be already set up. This queue manager can be either the default queue manager, which is set up automatically during default configuration, or another queue manager that you have set up yourself.
- Go to the WebSphere MQ Getting
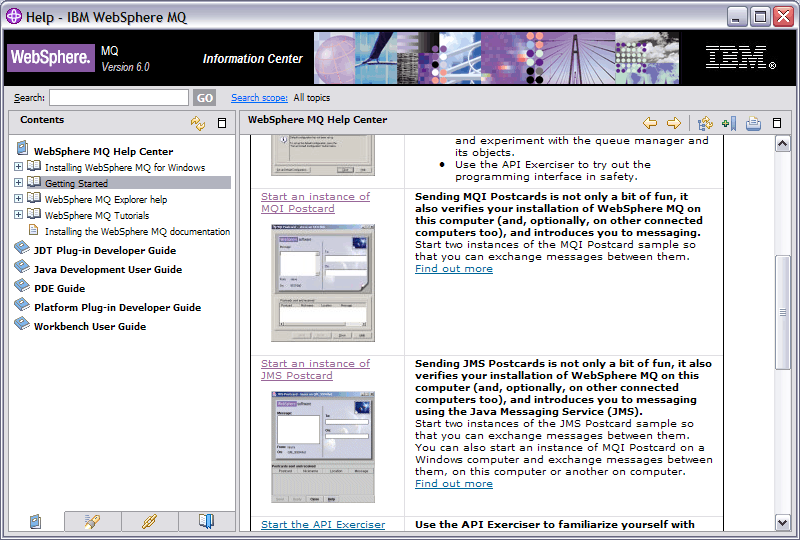
Started help page, shown in Figure 1.
- If at the end of the installation, if you clicked...
Launch WebSphere MQ Getting Started
...help from the...
Completing the Prepare WebSphere MQ Wizard
...window, this window is already open.
- Alternatively, select...
Start | Programs | IBM WebSphere MQ | Getting Started
- If at the end of the installation, if you clicked...
- Launch your choice of Postcard application:
- To launch the MQI Postcard, click Start an instance of MQI Postcard.
- To launch the JMS Postcard, click Start an instance of JMS Postcard.
Figure 1. Getting Started window with the Postcard options

- The WebSphere MQ Postcard
- Sign On window is displayed.
Type in a nickname to use to send messages within the postcard application (for example, user1).
- If the only queue manager on your machine is the default queue manager that you created by running the Default Configuration wizard, this queue manager is used as your mailbox for postcards. Click OK to display your first postcard, then go to step 5.
- If you do not have a default queue manager, or if you want to use a queue manager you have created yourself, then go to step 4.
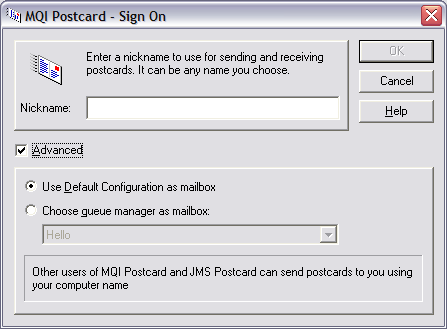
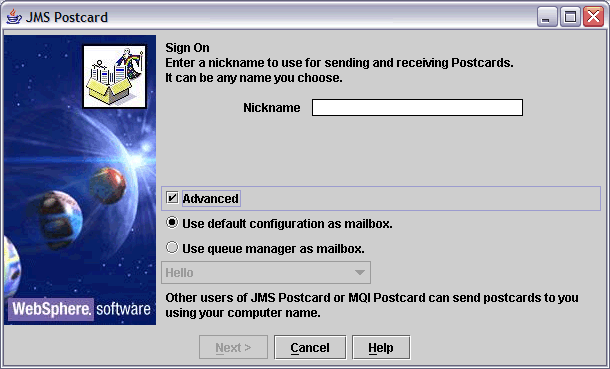
- Optional: To select the queue manager
to use as the mailbox, click the Advanced checkbox.
See Figure 2 for the MQI postcard
and Figure 3 for the JMS postcard.
Then do one of the following:
- If you have created one or more of your own queue managers, but you have not run the Default Configuration wizard, select the appropriate queue manager from the list displayed.
- If you have run the Default Configuration wizard and you want to use the default queue manager, but there is more than one queue manager on your machine, select Use Default Configuration as mailbox.
- If you have run the Default Configuration wizard and also created one or more of your own queue managers, and you do not want to use the default queue manager, select Choose queue manager as mailbox, then select the appropriate queue manager from the list displayed.
When your selection is complete, click OK if you are using an MQI postcard, or Next if you are using a JMS postcard to display your first postcard.
Figure 2. MQI Postcard - Sign On window with the Advanced options

Figure 3. JMS Postcard - Sign On window with the Advanced options

- From the Getting started help page, launch the same
Postcard application as you did earlier in step 2, either:
- Start an instance of MQI Postcard
- Start an instance of JMS Postcard
- The WebSphere MQ Postcard - Sign On panel
is displayed again.
Type in a second nickname to use to send messages within the Postcard application (for example, user2).
- Repeat the selection of the queue manager that you want to use
as the mailbox (as described earlier in step 4).
The queue manager you select for this second postcard must be in the same cluster as the queue manager for the first postcard.
You now have two postcards, one with the nickname user1 and one with the nickname user2.
- In one of the postcards (for example, user1),
type some message text in the Message: field and the
nickname of the other postcard (for example, user2) in the
To: field.
Because the sender and receiver are on the same machine, you do not need to type anything in the On: field. If the receiver is on a different machine and is using the default queue manager as the mailbox, type the recipient's machine in the On: field. An example machine name is machine2.server.company.com.
If the receiver is on a different machine and is not using the default queue manager as the mailbox, type the recipient's queue manager in the On: field.
- Click Send.
- The Postcards sent and received area of the postcard shows details of the message. In the sending postcard, the message is displayed as sent. In the receiving postcard, the message is displayed as received.
- From the receiving postcard, double-click on the message in the Postcards sent and received area to view it.
If you complete this procedure successfully, it verifies that WebSphere MQ is correctly installed.
Depending on your situation, you might want to do the following:
- Install WebSphere MQ on other machines. Follow the same installation procedure that you used for the first machine. Ensure that you use the Join Default Cluster window to add the other machines to your first machine's cluster.
- Install the WebSphere MQ client on other machines. See Installing the WebSphere MQ Client or, if you are using the client CD see WebSphere MQ Clients .
- Continue with further administration tasks. See the WebSphere MQ System Administration Guide.
Parent topic:
Using the Postcard applications