Database session management
Follow these steps to enable persistent sessions:
- Create a database that can be used for session management.
The session manager performs best when it has exclusive use of the database and its connections. It is possible to use an existing database, but it is best to create a new one. For example...
db2 create db sessdb
- If you are using multiple nodes and a multi-member, clustered environment, then this database needs to be catalogued at each physical machine.
- Catalog the DB2 node that contains the session database. If the node is not already cataloged, open a command window and type:
db2 catalog tcpip node node_name remote remote_hostname server service_name
Where:
node_name Arbitrary name for identification, for example sessnode. remote_hostname Host name that DB2 can use to connect to the DB2 server containing the session database, for example sesshost. service_name Port number that DB2 is listening to on the remote DB2 server. The default is 50000. - Next, catalog the database at that node using the command:
db2 catalog db sessdb as sessdb at node node_name
Where, node_name is the node name specified in the previous step.
- Verify that it is possible to connect to this newly cataloged database...
db2 connect to sessdbs user userid using password
- Catalog the DB2 node that contains the session database. If the node is not already cataloged, open a command window and type:
- Set up a JDBC provider using the WebSphere administration tools.
- Within the JDBC provider that you have just created, configure a new data source.
To enable persistent sessions, repeat the following steps for each appserver in the cluster:
Click thru...
Servers | Application Servers | AppServer Name | Web Container | Session Management | Distributed Environment Settings | Database radio button | Apply | Database link
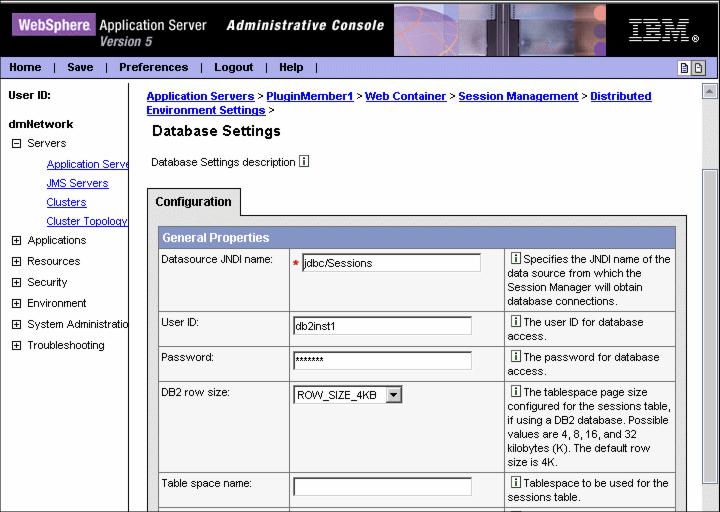
- Enter values where necessary for the configuration properties:
Enter your datasource JNDI name. The data source must be a non-JTA enabled data source.
If required, enter a user ID and password and confirm the password.
If you are using DB2 and you anticipate requiring row sizes greater than 4 KB, select the appropriate value from the DB2 row size pull-down.
If you intend to use a multi-row schema, check the appropriate box.
- Click Apply.
- Repeat these configuration steps for all cluster members.
Upon the first creation of a session, see that a table called Session is created for you. The cluster members will now make use of this session database.
In our example we have two cluster members in PluginCluster:
- PluginMember1
- PluginMember2
If we make an initial session-based request to PluginMember1 and shut it down afterwards, the plug-in will then try to route requests through to PluginMember2. In general, if the plug-in is unable to contact the initial server it will try another cluster member. The next cluster member that responds will check its local cache and, upon not finding the session, will connect to the session database and retrieve the session from there.
When the servlet returns the result to the plug-in, the cluster member that served the page is appended to the list of clone IDs in the session identifier.
 JSESSIONID=0002YBY-wJPydXZvCZkc-LkoBBH:v544d031:v544d0o0

The plug-in now tries both of these servers before resorting to the workload management algorithm again. Once the original server is available again, all session requests will return to it.
This behavior means that the plug-in performs faster and the user will go to a server that has a local cached version of the session.
If you wish to test whether the failover and persistent sessions are working, follow the steps in 5.7, Web server plug-in behavior and failover.
WebSphere is a trademark of the IBM Corporation in the United States, other countries, or both.
IBM is a trademark of the IBM Corporation in the United States, other countries, or both.