Lesson 4: Connect nodes in the Web diagram
Use this lesson to learn how to use connection handles to connect the nodes in your Web diagram.
Now that you have placed nodes in your Web diagram, the next step is to connect them. You will use connection handles for this purpose. There are two types of connection handles:
- Top-level handles can be used to draw a connection from a node.

- Nested handles can be used to draw a connection from an item that
is in a node compartment.

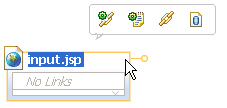
- In the diagram, hold the mouse pointer over the input.jsp
node. The node is highlighted, a connection handle is displayed, and
a hover action menu is displayed.

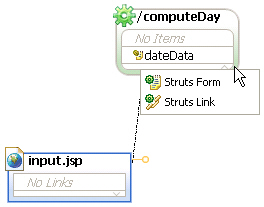
- Click and drag the handle from the input JSP node to the /computeDay action.
A pop-up menu is displayed.

- Select
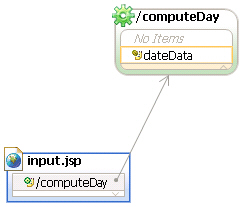
Struts Form to submit an input to the action when processing a form. A Struts form is added to the input JSP node with a line connecting the node to the /computeDay action.

Tip: Alternatively, you can use the hover menu to add a Struts link to the input JSP node and then drag the link connection handle to the /computeDay action.
- Connect the /computeDay action to the
output.jsp node using a local forward:
- Hold the mouse pointer over the /computeDay node to display the hover menu.
- Click the
Add Local Forward icon. A local forward named success is added to the node. By default, the first local forward that you create in each node is named success.
- Drag the connection handle from the success link
to the output JSP node. A line is drawn from the link to the node
to show the connection.
Tip: Each item in the Links compartment of a node also has a connection handle. When you click a node to grab its handle, be sure that you drag the node handle and not a link handle.
- Connect the /computeDay node to the input
JSP node using a local forward:
- Hold the mouse pointer over the /computeDay node
and drag its connection handle to the input JSP node.
- On the hover menu, select
Local forward. A local forward named failure is added to the node, and a line connects the local forward to the input JSP node. By default, the second local forward that you create in each node is named failure.
- Hold the mouse pointer over the /computeDay node
and drag its connection handle to the input JSP node.
- Save your Web diagram.
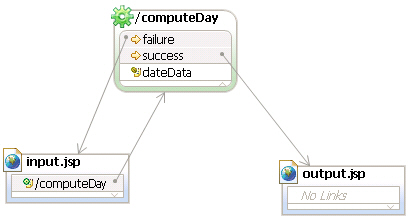
The Web diagram editor should show a Struts link and two local forwards.

Lesson checkpoint
Well done! You have connected nodes in a Web diagram.
You learned to do these tasks:
- Choose a top-level handle or a nested handle to draw a connection.
- Add Struts links from the input JSP node to the action node.
- Add a local forward from the action node to the output JSP node.