Configure ODM v8.5 Decision Server
- Overview
- Create dmgr profile
- Augment dmgr profile with rules
- Create profiles on node01 and node02
- Federate both managed node profiles with dmgr
- Augment dmgr profile with events
- Augment custom profiles with events
- Configure decision server cluster
- Add second node and member to decision server cluster
- Tune JVMs
- Create groups and map users
- Configure event runtime
- Backup profiles
- LDAP Integration
- IBM Http Server Configuration
- Edit http configuration
- Change WCT repository location
- Customize response file to configure plugin
- Web Server Configuration
- Tuning of Decision Server and Events
- Number of event rule processing threads
- Tuning history processing
- Event datasource connection pool
- Event queue/topic connection factory connection pool
- Recording History and impact on performance
Example setup
Decision Server cluster
- dmgrhost
- node1
- node2
- node3
- node4
- Decision Server WAS dmgr console
Default credentials...
User: odmAdmin
Pass: odmAdmin - Rule Execution Server console
Default credentials...
User: resAdmin
Pass: resAdmin - Decision Server console
Create dmgr profile
cd $WAS_HOME/bin/
./manageprofiles.sh -create \
                    -templatePath $WAS_HOME/profileTemplates/management \
                    -serverType DEPLOYMENT_MANAGER \
                    -profileName odmDmgr \
                    -profilePath $WAS_HOME/profiles/dmgr \
                    -enableAdminSecurity true \
                    -adminUserName odmAdmin \
                    -adminPassword password \
                    -cellName odmCell \
                    -startingPort 49000
Start dmgr server...
-
cd $WAS_HOME/profiles/dmgr/bin
./startManager.sh
...then log on to console...
-
dmgrhost.myorg.org:12501/ibm/console/
Augment dmgr profile with rules
cd $WAS_HOME/profiles/dmgr/bin
./stopManager.sh -username odmAdmin -password password
cd $$WAS_HOME/bin/
./manageprofiles.sh -augment \
                    -profileName odmDmgr \
                    -templatePath $WAS_HOME/profileTemplates/rules/management/ds
cd $WAS_HOME/profiles/dmgr/bin
./startManager.sh -username odmAdmin -password password
Create profiles on node01 and node02
cd $WAS_HOME/bin/
./manageprofiles.sh -create \
                    -templatePath $WAS_HOME/profiles/profileTemplates/managed \
                    -profileName node01 \
                    -profilePath $WAS_HOME/profiles/node01 \
                    -nodeName node01 \
                    -cellName node01Cell \
                    -federateLater true \
                    -dmgrHost mydmgr.myorg.org \
                    -dmgrPort 49003

./manageprofiles.sh -create \
                    -templatePath WAS_HOME/profiles/profileTemplates/managed \
                    -profileName node02 \
                    -profilePath WAS_HOME/profiles/node02 \
                    -nodeName node02 \
                    -cellName node02Cell \
                    -federateLater true \
                    -dmgrHost mydmgr.myorg.org \
                    -dmgrPort 49003
Federate both managed node profiles with deployment manager
cd WAS_HOME/profiles/node01/bin/
./addNode mydmgr.myorg.org 49003 \
          -conntype SOAP \
          -username odmAdmin \
          -password password
Augment dmgr profile with events
cd WAS_HOME/profiles/dmgr/bin
./stopManager.sh -username odmAdmin -password password
./manageprofiles.sh -augment \
                    -templatePath $WAS_HOME/profileTemplates/wbe/management \
                    -profileName odmDmgr \
                    -wbeHome /opt/IBM/WebSphere/AppServer/ODM/ \
                    -adminUserName odmAdmin
                    -adminPassword password \
                    -wbeDbType Oracle \
                    -wbeDbName bpodev \
                    -wbeDbUserId WBEL1 \
                    -wbeDbPassword password \
                    -wbeDbJDBCClasspath $WAS_HOME/ODMjdbcdrivers/Oracle/ojdbc6.jar \
                    -wbeDbHostName 10.230.13.21 \
                    -wbeDbServerPort 1521 \
                    -wbeMsgingType Default_Messaging \
                    -disableBusSecurity
Augment node profiles with events
On each node...
cd WAS_HOME/profiles/node01/bin/
./manageprofiles.sh -augment \
                    -templatePath ODM_INSTALL/shared/profiles/profileTemplates/wbe/managed \
                    -profileName node01
Configure decision server cluster
- Log on to Dmgr as user who owns ODM file system.
- Set ODM_HOME path environment variable...
export ODM_HOME=/opt/IBM/WebSphere/AppServer/ODM
- Set decision server cluster properties...
-
ODM_HOME/profiles/dmgr/bin/rules/configureDSCluster.properties
- If you have a non-default directory structure the configuration scripts can fail to copy rulesTemplateResource.jar files, and other runtime ears and resource adapters, from ODM directory to WAS.
To prevent this scenario, you can apply Interim Fix (iFix) 21 or the 8.5.1.1 Fix Pack.
Another work around is to manually copy...
-
ODM_HOME/shared/profiles/profileTemplates/rules/lib/rulesTemplateResource.jar
...to both...
-
WAS_HOME/profileTemplates/rules/lib
WAS_HOME/lib/If dmgr and node servers use different directories, to ensure installation of required runtime ears and resource adapters, recreate dmgr directory structure on each node, and copy resources to node server. For example, on each node...
-
mkdir ALT_ODM_HOME/executionserver/applicationservers/WebSphere85
mkdir ALT_ODM_HOME/shared/profiles/profileTemplates/rules/lib
cp -r ODM_HOME/executionserver/applicationservers/WebSphere85 ALT_ODM_HOME/executionserver/applicationservers/WebSphere85
cp -r ODM_HOME/shared/profiles/profileTemplates/rules/lib ALT_ODM_HOME/shared/profiles/profileTemplates/rules/lib - Optional. Set custom member name.
Edit...
-
ODM_HOME/bin/rules/configureDSRulesNetworkDeployer.py
and change...
-
deployClusterTools.createCluster(cellName, clusterName, clusterNodeName, clusterNodeName = "-DSServer")
...to...
-
deployClusterTools.createCluster(cellName, clusterName, clusterNodeName, clusterNodeName = "odmDSClone01")
- Set MaxPermGen heap size in...
-
ODM_HOME/bin/rules/configureDSRulesND.ant
- On deployment manager server, create decision server cluster
cd $WAS_HOME/profiles/dmgr/bin/
./configureDSCluster.sh -dmgrAdminUsername odmAdmin \
                        -dmgrAdminPassword password \
                        -clusterPropertiesFile $WAS_HOME/profiles/dmgr/bin/rules/configureDSCluster.properties \
                        -targetNodeName node01 \
                        -dmgrHostName mydmgr.myorg.org \
                        -dmgrPort 49003
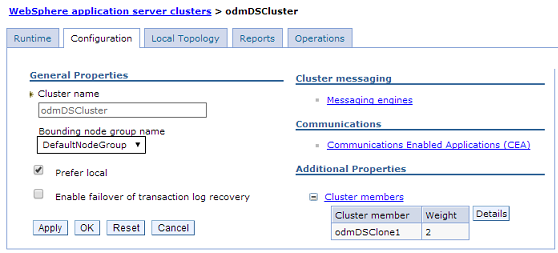
On successful execution of command, decision server cluster named odmDSCluster is created.

To verify, log in to admin console and go to...
-
Servers | Clusters | Websphere application server

To verify, if DS server profile is created on node01, Click on...
-
cluster name | Cluster members
Add second node and member to decision server cluster
- Optional: Change default server name in script...
-
DMGR_PROFILE/bin/addNodeToDSCluster.py
For example, from...
-
<node_name>-DSServer
...to...
-
deployClusterTools.createMemberOnNewNode(clusterName, clusterNodeName, "odmDSClone4");
- Set MaxPermGen heap size in...
-
DMGR_PROFILE/bin/rules/addNodeToDSCluster.ant
- Run script addNodeToDSCluster.sh...
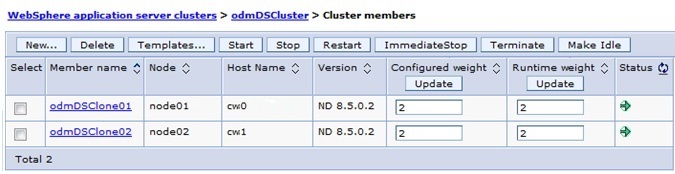
cd $WAS_HOME/profiles/dmgr/bin/bin/ ./addNodeToDSCluster.sh -dmgrAdminUsername odmAdmin \ -dmgrAdminPassword password \ -clusterPropertiesFile $WAS_HOME/profiles/dmgr/bin/rules/configureDSCluster.properties \ -targetNodeName node02 \ -dmgrHostName mydmgr.myorg.org \ -dmgrPort 49003 - After successful execution, a second cluster member is created with all resources configured. To verify, from the admin console go to...
-
Servers | Clusters | Websphere application cluster | odmDSCluster | Members | Details
Tune JVMs
Log in to admin console, go to...
-
Servers | Websphere application servers | server name | Server Infrastructure | Process definition | Java and Process Management | Java Virtual Machine
...and set...
| Initial Heap Size | 4096 MB |
| Maximum Heap Size | 4096 MB |
| Generic JVM Argument | -XX:MaxPermSize=1024m |

Set the same parameters for dmgr server...
-
System Administration | Deployment manager | Process definition | Java Virtual Machine
Create required groups and map users
Note that Decision Server augmentation should create users. We create groups and do mapping manually.
- Log in to the Integrated Solutions Console and go to...
-
Security | Global security

- If Federated repositories is already selected under Current realm definition, make sure that...
-
Enable application security
...is selected.
- If Federated repositories is not already selected, click...
-
Security Configuration Wizard
...and complete the wizard as follows...
- In Step 1 of wizard, to specify the level of protection, select...
-
Enable application security
...and click Next.
- In Step 2 of wizard, select...
-
Federated repositories
...and click Next.
- In Step 3 of wizard, type a name in the primary administrative user name field and password in the password field, and click Next.
- In Step 4 of wizard, review the security configuration summary and click Finish.
- Click Save to save the changes to the master configuration.
- Restart the server.
- In Step 1 of wizard, to specify the level of protection, select...
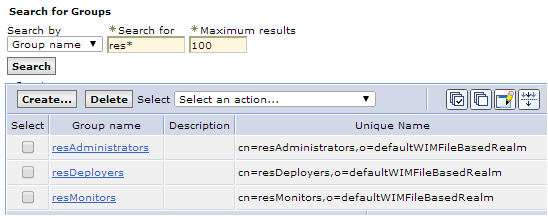
- Create Groups
- In the side panel, select...
-
Users and Groups | Manage Groups | Create
- Enter "resAdministrators" as the group name, then click Create.
- Click Create Like and create another group named "resDeployers", then click Create.
- Click Create Like again and enter another group named "resMonitors, then click Create. Click Close.
- In the side panel, select...
- Create users
- In the panel open...
-
Users and Groups | Manage Users | Create
- Enter "resAdmin" as the User ID and again "resAdmin" as the password. Also specify the given name and last name.
- Click Group Membership and proceed as follows:
- Click Search.
- Select the resAdministrators, resDeployers and resMonitors groups and click Add.
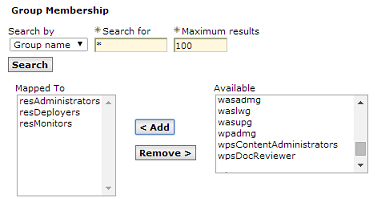
- Click Close, then click Create and Close again.
- Click Search.
- Create users with deployer and monitor roles as follows:
- Create another user named resDeployer with password resDeployer.
- Assign the user to the resDeployers and resMonitors groups.
- Create a user named resMonitor with password resMonitor.
- Assign the user to the resMonitors group.

- Create another user named resDeployer with password resDeployer.
- Restart the application server or the deployment manager.
- In the panel open...
Configure event runtime on new Decision Server cluster
- Enable security for the service integration bus
- Logon to admin console and go to...
-
Service Integration | Buses | WbeBus

- Click on Security under Additional Properties

- Click on button "Launch Bus Security Wizard", then click Next
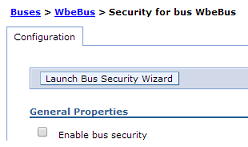
- Unselect the check box for "Require client use SSL protected transport" and click on button "Next"
- For security domain, keep default value of...
-
Inherit the cell level security domain
...and click on button "Next"

- Click on Finish

- Save changes and verify if security is enabled on bus as below.

- Logon to admin console and go to...
- Create data source for messaging engine
- Go to...
-
Global security > JAAS - J2C authentication data > New
...and create authentication alias for messaging engine datasource...
Alias MEOracleDBAuthAlias User ID myOracleId Password
- Go to...
-
Resources | JDBC | JDBC providers
...and create new JDBC provider for messaging engine data store at "odmDSCluster" scope with following values...
Database type Oracle Provider type Oracle JDBC Driver Implementation type XA data source Name Messaging Engine Oracle JDBC Driver (XA) Class path ${ORACLE_JDBC_DRIVER}/ojdbc6.jar Directory location for "ojdbc6.jar" which is saved as WebSphere variable ${ORACLE_JDBC_DRIVER_PATH} WAS_HOME/ODMjdbcdrivers/Oracle - Create datasource for messaging engine data store at "odmDSCluster" scope with following values
Datasource Name Messaging Engine Datasource JNDI Name jdbc/me/repository Auth Alias MEOracleDBAuthAlias URL jdbc:oracle:thin:@wtrstg:1522:odm_stg2 jdbc:oracle:thin:@(DESCRIPTION=(ENABLE=BROKEN)(LOAD_BALANCE=ON)(ADDRESS=(PROTOCOL=TCP)(HOST=wtrstg)(PORT=1522))(CONNECT_DATA=(SERVICE_NAME=odm_stg2)))
In Custom Properties, set...
user DWDSTG2 password
driverType thin databaseName bpm_stg2 serverName wtrstg portNumber 1522 Synchronize nodes and test connection.
- Go to...
- Record the hostname:port:BootstrapSecureMessaging, where each hostname:port pair corresponds to the host name and SIB_ENDPOINT_SECURE_ADDRESS of the application servers in event runtime cluster.
For each cluster member, click...
-
Servers | WebSphere application server clusters | Cluster Name | Cluster members | Ports
...and record the port number associated with the SIB_ENDPOINT_SECURE_ADDRESS...
Cluster member SIB_ENDPOINT_SECURE_ADDRESS odmDSClone1 12532 odmDSClone2 12532 odmDSClone3 12533 odmDSClone4 12533 odmDSClone5 12552 odmDSClone6 12552 - For every application server in the cluster, create a JVM custom property that points to the ODM installation directory...
Go to...
-
Servers | Server Types | WebSphere application servers | server-name | Java and Process Management | Process Definition | Java Virtual Machine | Custom properties | New
...and set...
Name wbe.home Value WAS_HOME/ODM Click Apply and Save.
- For every application server in the cluster, enable the Startup Bean service...
Go to...
-
Servers | Server Types | WebSphere application servers | server-name | Container Services | Startup beans service
...and select...
-
Enable service at server startup
- Add the event runtime cluster as a member to the service integration bus
- Click...
-
Service integration | Buses | WbeBus | Bus members | Add | Cluster | odmDSCluster | Next
- Select a messaging engine policy setting from the options High availability
- To ensure the recovery of JMS messages after a failover, you must configure a message store. Set the type of message store by selecting Data store. Click Next
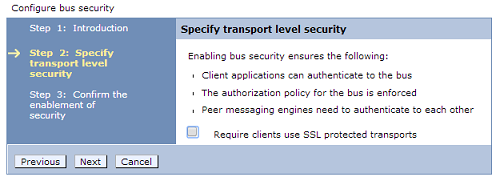
- On the Configure messaging engines panel, click the messaging engine name.
- Set the datasource JNDI name, schema name and authentication alias for data store as below
- Click Next.
- Click Change heap sizes. Accept the default values
- Review the Summary information. Click Finish and Save.
- Click...
- Create three service integration bus destinations for the event runtime messaging destinations:
- Click...
-
Service integration | Buses | WbeBus | Destinations
- Click New.
- Click Queue, and click Next. In the Identifier field, type eventQueue, then click Next.
- Repeat this step to create two further queues, with identifiers of historyModuleQueue and durableEventQueue.
- Click Finish and Save.
- Select
-
Resource | JMS | Queues | New | Default Messaging Provider
...and set...
Name JNDI Name Bus Name Queue Name durableEventDestination jms/durableEventDestination WbeBus durableEventQueue durableEventDestination jms/durableEventDestination WbeBus durableEventQueue eventDestination jms/eventDestination WbeBus eventQueue historyModuleDestination jms/historyModuleDestination WbeBus historyModuleQueue - It will create the following three JMS Queue JNDI definitions. These definitions are used by activation specifications.

- Click...
- Create J2C Authentication Alias named "ODMAdminAuthAlias" with admin credentials to be used by JMS activation specifications to connect to messaging engine.

- Go to...
-
Resource | JMS | Activation Specification
...and for the following activation specifications set...
Activation Specification Destination Type Destination JNDI Name wbe_events Queue jms/eventDestination wbe_events_durable Queue jms/durableEventDestination wbe_history Queue jms/historyModuleDestination - Modify the provider endpoints for the connection factories to point to the servers in the event runtime cluster. Go to...
-
Resources | JMS | Connection factories (scope cell) | WbeConnectionFactory
In the Provider endpoints field, set...
-
hostname:port:BootstrapSecureMessaging,hostname:port:BootstrapSecureMessaging
...where each hostname:port pair corresponds to the host name and SIB_ENDPOINT_SECURE_ADDRESS of the application servers in your event runtime cluster. For example...
-
node1:12532,node2:12532,node182:12533,node4:12533,node1:12552
Click Apply and Save.
- Modify the provider endpoints for the JMS queue connection factory to point to the servers in your event runtime cluster:
-
Resources | JMS | Queue connection factories (scope Cell=cell) | WbeQueueConnectionFactory
In the Provider endpoints field, type...
-
hostname:port:BootstrapSecureMessaging,hostname:port:BootstrapSecureMessaging
..where each hostname:port pair corresponds to the host name and SIB_ENDPOINT_SECURE_ADDRESS of the application servers in your event runtime cluster. For example...
-
node1:12532,node2:12532,node182:12533,node4:12533,node1:12552
Click Apply and Save.
- Modify the provider endpoints for the JMS topic connection factory to point to the servers in your event runtime cluster:
-
Resources | JMS | Topic connection factories (scope Cell) | WbeTopicConnectionFactory
In the Provider endpoints field, set...
-
hostname:port:BootstrapSecureMessaging,hostname:port:BootstrapSecureMessaging
...where each hostname:port pair corresponds to the host name and SIB_ENDPOINT_SECURE_ADDRESS of the application servers in your event runtime cluster. For example...
-
node1:12532,node2:12532,node182:12533,node4:12533,node1:12552
Click Apply and Save.
- Install the event runtime application:
- Go to...
-
Applications | New Application | New Enterprise Application | Remote file system | dmgr
- Browse to..
-
WAS_HOME/ODM/runtime
...and select wberuntimeear.ear
- Click Next.
- In the window...
-
Preparing for the application installation
...select: Fast Path.
- In the window...
-
Select installation options
...accept the default options.
- In the window...
-
Map modules to servers
...in the Clusters and Servers field, select...
-
WebSphere:cell=cell-name,cluster=odmDSCluster
...then select check boxes for both modules...

- Click Apply and next.
- Accept defaults for remainder of panels, then select Finish.
- Go to...
- Deploy EventWidgetsEar on cluster.
- Change default credentials for messaging engine properties to admin user
-
Resources | Resource Environment | Resource environment entries | WbeSrv01 | Custom Properties
Set the default user and passwords for the following...
as.director.server.authentication.username odmAdmin as.director.server.authentication.password odmAdmin as.director.businessspace.authentication.username odmAdmin as.director.businessspace.authentication.password odmAdmin as.director.server.jms.username odmAdmin as.director.server.jms.password odmAdmin If any of the fields properties are preceded by a comment (!), for example...
-
!as.director.server.jms.username
...remove the comment.
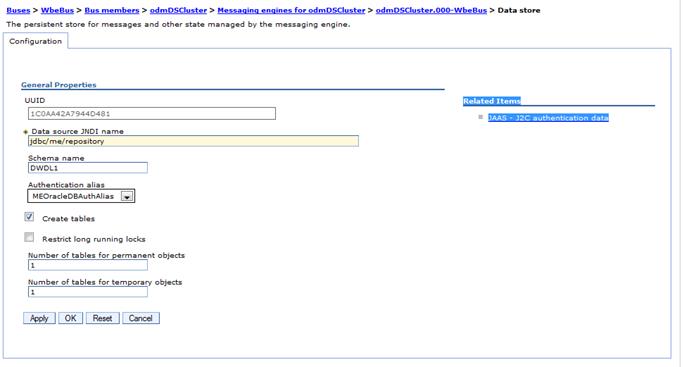
- Customize the XU connection factory from the WebSphere Application Server administrative console.
- Go to...
-
Resources | Resource Adapters | Resource adapters
- Go to...
-
Resource_adapter | Additional Properties | J2C connection factories

- Go to...
-
XU connection factory | Additional Properties | Custom properties
...and set value for property plugins to...
-
{pluginClass=com.ibm.rules.res.xu.management.XUManagementPlugin,xuName=default,protocol=jmx},{pluginClass=com.ibm.rules.dvs.plugin.IlrExecutionTracePlugin},{pluginClass=com.ibm.rules.htds.plugin.WSDLGeneratorPlugin},{pluginClass=com.ibm.rules.res.event.plugin.EventPlugin,EventDestinationType=Queue,EventDestinationConnectionFactoryName=jms/WbeQueueConnectionFactory,EventDestinationName=jms/eventDestination}
- Repeat steps for resource adapters on all nodes.
- Go to...
- Update security setting for JMS activation specifications. For each specification, go to...
-
Resources | JMS | Activation specifications | activation_specification | Security settings
...and set Authentication alias to "ODMAdminAuthAlias".
- Go to...
-
All Applications | wberuntimeear | Security role to user/group mapping
...and map roles to user odmAdmin...

- Go to...
-
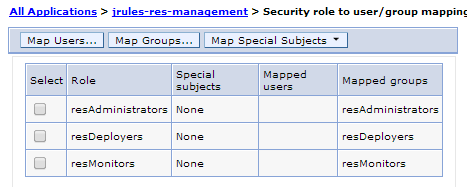
All Applications | jrules-res-management | Security role to user/group mapping
...and map roles...
- Go to...
-
All Applications | jrules-ssp | Security role to user/group mapping
...and map roles...

- Create catalog service domain.
- Go to...
-
System administration | WebSphere eXtreme Scale | Catalog service domains | New
...and set...
Name DefaultCatalogServiceDomain Catalog Server Endpoint Select deployment manager from the drop down list Client Port 4809 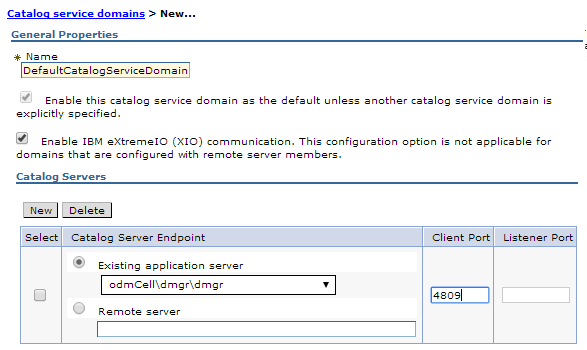
- Save the changes. DefaultCatalogServiceDomain is created...

- Select...
-
DefaultCatalogServiceDomain | catalog server list | deployment manager server | Test Connection
Connection successful for catalog service massage will be displayed.

- Go to...
- Create event runtime tables
Use Oracle SQL Developer to create Decision Server Events tables...
-
ODM_Install_Dir/config/dbdirectory/ora.sql
Successful execution will create tables...

Restart deployment manager, node agents and all servers in the cluster.
Backup profiles
Backup installation and profile directory.
cd /opt/ODM/
tar -cvf stage_node01_010614.tar stage
LDAP Integration
- Go to...
-
Security | Global Security | Federated Repository | Configure | Add repositories button
- Fill in following details as shown in below snapshot. For New Repository value, select "LDAP repository" from available options. Click on Apply
Repository Name LDAP1_ODM Repository Type LDAP Repository Unique Distinguished name of the base o=myorg,st=mn,c=us - On next page, fill in below details as shown in below snapshot. Keep rest as default and click on Ok. Save the changes.
Primary Host Name ldap004.myorg.org Port 389 Bind distinguished name uid=was1bind,cn=ieewasadmins,o=myorg,st=mn,c=us Bind Password password for bind id - Verify integration.
- Click on...
-
Users and Groups | Manage Users | Search
It will list users from Repository
- Click on Manage Groups -> Search. It will list groups from Repository
- Click on...
IBM Http Server Configuration
Following steps needs to be executed to configure IHS
- Configure Plugin on both node servers
- Create web server definition on deployment manager
Edit http configuration
On each node server edit...
-
/opt/ihs85/stage/conf/httpd.conf
...and set...
-
Listen 8181
ServerName hostname:8181
Change WCT repository location
If WCT repository is in shared file system, change to non-shared location.
- On each node server, create directory location...
-
cd /opt/toolbox85/stage/WCT/
mkdir WCT85data - Edit...
-
/opt/toolbox85/stage/WCT/configuration/config.ini
...and set...
osgi.instance.area.default=/opt/toolbox85/stage/WCT/WCT85data/workspaces/WCT85
osgi.configuration.area=/opt/toolbox85/stage/WCT/WCT85data/configurations/WCT85 - Save the changes in conf.ini file.
Customize response file to configure plugin
To customize the response file for plugin configuration on each node server
- Make a copy of the old response file...
cd /opt/toolbox85/stage/WCT
cp pct_responsefile.txt stage_node01_responsefile.txt - Edit stage_node01_responsefile.txt and set...
-
configType="local_distributes"
wasExistingLocation="/opt/IBM/WebSphere/AppServer"
webServerSelected="ihs"
#ihsAdminPort=""
#ihsAdminUserID=""
#ihsAdminUserGroup=""
webServerConfigFile="/opt/ihs85/stage/conf/httpd.conf"
webServerConfigFile2=""
webServerPortNumber="8181"
dominoUserID="notes"
webServerDefinition="ihs-node01"
wasMachineHostName=""
mapWebserverToApplications="true"
webServerHostName="<nodeservername>.myorg.org"
webServerInstallArch="64"
profileName="node01"
ihsAdminCreateUserAndGroup="false"
#ihsAdminUnixUserID
#ihsAdminUnixUserGroup
#ihsAdminPassword
enableAdminServerSupport="false"
enableUserAndPass="false"
webServerType="IHS" - Create new definition using customized response file...
cd /opt/toolbox85/ODM/WCT/
./wctcmd.sh -tool pct \
            -createDefinition \
            -defLocName ihs-node01Location \
            -defLocPathname /opt/plugins85/stage \
            -response stage_node01_responsefile.txt
Web Server Configuration
- Copy
-
/opt/plugin85/stage/bin/configureihs-node01.sh
...to...
DMGR_HOME:$WAS_HOME/profiles/dmgr/bin
- Log on to dmgr host and run...
-
cd $WAS_HOME/profiles/dmgr/bin
./configurewebserver1.sh -profileName odmDmgr -userwasadmin -password password - From WAS admin console, navigate to...
-
Environment | Virtual hosts | default_host | Host Aliases
...and set...
-
* 8081
node0 8181Add entries for nodehost.mydomain.com for port 49019, used by /teamserver and /decisioncenter.
Remove definitions for port 9080
Save changes
- Navigate to Environment->Update global Web server plug-in configuration and click OK
- Navigate to Servers->Server Types->Web servers, select both servers, and click Generate Plug-in
- Select the two servers, and click Propogate Plug-in
- Restart the web servers.
- Navigate to Servers->Clusters->WebSphere application clusters and Restart the cluster.
Tuning of Decision Server and Events
Consider the following settings to give better decision server event runtime. Note, these are minimum and initial recommendations only and may vary based on application design and runtime load. Refer IBM redbook titled "ODM 8.5 Performance Tuning"
Number of event rule processing threads
Most event rule processing in the event run time occurs on rule processor threads. The number of these threads is controlled by the following event property:
as.director.server.ruleProcessorInstances
The following sequence shows where this is configured in the WebSphere Application Server administrative console:
Resources -> Resource environment -> Resource environment entries -> WbeSrv01 -> Custom properties
The default value is 31. If messages build up on the event destination as the rate of event production increases, then increasing the number of rule processing instances might improve the rate of event processing (by adding greater concurrency).
Tuning history processing
If history is enabled and messages are building up on the history topic or queue, you should consider increasing the maximum concurrency on the history activation specification. This will increase the concurrency of Message Driven beans (MDBs) that are writing the history data to the database. A value of 30 is suitable to start with as per IBM recommendation. This setting can be altered in the WAS administrative console using the following menu selections:
Resources -> JMS Activation specifications -> wbe_history
Event datasource connection pool
Each rule processor thread could use a database connection from the Event runtime datasource connection pool. The maximum connections setting for this connection pool should be set using the following formula as the minimum:
history MDB concurrency + value of as.director.server.ruleProcessorInstances + 10
Based on initial recommended values, it is 30 + 31 + 10 = 71. This is set in the WAS administrative console using the following menu selections:
Resources -> JDBC -> Data sources -> Event Runtime Datasource -> Connection pools
Event queue/topic connection factory connection pool
Each rule processor thread could use a JMS connection from the WbeTopicConnectionFactory connection pool. The maximum connections setting for this connection pool should be greater than or equal to the following value: value of
as.director.server.ruleProcessorInstances + 10
Considering the initial recommended values, it should be minimum 31+10 = 41. Default value for this property is 50. This is set in the WebSphere Application Server administrative console using the following menu selections:
Resources -> JMS -> Queue/Topic connection factories -> WbeTopicConnectionFactory/ WbeQueueConnectionFactory -> Connection pools
Recording History and impact on performance
History is required if you need to run reports or monitor events, actions, filters, or data in real time. When history is enabled, a significant amount of information about events, actions, and filters is written to the Decision Server Events repository. The history data can be viewed using the reports section of the Decision Server Events administration interface and the Business Space dashboards. You can produce reports that show what events enter Decision Server Events, the actions that are triggered by those events, and the event rules and filters that are evaluated in response to those events. In order to generate these reports, you need to enable history. History is disabled by default unless Business Events Tester is installed. For performance reasons, the installation of Business Event Tester it is not a preferred practice on a production system. History is tracked in history database tables that record events, actions, filters, and other assets that are processed by the Decision Server Events run time. For instructions on enabling and disabling history, see the following web page in the Operational Decision Management V8.0 Information Center:
Related