Configure Operational Decision Manager (ODM) on WebSphere Application Server (WAS)
- Overview
- Extend Eclipse with the Rule Designer update sites
- Change the JVM used by Rule Designer
- Cluster ODM servers
- Gold topology
- ODM cell
- Decision Server gold topology cell
- ODM profile templates
- Configure Rule Execution Server on Decision Center
- Configure the Decision Center consoles using profile templates
- Configure the event runtime using profile templates
- Configure Rule Execution Server (Decision Center) on WAS
- Configure Rule Execution Server
- Before you start
- Step 1: Apply the persistence type
- Step 2: Restrict database user permissions
- Step 3: Establishing the database credentials
- Step 4: Set up a data source and connection pool
- Step 5: Activate security
- Step 6: Deploy the Rule Execution Server Management EAR
- Step 7: Create a Rule Execution Server database schema
- Step 8: Deploy the Rule Execution Server MBean descriptors
- Step 9: Deploy the XU RAR
- Step 10: Deploy the hosted transparent decision service EAR
- Step 11: Set the DecodeUrlAsUTF8 custom property
- Configure Rule Execution Server
- Optional configuration steps
- Integrating WebSphere MQ in WAS to support asynchronous execution
- WebSphere MQ integration overview
- Create the WebSphere MQ queue connection factory
- Create the WebSphere MQ input queue
- Create the WebSphere MQ output queue
- Create a topic connection factory
- Create the WebSphere MQ input topic
- Create the WebSphere MQ output topic
- Create the WebSphere MQ queue activation specification
- Create the WebSphere MQ topic activation specification
- Installing the message-driven rule bean
- Enabling server-wide Last Participant Support
- Configure Rule Execution Server in different environments
- Integrating WebSphere MQ in WAS to support asynchronous execution
- Troubleshooting Rule Execution Server
- Activate the XU log in WAS
- Configure the XU memory profiler
- Rule Execution Server database driver issues
- Provide more memory for applications
- Verify the deployment and configuration
- Configure Decision Server Events
- Plan your Decision Server Events environment
- Configure a stand-alone Decision Server Events environment
- Customize the event runtime environment
- Configure the event runtime database for Decision Server Events
- Edit the setenv file
- Change the event runtime messaging provider
- Set properties
- Configure the event runtime to record history
- Configure the durable event queue
- Configure how time-delayed event rules and actions are handled after a shutdown
- Configure the event runtime to store step data in memory
- Configure the event runtime to store step data in ObjectGrid
- Tuning your event runtime configuration
- Configure multiple Decision Server Events profiles to coexist
- Configure technology connectors on a separate computer
- Configure the User Console connector to use a WAS data source
- Verify your Decision Server Events configuration
- Secure Decision Server Events
- Secure access to dashboards
- Secure the service integration bus
- Configure the Decision Center consoles
- Configure the Decision Center consoles
- Create a JDBC provider
- Create a data source and a connection pool
- Create J2C authentication data
- Change the custom properties of your data source
- Connecting to the database
- Step 3: Configure security
- Step 4: Deploy the Decision Center EAR file
- Step 5: Verify the deployment of the Decision Center Enterprise console
- Step 6: Complete the configuration of the Decision Center consoles
- Complete the configuration from the Decision Center Enterprise console
- Complete the configuration using Ant tasks
- Additional steps to configure the Decision Center Business console
- Additional steps to configure Decision Validation Services
- Before you start
- Step 1: Create Decision Warehouse database resources
- Step 2: Deploy the Decision Validation Services archive
- Step 3: Checking the availability of Decision Validation Services
- Step 4: Packaging Decision Validation Services using Ant
- Step 5: Redeploying the Decision Validation Services archive
- Troubleshooting
- Provide more memory for applications
- Configure Rule Execution Server in shared mode
- Configure Rule Execution Server in scoped mode
Overview
To use Rule Execution Server or Decision Center on any instance of WAS other than the Samples Server, deploy the archives provided with the ODM v8.0 install media.
| Application server | Rule Execution Server | Decision Center Enterprise console | Decision Center Business console | Event runtime | Event widgets |
|---|---|---|---|---|---|
| WAS V8.5 | X | X | |||
| WAS V.8.0 | X | X | X | X | X |
| WAS V7.0 | X | X |
Extend Eclipse with the Rule Designer update sites
We can use update sites to install Rule Designer on an existing Eclipse environment after installing ODM. The ZIP files for the update sites are available if you have selected the corresponding option in Installation Manager. The installation process is to add the Rule Designer plug-ins from an installation of ODM into your Eclipse.
To extend Eclipse with the Rule Designer update sites...
- Define the variable for the Decision Server installation directory.
The installation directory contains the components for Decision Server such as executionserver and studio.
Edit...
-
ECLIPSE_HOME/configuration/config.ini
...and add the property...
-
IBM_DS_HOME
For example...
-
IBM_DS_HOME=C:/Program Files/IBM/ODM801
C:/Program Files/IBM/ODM801/ODMWe can copy this property from...
-
DECISON_SERVER_HOME/configuration/config.ini
- Start Eclipse
- Switch to the Java perspective...
-
Window | Open Perspective | Java | Help | Install New Software
- Add the sites to install:
- In the Install wizard, next to the "Work with" field, click Add.
- In the Add Repository dialog, click...
-
Archive | ODM_INSTALL/studio/update-sites | Open | designer-base-update-site.zip
- In the Name field, enter a name for the site, and then click OK.
This might take a few seconds.
- Proceed the same way to add the rule-designer-update-site.zip update site.
- In the Work with field, select...
-
All Available Sites
- Expand the Business rules and events category, and select...
- IBM Decision Server Designer Base
- IBM Decision Server Rule Designer
- Click Next.
Eclipse calculates the dependencies and requirements.
- In the Install dialog, click Next, select...
-
I accept the terms of the license agreement
...and click Finish.
The installation may take a few seconds to complete. If a security warning about the validity of the software opens, click OK to proceed with the installation.
- Click Restart Now if you are prompted to restart Eclipse.
We can also install the following update sites the same way. These update sites are optional:
- IBM Decision Server Rule Designer Samples:
- rule-designer-samples-update-site.zip
- IBM Decision Server Scorecard Modeler:
- scorecard-update-site.zip
- IBM Decision Server COBOL management update sites:
- cobol-importer-license-update-site.zip
- cobol-importer-update-site.linux.zip (for installation on Linux)
- cobol-importer-update-site.win32.zip (for installation on Windows)
- cobol-update-site.zip
We can check what you have installed by clicking...
-
Help | Install New Software | What is already installed?
If we install Rule Designer in an Eclipse environment that uses a non-English locale:
- The Eclipse messages remain in that language.
- If Rule Designer provides the verbalizer for the language, we can create rule artifacts in this language. If there is no verbalizer for this language, the rule artifacts that you create are in English.
- Rule Designer messages appear in the non-English locale if it is supported, otherwise they appear in English.
- To change the locale, so that everything is in English, edit...
-
ECLIPSE_HOME/configuration/config.ini
...add the property...
-
osgi.nl=en_US
...and then restart Rule Designer.
Change the JVM used by Rule Designer
We can change the JVM used by Rule Designer.
On Windows, by default the ODM installer installs the IBM JVM with Rule Designer. However, we can select a different JVM during or after installation. On UNIX, select a JVM during installation.
We can change the JVM used by Rule Designer on an existing installation of ODM. The Rule Designer shortcut runs Eclipse using the JVM specified in...
-
ECLIPSE_HOME/eclipse.ini
We can use the -vm and -vmargs in the command line of the eclipse.exe file.
To run on Sun Hotspot Virtual Machines, Rule Designer needs a PermGen size of at least 128 MB. Use the parameter: --launcher.XXMaxPermSize
Cluster ODM servers
To achieve a highly available and scalable system, we can group a set of WAS instances in a cluster. Clusters provide workload balancing and failover support for applications that run on WAS, enhancing throughput and availability.
ODM provides scripts we can run to create and configure Decision Server clusters or Decision Center clusters.
WAS clustering and the gold topology
A gold topology provides a model to follow based on the experience of knowledgeable ODM users.
There are two gold topologies for WAS cells.
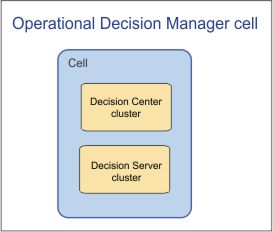
| ODM cell | Enable all applications that ODM provides.
Includes a Decision Center cluster and a Decision Server cluster. |
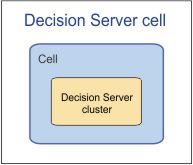
| Decision Server cell | Intended for the rules and event runtime environments.
Contains subset of ODM components that support rules and event runtime execution environments and testing. |
We can use these two types of cells to create a shared environment or a staged environment.
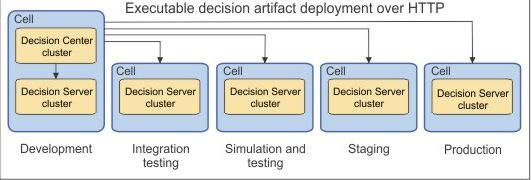
Shared environment
A single authoring server that feeds multiple runtime servers, which are specialized and isolated by lifecycle phases. You deploy the executable artifacts to run business rules and events over HTTP and HTTPS.
A shared environment has the following advantages:
- Provides functional isolation between business authoring and execution.
- Offers a single source for authoring and deployment.
- Supports branching and merging for deploying executable rules on servers.
- Enables high availability for all ODM capabilities.
- Separates execution and simulation workloads.
A shared environment has the following disadvantages:
- Lacks the ability to customize Decision Center for a single phase (development, test, or production).
- Introduces a single point of failure for authoring because of the shared Decision Center repository. Use a database replication to avoid.
- Requires management of access to actions and servers.
The following diagram shows how we can use a single Decision Center to propagate decision artifacts to multiple Decision Server instances.
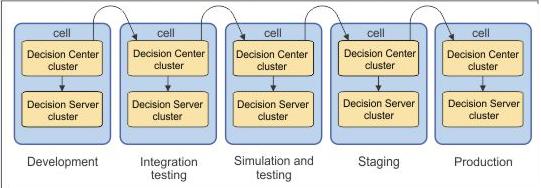
Staged environment
Each cell can be managed independently and includes a Decision Center and a Decision Server cluster. A staged environment has the following advantages:
- Provides full isolation between development lifecycle stages.
- Isolates authoring and execution by stage and cell.
- Offers the ability to customize Decision Center in each cell, including security.
- Supports high availability for clustered Decision Center and Decision Server instances.
A staged environment has the following disadvantages:
- Requires the provisioning and management of multiple JVMs and Decision Center databases.
- Requires the synchronization of Decision Center repository content across cells from the development cell to the production cell.
You must propagate rule and event projects from one stage to another using Export and Import commands. We can automate the propagation process using the Java APIs and Ant tasks provided.
The following diagram shows how the ODM cell is used in each stage in the development lifecycle.
We can configure the ODM cell and the Decision Server cell using the provided profile template scripts, or manually by following the documented steps.
ODM cell
The ODM gold topology cell includes the full functionality of Decision Center and Decision Server.
The ODM cell can be used to stage your authoring, testing, and production environments. If some Decision Server components are not relevant to your particular requirements, we can remove them to reduce resource usage. Each node contains a Decision Server instance and a Decision Center instance.
The Decision Server and Decsion Center instances form separate clusters. Members of the same cluster are configured identically for workload balancing and failover.
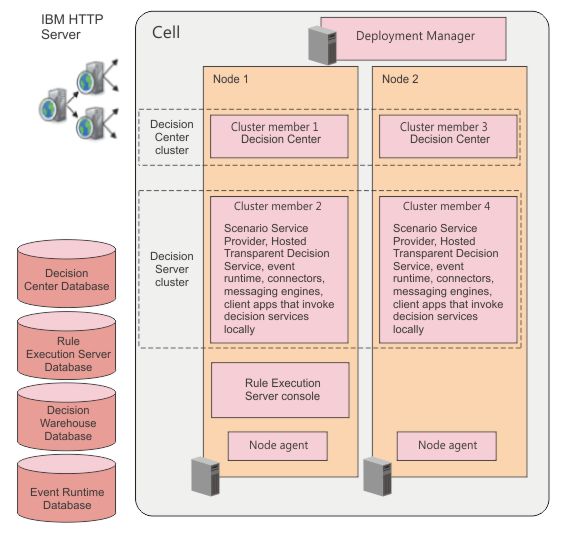
| Decision Center cluster | - Components for business authoring and simulation management.
- EAR file for the web consoles - EAR file for the event widgets |
| Decision Server cluster |
- Execute business rule test suites and simulations
- Java EE artifacts:
|
Rule and event runtimes are co-located in the same JVMs. To enable a decision service that is triggered by an event detection, place the two engines in the same JVM for a local invocation.
Node 1 in the previous diagram includes a Rule Execution Server console that is shared by the Decision Server instances. The Rule Execution Server console is deployed as an EAR file on a separate server outside the Decision Server cluster.
Decision Server gold topology cell
The Decision Server gold topology cell includes...
- Decision Server Rules
- Decision Server Events runtimes
The Decision Server cell can be used to host, testing, and production environments. If some Decision Server components are not relevant to your particular requirements, we can remove them to minimize resource usage.
Each node contains a Decision Server instance. The Decision Server instances in each cell form a cluster. Members of the cluster are configured identically for failover support and workload balancing.
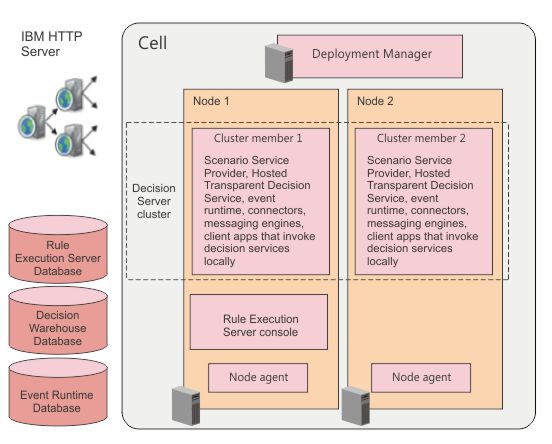
The Decision Server cluster...
- Includes all of the components to execute business rules and event logic.
- Covers the execution of business rule test suites and simulations.
- Includes the following Java EE artifacts:
- Rules Execution Unit RAR file deployed at the node level
- EAR file for the Scenario Service Provider. Executes business rule test suites and simulations
- EAR file that contains the hosted transparent decision service. Publishes and runs decision web services
- Event runtime to execute and test event rules. Includes runtime and test EAR files.
- Event connectors
- Message engines required for event processing and are used by rule MDBs
Rule and event runtimes are co-located in the same JVMs. To enable a decision service that is triggered by an event detection, place the two engines in the same JVM for a local invocation.
Node 1 includes a Rule Execution Server console that is shared by the Decision Server instances.
The Rule Execution Server Console is deployed as an EAR file in a separate server outside the Decision Server cluster.
ODM profile templates
When you install ODM, the installer creates profile template directories.
If we specify the WAS_HOME in Installation Manager, the profile templates are also copied to the profileTemplates directory.
If we do not install the product Samples and Tutorials, copy the folders from ODM_HOME to WAS_HOME.
| Location | When | Files | |||||||||||||||||||||||||||
|---|---|---|---|---|---|---|---|---|---|---|---|---|---|---|---|---|---|---|---|---|---|---|---|---|---|---|---|---|---|
| ODM_HOME/executionserver/applicationservers/WebSphere8 | At product installation |
| ODM_HOME/teamserver/applicationservers/WebSphere8
| At product installation
| The Decision Center EAR file.
| ODM_HOME/shared/profiles/profileTemplates/rules
| At product installation
|
| WAS_HOME/profileTemplates/rules
| At product installation if WAS_HOME is selected in the installer
|
| WAS_HOME/profileTemplates/rules/default/ds
| At product installation
| The scripts to augment a node or a WAS profile with Decision Server.
| WAS_HOME/profileTemplates/rules/default/dc
| At product installation
| The scripts to augment a node or a WAS profile with Decision Center.
| ODM_HOME/runtime
| At product installation
| The event runtime EAR files:
|
|
Configure Rule Execution Server on a new profile
To create a new stand-alone instance of Rule Execution Server environment, first create a Decision Server profile. We can create a profile using pmt.sh or using manageprofiles.sh.
During profile creation, you are asked to select the database manager that hosts the tables for the execution server run time. Unless you are using Apache Derby, create this database before you configure a new profile.
Depending on your OS, we can use pmt.sh or manageprofiles.sh to create a new profile:
- On a 32-bit OS, we can use pmt.sh. pmt.sh is not supported on an HP-UX OS, nor is it on z/OS.
- On a 32-bit OS or any other OS, we can use manageprofiles.sh.
To configure Rule Execution Server on a new profile...
-
cd was_install_dir/bin
manageprofiles.sh
Parameters...
| -create | To create the new profile. |
| -templatePath <template_path> | <template_path> is the location of the profile template. Provide the path to...
|
Optional parameters:
| -dsHome installation location | Fully-qualified path of the Decision Server installation directory. Specify if you have installed Decision Server in a non-default location. |
| -profileName profile_name | name of the profile. |
| -cellName cell_name | name of the cell. |
| -nodeName node_name | name of the node. |
| -hostName host_name | host name of the computer hosting the profile. |
| -serverName server_name | server name. |
| -enableAdminSecurity true|false | true turns on WAS administrative security. If provided, also provide -adminUserName and -adminPassword. Default is false. |
| -adminUserName username | User ID to access WAS. Only required if enableAdminSecurity is enabled. |
| -adminPassword password | Password for the user ID to access WAS. Only required if enableAdminSecurity is enabled. |
| -dbType database_type | Database product. Valid values are:
|
| -dbName database_name | Database. Required unless -dbType is Derby_Embedded. |
| -dbUserId database_user_name | User ID to access the database server. Required unless -dbType is Derby_Embedded. |
| -dbPassword password | Password for the user ID to access the database server. Required unless -dbType is Derby_Embedded. |
| -dbJDBCClasspath database_jdbc_classpath | JDBC class path files. Required unless -dbType is Derby_Embedded. |
| -dbJDBCLicenseClasspath database_jdbc_license_classpath | Path to the JDBC class path files. Only required if -dbType is DB2_Universal. |
| -dbHostName host_name | Host name for the database server. Required unless -dbType is Derby_Embedded. |
| -dbServerPort port_number | Port of the TCP/IP service, or the port on which the database is listening. Required unless -dbType is Derby_Embedded. |
Examples
Create a new application server profile using embedded Apache Derby and WAS default messaging
manageprofiles.sh -create
                   -templatePath "C:\IBM\ODM801\ODM\WAS\profileTemplates\rules\default\ds"
                   -dsHome  "C:\Program Files\IBM\ODM801\ODM"
Augment an existing profile with Rule Execution Server
To create an instance of Rule Execution Server on an existing WAS, augment the profile using manageprofiles.sh.
Before augmenting an existing WAS application server profile, stop all appservers.
During profile creation; you are asked to select the database manager, which hosts the tables for the event runtime. If we are not using Apache Derby, create the database before you create a profile.
We can use manageprofiles.sh or pmt.sh to augment an existing profile:
- The manageprofiles command is supported on all OSs.
- pmt.sh is only supported on 32-bit OSs. pmt.sh is not supported on an HP-UX OS, nor is it on z/OS.
The procedure describes how to use manageprofiles.sh to augment Rule Execution Server on an existing profile.
Procedure
- cd WAS_HOME/bin
- Run manageprofiles.sh and provide the following parameters:
-augment To augment the existing profile. -unaugment To undo the augmentation of the profile. -templatePath <template_path> Location of the profile template. Provide the following value for the application server profile: WAS_HOME/profileTemplates/rules/default/ds. -profileName profile_name Name of the existing application server profile that you are augmenting. Optional parameters:
-dsHome installation location Specify if Decision Server is installed in a location other than the default. -profileName profile_name Name of the profile. -cellName cell_name Name of the cell. -nodeName node_name Name of the node. -hostName host_name Host name of the computer that hosts the profile. -serverName server_name wServer name. -enableAdminSecurity true|false true turns on WAS administrative security. If provided, also provide -adminUserName and -adminPassword. Default is false. -adminUserName username User ID to access WAS. Only required if enableAdminSecurity is enabled. -adminPassword password Password for the user ID to access WAS. Only required if enableAdminSecurity is enabled. -dbType database_type Database product. Valid values are: - Derby_Embedded: the default value
- DB2_Universal
- Derby_NetworkServer
- Oracle
- MS_SQL_Server
-dbName database_name Database. Required unless -dbType is Derby_Embedded. -dbUserId database_user_name User ID to access the database server. Required unless -dbType is Derby_Embedded. -dbPassword password Password for the user ID to access the database server. Required unless -dbType is Derby_Embedded. -dbJDBCClasspath database_jdbc_classpath Path to the JDBC class path files. Required unless -dbType is Derby_Embedded. -dbJDBCLicenseClasspath database_jdbc_license_classpath Path to the JDBC class path files. Only required if -dbType is DB2_Universal. -dbHostName host_name Host name for the database server. Required unless -dbType is Derby_Embedded. -dbServerPort port_number Port of the TCP/IP service, or the port on which the database is listening. Required unless -dbType is Derby_Embedded.
Examples
Augment an existing application server profile called AppSrv01 using embedded Apache Derby.
manageprofiles.sh -augment
                  -templatePath "/opt/ibm/ODM801/ODM/WAS/profileTemplates/rules/default/ds"
                  -dsHome /opt/ibm/ODM801/ODM
                  -profileName AppSrv01
Unaugment an existing Decision Server application server profile called ODMSrv01 on Windows.
manageprofiles.bat -unaugment
                   -templatePath "C:\IBM\ODM801\ODM\WAS\profileTemplates\rules\default\ds"
                   -profileName ODMSrv01
Augment a dmgr profile with Rule Execution Server
- Install Decision Server, which includes WAS and its profile templates.
- Unless one already exists, create a dmgr profile.
This step creates directory...
-
profiles/Dmgr01/bin
- Add a node.
The node receives the base configuration, that is, the first cluster member and a server for the Rule Execution Server console. The node must be started and visible by the dmgr. We can...
- Create a default node on another computer
- Use an existing node
- Use the -createNode option to create the target node on the computer where the configuration is run
Augment the dmgr profile
-
WAS_HOME/bin/manageprofiles.sh -augment -profileName Dmgr01 -templatePath WAS_HOME/profileTemplates/rules/management/ds
The manageprofiles.sh command...
- Creates the users resAdmin, resMonitor, and resDeployers.
- Copies configureDSCluster.sh to...
-
profiles/Dmgr01/bin
Run configureDSCluster.sh to create a cluster
After augmenting the default management profile, we can run the script that configures Rule Execution Server as a WAS cluster. Before starting, set the WODM_HOME environment variable. After augmenting the management profile, set the cluster configuration properties, and run the configuration script. You cannot use the configuration script to initialize the cluster nor to add a node to an existing cluster.
- To set the cluster name and database values, edit...
-
dmgr/bin/rules/configureDSCluster.properties
...and set...
wodm.dsrules.clusterName Name of an existing cluster. If no cluster exists already, a cluster is created. wodm.dsrules.rulesMgrServerName Name of the server that hosts the Rule Execution Server console. wodm.dsrules.db.type DB2, Oracle, or MSQL wodm.dsrules.db.jdbcDriverPath Path to the JDBC drivers. Separate the driver names with a colon (;). For example: D:/WODM80/drivers/db2jcc.jar;D:/WODM80/drivers/db2jcc_license_cu.jar;
wodm.dsrules.db.name Name of the database. wodm.dsrules.db.hostname Name of the host where the database is hosted wodm.dsrules.db.port Port number to establish the connection to the database wodm.dsrules.db.user User name to connect to the database. wodm.dsrules.db.password Password for the user to connect to the database. - Start the configureDSCluster script with the required parameters.
cd WAS_InstallDir/profiles/Dmgr01/bin/
./configureDSCluster.sh -dmgrAdminUsername websphere
                           -dmgrAdminPassword websphere
                           -clusterPropertiesFile WAS_InstallDir/profiles/Dmgr01/bin/rules/configureDSCluster.properties
                           -createNode
                           -targetNodeName DecisionServerNode01
                           -dmgrHostName localhost
                           -dmgrPort 8879
If you make a mistake, such as a missing parameter or a wrong node name, you can execute the script again.
Parameter name Required Description -dmgrAdminUsername Mandatory The WAS administrator.s user identifier -dmgrAdminPassword Mandatory The WAS administrator.s password. -clusterPropertiesFile Mandatory Path to properties file. -uninstall Optional Remove all the applications and resources from the cluster. The cluster itself is not removed because it might contain other applications. -createNode Optional Create a default node profile with the name set in the -targetNodeName parameter. -targetNodeName Optional Default is RulesNode01. -dmgrHostName Optional Name of the host on which the dmgr is located. Mandatory if you create the target node by setting the -targetNodeName parameter. -dmgrPort Optional The SOAP TCP port of the dmgr. By default, 8879.
Results
The script performs the following actions:
- Installs the JDBC provider, JCA connector, and data source at node level.
- Installs the non-clusterized Rule Execution Server console.
- Deploys the hosted transparent decision services and Scenario Service Provider (SSP) to the cluster member. Users are mapped to application groups when an application is deployed.
- Starts the dmgr server if it is not already started.
- Configures security.
- Creates the resAdmin, resDeployer, resMonitor users. These users belong to the WAS monitor so that JMX notifications work on all cluster nodes.
- Configure users and groups.
- Installs the Execution Unit (XU).
- Maps users and groups to roles.
- Starts the cluster, servers, and applications.
When the script completes, the cluster is up and running. The user should then configure the load balancing system, such as IBM HTTP Server.
Unaugment Decision Server from existing profiles
We can unaugment Decision Server from existing profiles without deleting the cluster. Use manageprofiles.sh to unaugment Decision Server from existing profiles in a cluster.
Procedure
Launch the manageprofiles file with the following -unaugment options:
cd WAS_HOME/bin/
./manageprofiles.sh -unaugment
                    -profileName Dmgr01
                    -templatePath WAS_HOME/profileTemplates/rules/management/ds
                    -nodeName DecisionNode
                    -cellName DecisionCell
                    -targetNodeName DecisionServerNode01
where
- WAS_HOME is the directory where you installed WAS.
- Dmgr01 is the name of the profile deployment manager that you created as a prerequisite to configuring the cluster.
- ds is the abbreviation of Decision Server.
- -nodeName and -cellName are the names of the node and cell that you defined when you created the dmgr profile.
- -targetNodeName is the name of the node to which you installed Decision Server.
Results
When the process completes, a message similar to the following one is displayed:
-
INSTCONFSUCCESS: Profile unaugmentation succeeded
The command removes the resAdmin, resDeployer, and resMonitor users. The cluster is kept as is to prevent any risk of deleting previously existing configurations.
Uninstall Rule Execution Server from a cluster
We can uninstall Rule Execution Server from an existing cluster. To uninstall Rule Execution Server from a cluster, you use the same configuration script that you use to configure the cluster.
cd <WAS_InstallDir/profiles/Dmgr01/bin/
configureDSCluster.sh -dmgrAdminUsername websphere
                       -dmgrAdminPassword websphere
                       -clusterPropertiesFile <WAS_InstallDir/profiles/Dmgr01/bin/rules/configureDSCluster.properties
                       -targetNodeName DecisionServerNode01
                       -dmgrHostName localhost
                       -dmgrPort 8879
                       -uninstall
...where...
| Parameter name | Mandatory/Optional | Description |
|---|---|---|
| -dmgrAdminUsername | Mandatory | WAS administrator's user identifier that you defined when you installed Decision Server |
| -dmgrAdminPassword | Mandatory | WAS administrator.s password that you defined when you installed Decision Server. |
| -clusterPropertiesFile | Mandatory | Full path to the properties file. |
| -uninstall | Mandatory | Remove all the applications and resources from the cluster. The cluster itself is not removed because it might contain other applications. |
| -createNode | Optional | Create a default node profile with the name set in the -targetNodeName parameter. |
| -targetNodeName | Optional | Default is RulesNode01. |
| -dmgrHostName | Optional | Name of the host on which the dmgr is located. Mandatory if you create the target node by setting the -targetNodeName parameter. |
| -dmgrPort | Optional | SOAP TCP port of the dmgr. By default, 8879. |
This command has the following results:
- Uninstalls hosted transparent decision services and Scenario Service Provider (SSP).
- Uninstalls the Rule Execution Server console.
- Removes the Rule Execution Server console server.
- Uninstalls the Execution Unit (XU).
- Uninstalls the data source.
- Removes the administrative and applicative groups.
Configure the Decision Center consoles using profile templates
We can create new profiles for the Decision Center consoles and configure a WAS cluster for high availability and scalability.
To create a new stand-alone server to host Decision Center, first create a new profile. We can create a profile using pmt.sh or the manageprofiles command.
Configure Decision Center on a new profile
To create a new stand-alone instance of Decision Center, first create a Decision Center profile. We can create a profile using pmt.sh, or using manageprofiles.sh.
During profile creation, you are asked to select the database manager that hosts the tables for the execution server run time. Unless you are using Apache Derby, create this database before you configure a new profile.
Depending of your OS, we can use pmt.sh or manageprofiles.sh create a new profile:
- On a 32-bit OS, we can use pmt.sh. pmt.sh is not supported on an HP-UX OS, nor is it on z/OS.
- On a 32-bit OS or any other OS, we can use manageprofiles.sh.
To use manageprofiles.sh to configure Decision Center on a new profile.
-
cd WAS_HOME/bin
./manageprofiles.sh
...provide the following parameters:
| -create | To create the new profile. |
| -templatePath <template_path> | Location of the profile template. Provide the path to...
|
Optional parameters:
| -dsHome installation location | Fully-qualified path of the Decision Center installation directory INSTALL_DIR. Specify if you have installed Decision Center in a non-default location. |
| -profileName profile_name | Name of the profile. |
| -cellName cell_name | Name of the cell. |
| -nodeName node_name | Name of the node. |
| -hostName host_name | Host name of the computer hosting the profile. |
| -serverName server_name | wServer name. |
| -enableAdminSecurity true|false | true turns on WAS administrative security. If provided, also provide -adminUserName and -adminPassword. Default is false. and security will not be active. You must also provide -adminUserName and -adminPassword. |
| -adminUserName username | User ID to access WAS. Only required if enableAdminSecurity is enabled. |
| -adminPassword password | Password for the user ID to access WAS. Only required if enableAdminSecurity is enabled. |
| -dbType database_type | Database product. Valid values are:
|
| -dbName database_name | Database. Required unless -dbType is Derby_Embedded. |
| -dbUserId database_user_name | User ID to access the database server. Required unless -dbType is Derby_Embedded. |
| -dbPassword password | Password for the user ID to access the database server. Required unless -dbType is Derby_Embedded. |
| -dbJDBCClasspath database_jdbc_classpath | Path to the JDBC class path files. Required unless -dbType is Derby_Embedded. |
| -dbJDBCLicenseClasspath database_jdbc_license_classpath | Path to the JDBC class path files. Only required if -dbType is DB2_Universal. |
| -dbHostName host_name | Host name for the database server. Required unless -dbType is Derby_Embedded. |
| -dbServerPort port_number | Port of the TCP/IP service, or the port on which the database is listening. Required unless -dbType is Derby_Embedded. |
Examples
Create a new application server profile using embedded Apache Derby and WAS default messaging
manageprofiles.bat -create
                   -templatePath "C:\IBM\ODM801\ODM\WAS\profileTemplates\rules\default\dc"
                   -dcHome "C:\IBM\ODM801\ODM"
Augment an existing profile with Decision Center
To create an instance of Decision Center on an existing WAS, augment the profile using manageprofiles.sh.
Before augmenting an existing WAS application server profile, stop all appservers.
During profile creation; you are asked to select the database manager, which hosts the tables for the event runtime. If we are not using Apache Derby; create the database before you create a profile. We can use manageprofiles.sh or pmt.sh to augment an existing profile:
- The manageprofiles command is supported on all OSs.
- pmt.sh is only supported on 32-bit OSs. pmt.sh is not supported on an HP-UX OS, nor is it on z/OS.
The procedure describes how to use manageprofiles.sh to augment Decision Center on an existing profile.
Procedure
- cd WAS_HOME/bin
- Run manageprofiles.sh provide the following parameters:
-augment To augment the existing profile. -unaugment To undo the augmentation of the profile. -templatePath <template_path> Location of the profile template. Provide the following value for the application server profile: WAS_HOME/profileTemplates/rules/default/dc.
-profileName profile_name Name of the existing application server profile that you are augmenting. Optional parameters:
-dsHome installation location fully qualified path to installation location for Decision Center. Specify if you have installed Decision Center in a location different to the default. -profileName profile_name Name of the profile. -cellName cell_name Name of the cell. -nodeName node_name Name of the node. -hostName host_name Host name of the computer that hosts the profile. -serverName server_name wServer name. -enableAdminSecurity true|false true turns on WAS administrative security. If provided, also provide -adminUserName and -adminPassword. Default is false. -adminUserName username User ID to access WAS. Only required if enableAdminSecurity is enabled. -adminPassword password Password for the user ID to access WAS. Only required if enableAdminSecurity is enabled. -dbType database_type Database product. Valid values are: - Derby_Embedded: the default value
- DB2_Universal
- Derby_NetworkServer
- Oracle
- MS_SQL_Server
-dbName database_name Database. Required unless -dbType is Derby_Embedded. -dbUserId database_user_name User ID to access the database server. Required unless -dbType is Derby_Embedded. -dbPassword password Password for the user ID to access the database server. Required unless -dbType is Derby_Embedded. -dbJDBCClasspath database_jdbc_classpath Path to the JDBC class path files. Required unless -dbType is Derby_Embedded. -dbJDBCLicenseClasspath database_jdbc_license_classpath Path to the JDBC class path files. Required only if -dbType is DB2_Universal. -dbHostName host_name Host name for the database server. Required unless -dbType is Derby_Embedded. -dbServerPort port_number Port of the TCP/IP service, or the port on which the database is listening. Required unless -dbType is Derby_Embedded.
Examples
Augment an existing application server profile called AppSrv01 using embedded Apache Derby.
manageprofiles.bat -augment  \
                   -templatePath "C:\IBM\ODM801\ODM\WAS\profileTemplates\rules\default\dc"  \
                   -dcHome  "C:\IBM\ODM801\ODM"  \
                   -profileName AppSrv01
Unaugment an existing Decision Center application server profile called WODMSrv01.
manageprofiles.sh -unaugment
                   -templatePath "/opt/ibm/ODM801/ODM/WAS/profileTemplates/rules/default/dc"
                   -profileName WODMSrv01
Augment a dmgr profile with Decision Center
- Install Decision Center, which includes WAS and its profile templates.
- Unless one already exists, create a default dmgr profile.
This step creates a new directory...
-
profiles/Dmgr01/bin
- Add a node.
We augment the dmgr profile so we can create additional nodes using the provided template.
Launch the manageprofiles file with the -augment options.
-
WAS_HOME/bin/manageprofiles.sh -augment -profileName Dmgr01 -templatePath WAS_HOME/profileTemplates/rules/management/dc
The manageprofiles command...
- Creates the users...
- rtsAdmin
- rtsUser1
- rtsConfig
- Copies configureDCCluster.sh to...
-
profiles/Dmgr01/bin
Run configureDCCluster.sh to create a cluster
After we have augmented the default management profile, run the script that configures Decision Center on a WAS cluster. Before starting, set the WODM_HOME environment variable. After augmenting the management profile, set the cluster configuration properties, and run the configuration script. You cannot use the configuration script to initialize the cluster nor to add a node to an existing cluster.
- Set the cluster name and database values. Edit...
-
dmgr/bin/rules/configureDCCluster.properties
...and set...
wodm.dcrules.clusterName The value can be the name of an existing cluster. If no cluster exists already, a cluster is created. wodm.dcrules.db.type The database type: DB2, Oracle, or MSSQL wodm.dcrules.db.jdbcDriverPath Path to the JDBC drivers. Separate the driver names with a colon (;). D:/WODM80/drivers/db2jcc.jar;D:/WODM80/drivers/db2jcc_license_cu.jar;
wodm.dcrules.db.name Name of the database. wodm.dcrules.db.hostname Name of the host where the database is hosted: wodm.dcrules.db.port Port number to establish the connection to the database wodm.dcrules.db.user User name to connect to the database. wodm.dcrules.db.password Password for the user to connect to the database. - Start the configureDCCluster script
cd WAS_Installdir/profiles/Dmgr01/bin/
./configureDCCluster.sh -dmgrAdminUsername websphere
                        -dmgrAdminPassword websphere
                        -clusterPropertiesFile WAS_Installdir/profiles/Dmgr01/bin/rules/configureDCCluster.properties
                        -createNode
                        -targetNodeName DecisionCenterNode01
                        -dmgrHostName localhost
                        -dmgrPort 8879
Cluster configuration parameters Parameter name Required Description -dmgrAdminUsername Mandatory The WAS administrator.s user identifier that you defined when you installed Decision Center -dmgrAdminPassword Mandatory The WAS administrator.s password that you defined when you installed Decision Center. -clusterPropertiesFile Mandatory The full path to the properties file. -uninstall Optional Remove all the applications and resources from the cluster. The cluster itself is not removed because it might contain other applications. -createNode Optional Create a default node profile with the name set in the -targetNodeName parameter. -targetNodeName Optional Default is set RulesNode01. -dmgrHostName Optional Name of the host on which the dmgr is located. Mandatory if you create the target node by setting the -targetNodeName parameter. -dmgrPort Optional SOAP TCP port of the dmgr. Default is 8879.
Results
The script performs the following actions:
- Installs the JDBC provider and the data source at node level.
- Installs the Decision Center application at the cluster level. Users are mapped to application groups when an application is deployed.
- Starts the dmgr server if it is not already started.
- Configures security.
- Creates the rtsAdmin, rtsInstaller, rtsUser1, and rtsConfig users.
- Configures users and groups.
- Maps users and groups to roles.
- Starts the cluster, servers, and applications.
When the script completes, the cluster is up and running. The user should then configure the load balancing system, such as IBM HTTP Server (IHS).
Depending on your hardware configuration, and because the Decision Center EAR file is very large, you might need to connect to the Decision Center administration console to verify whether the cluster is correctly started and, if it is not, start it manually.
Unaugment Decision Center from an existing cluster
We can unaugment Decision Center from existing profiles without deleting the cluster.
Use manageprofiles.sh to unaugment Decision Centerfrom existing profiles in a cluster.
Procedure
Launch the manageprofiles file with the following -unaugment options:
-
WAS_HOME/bin/manageprofiles.sh -unaugment -profileName Dmgr01 -templatePath WAS_HOME/profileTemplates/rules/management/dc -nodeName DecisionNode -cellName DecisionCell -targetNodeName DecisionCenterNode01
where
The command removes the rtsAdmin, rtsInstaller, rtsUser1, and rtsConfig users. The cluster is kept as is to prevent any risk of deleting previously existing configurations.
Uninstall Decision Center from a cluster
We can uninstall Decision Center from an existing cluster.
To uninstall Decision Center from a cluster, you use the same configuration script that you use to configure the cluster.
cd <WAS_InstallDir/profiles/Dmgr01/bin/
./configureDCCluster.sh -dmgrAdminUsername websphere
                        -dmgrAdminPassword websphere
                        -clusterPropertiesFile <WAS_InstallDir/profiles/Dmgr01/bin/rules/configureDCCluster.properties
                        -targetNodeName DecisionCenterNode01
                        -dmgrHostName localhost
                        -dmgrPort 8879
                        -uninstall
| Parameter name | Mandatory/Optional | Description |
|---|---|---|
| -dmgrAdminUsername | Mandatory | The WAS administrator's user identifier that you defined when you installed Decision Center |
| -dmgrAdminPassword | Mandatory | The WAS administrator's password that you defined when you installed Decision Center. |
| -clusterPropertiesFile | Mandatory | The full path to the properties file. |
| -uninstall | Mandatory | Removes all the applications and resources from the cluster. The cluster itself is not removed because it might contain other applications. |
| -createNode | Optional | Create a default node profile with the name set in the -targetNodeName parameter. |
| -targetNodeName | Optional | By default, the name of the target installation node is set to RulesNode01. |
| -dmgrHostName | Optional | Name of the host on which the dmgr is located. Mandatory if you create the target node by setting the -targetNodeName parameter. |
| -dmgrPort | Optional | The SOAP TCP port of the dmgr. By default, 8879. |
Results
This command has the following results:
- Uninstalls the clusterized application (teamserver).
- Uninstalls the data source.
- Removes application users and groups.
Configure the event runtime using profile templates
We can create new profiles for the event runtime and configure a WAScluster for high availability and scalability.
To create a new stand-alone server to host the event runtime, first create a new profile. We can create a profile using pmt.sh or using the manageprofiles command.
Augment an existing WAS management profile
To create a managed Decision Server Events environment, for example, a cluster, have a WAS management profile that you then augment. We can augment a profile using pmt.sh or using manageprofiles.sh.
Before augmenting an existing WAS management profile, ensure that the dmgr in the profile is stopped.
During profile creation, you are asked to select the database manager which hosts the tables for the event runtime Unless you are using Apache Derby, create this database before starting profile creation.
We can augment an existing profile as follows:
- On a 32-bit OS, we can use pmt.sh graphical user interface. pmt.sh is not supported on an HP-UX OS, nor is it on z/OS.
- On a 32-bit OS or any other OS, we can use manageprofiles.sh.
Augmenting an existing management profile using pmt.sh
To invoke pmt.sh directly:
- On Windows only, click...
-
Start | All Programs | IBM WebSphere | Application Server Network Deployment V8.0 | Profile Management Tool
- On multiplatforms...
-
cd WAS_HOME/bin/ProfileManagement
./pmt.sh
To augment an existing management profile with ODM Decision Server Events:
- On the Welcome page, click...
-
Launch Profile Management Tool
- On the Profiles page, highlight an existing management profile and click Augment.
- On the Augment Selection page, select...
-
Application server profile augmented with ODM Decision Server Events
- On the Installation Location page, enter or browse for the fully-qualified location where Decision Server Events is installed or accept the default location if correct.
- If WAS administrative security is turned on in the profile, the Administrative Security page is displayed. Enter the user ID and password.
- On the Database Configuration page,
- Select a database manager from the list and specify the appropriate connection details. This database manager hosts the tables for the event runtime.
If we select embedded Apache Derby, the repository database is created for you. In all other cases, have already created the database for the repository.
- If we did not select embedded Apache Derby, provide connection details including the fully-qualified location and name of the JDBC driver JAR file for your chosen database manager.
Enter the following details for the database server:
Database name Name of the database that hosts the Decision Server Events event runtime tables. Database server host name or IP address Name of the computer where the database server is located. The default is localhost. Database TCP/IP service port or listener port Connection port number for the database manager. Fully-qualified location and name of the JDBC driver file Enter the file name and location. User name User name that is used by Decision Server Events to connect to the database server. This user name must have administrative privileges. Password Password associated with the user name. Confirm the password. - Validate the connection to the database...
-
Test Connection
- Select a database manager from the list and specify the appropriate connection details. This database manager hosts the tables for the event runtime.
- On the Messaging Provider Configuration page, select one
of:
- WAS default messaging.
Decision Server Events is configured to use the default messaging provider that is embedded in WAS as the JMS provider.
- WebSphere MQ JMS messaging.
Supply the WebSphere MQ related information and Decision Server Events is configured to use WebSphere MQ as the JMS provider.
- Do not configure a messaging provider.
No messaging provider is configured during profile creation. Configure a single JMS provider before starting Decision Server Events.
After profile augmentation has completed, we can change JMS providers, or configure the JMS provider of your choice, but configure a single JMS provider before starting Decision Server Events.
- WAS default messaging.
- On the Profile Augmentation Summary page, review the information and click Augment to augment the profile.
Results
The existing management profile is augmented with ODM Decision Server Events.
Augmenting an existing management profile using manageprofiles.sh
- cd was_install_dir/bin
- Run manageprofiles.sh providing the following parameters:
-augment To augment the existing profile. -templatePath <template_path> Location of the profile template. Provide the following value for the management profile: was_install_dir/profileTemplates/wbe/management. -profileName profile_name Name of the existing management profile that you are augmenting. Optional parameters:
-wbeHome installation location Fully-qualified path that is the installation location for Decision Server Events. Specify if you have installed Decision Server Events in a nondefault location. -hostName host_name Host name of the computer hosting the profile. -adminUserName username User ID that is used to access WAS. Only required if WAS administrative security is turned on. -adminPassword password Password for the user ID that is used to access WAS. Only required if WAS administrative security is turned on. -wbeDbType database_type Database product. Valid values are: - Derby_Embedded: not supported for use in a clustered environment
- DB2_Universal: the default for the management profile
- Derby_NetworkServer
- Oracle
- MS_SQL_Server
-wbeDbName database_name Database. Required unless -wbeDbType is Derby_Embedded. -wbeDbUserId database_user_name User ID that is used to access the database server. Required unless -wbeDbType is Derby_Embedded. -wbeDbPassword password Password for the user ID that is used to access the database server. Required unless -wbeDbType is Derby_Embedded. -wbeDbJDBCClasspath database_jdbc_classpath Path to the JDBC class path files. Required unless -wbeDbType is Derby_Embedded. -wbeDbHostName host_name Host name for the database server. Required unless -wbeDbType is Derby_Embedded. -wbeDbServerPort port_number Port where the TCP/IP service is assigned or the port on which the database is listening. Required unless -wbeDbType is Derby_Embedded. -wbeMsgingType messaging_type Which JMS provider is to be configured. Valid values are: - Default_Messaging: Decision Server Events is configured to use WAS default messaging. Default
- MQ_JMS_Messaging: Decision Server Events is configured to useWebSphere MQ
- No_Messaging: No JMS provider is configured. Configure a JMS provider manually.
-wbeMqMsgingQmgrName queue_manager_name WebSphere MQ queue manager name. Required only if -wbeMsgingType is MQ_JMS_Messaging. -wbeMqMsgingQmgrHostName host_name Host name of the WebSphere MQ queue manager. Required only if -wbeMsgingType is MQ_JMS_Messaging. -wbeMqMsgingQmgrPort port_number Port on which the WebSphere MQ queue manager is listening. Required only if -wbeMsgingType is MQ_JMS_Messaging. -wbeMqMsgingTransType transport_type WebSphere MQ client transport type, either BINDINGS or CLIENT. Required only if -wbeMsgingType is MQ_JMS_Messaging. -disableBusSecurity Disable bus security for the service integration bus, WbeBus, when the bus is created.
Results
Profile is now augmented.
Examples
Augment an existing management profile called Dmgr01 using embedded Apache Derby and WAS default messaging.
manageprofiles.sh -augment
                  -templatePath "/opt/ibm/ODM801/ODM/WAS/profileTemplates/wbe/management"
                  -profileName Dmgr01
Unaugment an existing profile using manageprofiles.sh
To undo the augmentation of an existing profile using manageprofiles.sh:
- cd was_install_dir/bin
- Run manageprofiles.sh using the following parameters:
-unaugment To unaugment the existing profile. -templatePath <template_path> Location of the profile template. Provide the following value for the management profile: was_install_dir/profileTemplates/wbe/management. -profileName profile_name Name of the existing management profile that you are unaugmenting.
Results
Profile is now unaugmented. All Decision Server Events features are removed from the profile.
Examples
Unaugment an existing Decision Server Events management profile called WODMDmgr01
manageprofiles.sh -unaugment
                  -templatePath "/opt/ibm/ODM801/ODM/WAS/profileTemplates/wbe/management"
                  -profileName WODMDmgr01
Augment an existing WAS custom profile
To create a managed Decision Server Events environment, for example, a cluster, have a WAS custom profile that you then augment. We can augment a profile using pmt.sh or using manageprofiles.sh.
Before augmenting an existing WAS custom profile, ensure that any node agents or servers in the profile are stopped. We can augment an existing profile as follows:
- On a 32-bit OS, we can use pmt.sh graphical user interface. pmt.sh is not supported on an HP-UX OS, nor is it on z/OS.
- On a 32-bit OS or any other OS, we can use manageprofiles.sh.
Augmenting an existing custom profile using pmt.sh
To invoke Profile Management Tool directly:
- On Windows only, click...
-
Start | All Programs | IBM WebSphere | IBM WebSphere Application Server Network Deployment V8.0 | Tools | Profile Management Tool
- On multiplatforms...
-
cd WAS_HOME/bin/ProfileManagement
./pmt,.sh
To augment an existing custom profile with ODM Decision Server Events:
- On the Welcome page, click Launch Profile Management Tool.
- On the Profiles page, highlight an existing custom profile and click Augment.
- On the Augment Selection page, select Application server profile augmented with ODM Decision Server Events.
- On the Profile Augmentation Summary page, review the information and click Augment to augment the profile.
Results
The existing custom profile is augmented with ODM Decision Server Events.
Augmenting an existing custom profile using manageprofiles.sh
- cd was_install_dir/bin
- Run manageprofiles.sh using the following parameters:
-augment To augment the existing profile. -templatePath <template_path> Location of the profile template. Provide the following value for the custom profile: was_install_dir/profileTemplates/wbe/managed. -profileName profile_name Name of the existing custom profile that you are augmenting.
Examples
Augment an existing custom profile called Custom01...manageprofiles.sh -augment -templatePath "/opt/ibm/ODM801/ODM/WAS/profileTemplates/wbe/managed" -profileName Custom01
Unaugment an existing profile using manageprofiles.sh
To undo the augmentation of an existing profile using manageprofiles.sh:
-
cd was_install_dir/bin
Run manageprofiles.sh
Parameters...
| -unaugment | To unaugment the existing profile. |
| -templatePath <template_path> | Location of the profile template. Provide the following value for the custom profile: was_install_dir/profileTemplates/wbe/managed. |
| -profileName profile_name | Name of the existing custom profile that you are unaugmenting. |
Examples
Unaugment an existing Decision Server Events custom profile called WODMCustom01
manageprofiles.sh -unaugment
                  -templatePath "/opt/ibm/ODM801/ODM/WAS/profileTemplates/wbe/managed"
                   -profileName WODMCustom01
Create profiles for a gold topology cluster
In this task, you create the WAS profiles augmented with Decision Server Events that are required for a gold topology cluster.
Procedure
- Install Decision Server Events on both Computer1 and Computer2.
- On Computer1, create a WAS management
profile.
- cd was_install_dir/bin/ProfileManagement directory and start pmt.sh by running the pmt.bat or pmt.sh command.
- On the Welcome page, select Launch Profile Management Tool then Create.
- On the Environment Selection page, under WebSphere Application Server, click Management then Next then Deployment manager.
- Click Typical profile creation or Advanced profile creation. For more information about typical and advanced profile creation, see Create management profiles with dmgrs.
- Clear Launch the First steps console and click Finish.
To create a profile using command-line,
-
cd was_install_dir/bin
./manageprofiles.shTo create the dmgr, use the profile template...
-
was_install_dir/profileTemplates/management/
- Ensure that the dmgr is stopped, then augment the WAS management profile with Decision Server Events.
Select WAS default messaging as the messaging provider.
- Start the dmgr on Computer1:
-
cd was_install_dir/profiles/Dmgr01/bin
./startManager.sh - On Computer1, create a WAS custom profile.
-
cd was_install_dir/bin/ProfileManagement
./pmt.sh
- On the Welcome page, select...
-
Launch Profile Management Tool | Create | WebSphere Application Server | Custom profile | Next | [Typical profile creation | Advanced profile creation]
- On the Federation page, federate the custom profile into the cell of the dmgr.
- Enter the connection details for the dmgr created earlier
- Clear...
-
Federate this node later
- Click Next then click Create.
- On the Federation page, federate the custom profile into the cell of the dmgr.
As an alternative to using pmt.sh, for example where a graphical user interface is not available...
-
cd was_install_dir/bin
./manageprofiles.shTo create the custom profile, use the profile template...
-
was_install_dir/profileTemplates/managed/
- On the Welcome page, select...
- Check that the system clocks on all of the computers that you are using to create the cluster are synchronized and, to ensure that any time-based logic evaluates correctly, that the clocks are set to the same time zone.
- If we successfully federated earlier, you can skip this step. Otherwise, on Computer1, federate the custom profile into the cell of the dmgr:
-
cd was_install_dir/bin
./addnode -profileName profile_name <dmgr host> <dmgr port> - Start the WAS administrative console for the dmgr.
- Log in to the WAS administrative console and validate that the application server has been successfully federated to the dmgr. Click...
-
System administration | Nodes
On Computer1, the custom profile is now federated into the cell of the dmgr.
- Ensure that the node agent is stopped. To stop the node agent in the WAS administrative console, click...
-
System administration | Node agents | node agent | Stop
- Augment the custom profile with Decision Server Events.
Now that the profiles have been created, we can configure your gold topology cluster.
Configure a gold topology cluster
In this task, you configure the gold topology cluster for which you created profiles, to complete creating the cluster environment.
Before configuring the cluster, first create the profiles.
The following steps assume that security is enabled for the service integration bus, as described in Securing the service integration bus. If security is not enabled, replace SIB_ENDPOINT_SECURE_ADDRESS with SIB_ENDPOINT_ADDRESS and omit the BootstrapSecureMessaging chain from each hostname:port pair.
Procedure
- Create a WAS cluster and add two application servers as members of the cluster:
- Click Servers > Clusters > WebSphere application server clusters.
- Click New.
- In the Cluster name field, enter a name for the cluster, for example EventRuntimeCluster, then click Next.
- In the Member name field, enter a name for the first application server that you are adding to the cluster, for example eventruntime01.
- Select the name of the node on which the first application server runs, then click Next.
- In the Member name field, enter a name for the next application server that you are adding to the cluster, for example eventruntime02.
- Select the name of the node on which this application server runs. Click Add member, then click Next.
- To add more application servers to the cluster, repeat steps f. and g.
- Click Finish and Save.
- Identify and record the
- hostname:port :BootstrapSecureMessaging,hostname:port:BootstrapSecureMessaging
... where each hostname:port pair corresponds to the host name and SIB_ENDPOINT_SECURE_ADDRESS of the application servers in your event runtime cluster. To identify this information from the administrative console:
- Click Servers > WebSphere application server clusters > Event Runtime Cluster > Cluster members and note the hostname.
- For each cluster member, click Ports and record the port number associated with the SIB_ENDPOINT_SECURE_ADDRESS.
- Create a JVM custom property that points to the ODM installation
directory.
For every application server in the cluster.
- Click...
-
Servers | Server Types | WebSphere application servers | server-name | Java and Process Management | Process Definition | Java Virtual Machine | Custom properties | New
- In the Name field, type wbe.home
- As the value, enter the location of the home directory of your ODM installation.
If you installed using the launchpad and accepted the default install location:
- /opt/ibm/ODM801/ODM
If you installed using Installation Manager and accepted the default install location:
- /opt/ibm/ODM801
- Click Apply and Save.
- Click...
- Modify the server heapsize parameters.
You must do this step for every application server in the cluster.
- Click Servers > Server Types > WebSphere application servers > server-name > Java and Process Management > Process Definition > Java Virtual Machine, where server-name is an application server in the cluster.
- In the Initial heap size field, enter 768.
- In the Maximum heap size field, enter 1024.
- Click Apply and Save.
For more information about setting optimal heap settings, see Tuning your event runtime configuration.
- Enable the Startup Bean service for each application
server in the cluster.
Do this step for every application server in the cluster.
- Click Servers > Server Types > WebSphere application servers > server-name > Container Services > Startup beans service, where server-name is an application server in the cluster.
- Select Enable service at server startup.
- Click Apply and Save.
- Add the event runtime cluster as
a member to the service integration bus:
- Click Service integration > Buses > WbeBus > Bus members.
- Click Add. Click Cluster > DecisionServerCluster, then click Next.
- Select a messaging engine policy setting from the options High availability, Scalability, or Scalability with high availability.
- To ensure the recovery of JMS messages after a failover, configure a message store. Set the type of message store by selecting either File store or Data store. For more information about this concept and other high availability concepts, see Establishing high availability. Click Next
- On the Configure messaging engines panel, click the messaging engine name.
- Set the data store values:
- Either, if you are using a file store, set the value of Log directory path to point to a data store on a shared file system, for example, c:\filestoredirectory. Set the Permanent store directory path to point to a data store on a shared file system.
- Or, if you are using a database, set the Data connection JNDI name, the schema name and the authentication alias, to point to a data store on a database that you have already created.
Click Next.
- Click Change heap sizes. Accept the default values.
- Review the Summary information. Click Finish and Save.
- Create three service integration
bus destinations for the event runtime messaging destinations:
- Click Service integration > Buses > WbeBus > Destinations.
- Click New.
- Click Queue, and click Next. In the Identifier field, type eventQueue, then click Next.
- Repeat this step to create two further queues, with identifiers of historyModuleQueue and durableEventQueue.
- Click Finish and Save.
- Modify the provider endpoints for
the connection factories to point to the servers in your event runtime
cluster:
- Click Resources > JMS > Connection factories.
- From the Scope list, click Cell=cell-name, where cell-name is the name of the cell.
- Click WbeConnectionFactory
- In the Provider endpoints field, type hostname:port:BootstrapSecureMessaging,hostname :port:BootstrapSecureMessaging, where each hostname:port pair corresponds to the host name and SIB_ENDPOINT_SECURE_ADDRESS of the application servers in your event runtime cluster.
- Click Apply and Save.
- Modify the provider endpoints for
the JMS queue connection factory to point to the servers in your event runtime cluster:
- Click Resources > JMS > Queue connection factories.
- From the Scope list, click Cell=cell-name, where cell-name is the name of the cell.
- Click WbeQueueConnectionFactory
- In the Provider endpoints field, type hostname:port:BootstrapSecureMessaging,hostname :port:BootstrapSecureMessaging, where each hostname:port pair corresponds to the host name and SIB_ENDPOINT_SECURE_ADDRESS of the application servers in your event runtime cluster.
- Click Apply and Save.
- Modify the provider endpoints for
the JMS topic connection factory to point to the servers in your event runtime cluster:
- Click Resources > JMS > Topic connection factories.
- From the Scope list, click Cell=cell-name, where cell-name is the name of the cell.
- Click WbeTopicConnectionFactory
- In the Provider endpoints field, type hostname:port:BootstrapSecureMessaging,hostname :port:BootstrapSecureMessaging, where each hostname:port pair corresponds to the host name and SIB_ENDPOINT_SECURE_ADDRESS of the application servers in your event runtime cluster.
- Click Apply and Save.
- Install the event runtime application:
- Click Applications > New Application > New Enterprise Application.
- Click Remote file system.
- Click Browse and click a node or dmgr to browse its file system. Locate the wberuntimeear application file.
- Enter the full path of the location of the wberuntimeear application file.
For example, on Windows enter...
-
C:\IBM\ODM801\ODM\runtime\wberuntimeear.ear;
...On Linux and UNIX enter...
-
/opt/ibm/ODM801/ODM/runtime/wberuntimeear.ear
Click Next.
- In the Preparing for the application installation window, select Fast Path. Click Next.
- In the Select installation options window, accept the default options and click Next.
- In the Map modules to servers window,
in the Clusters and Servers field, click...
-
WebSphere:cell=cell-name,cluster=DecisionServerCluster,
Select both check boxes, click Apply, then Next.
- Click Finish and Save.
- To ensure all these changes take effect, and that the cluster can be started correctly, start the node agents on all the computers in the cluster:
-
cd was_install_dir/bin
./startNode.sh >-profileName profile_name - Start all the application servers in the cluster:
-
Servers | Clusters | WebSphere application server clusters | cluster-name | Cluster members | application_server | Start
Results
The gold topology cluster is now configured and running. If the cluster fails to start, see Start clusters.
Create a cluster that uses WebSphere MQ as the messaging provider
We can cluster Decision Server Events to provide high availability and scalability for the event runtime, but using WebSphere MQ as the messaging provider instead of using WAS default messaging as the messaging provider.
A Decision Server Events cluster consists of a single dmgr and one or more managed nodes. An event runtime cluster spans the managed nodes and provides high availability and scalability of the event runtime. This documentation describes how to set up a clustered event runtime for high availability and scalability, that uses WebSphere MQ as the messaging provider; but not how to configure WebSphere MQ for high availability. You create a two node cluster spanning two computers, as shown in the following diagram:

- There is one cluster, contained inside a single cell.
- A management profile is configured on Computer1.
- There are managed nodes (custom profiles) on both Computer1 and Computer2.
- Each computer has Decision Server Events and WAS installed.
- WebSphere MQ is installed and configured for use with Decision Server Events and provides all of the JMS messaging capability for the event runtime.
This cluster topology can be extended across more computers in a similar way, in a single cluster.
To complete this task:
- Configure WebSphere MQ for use as a messaging provider.
- Create profiles for a cluster that uses WebSphere MQ as the messaging provider.
- Configure your cluster for Decision Server Events.
Configure WebSphere MQ for use as a messaging provider
Before we can use WebSphere MQ as the messaging provider for your Decision Server Events cluster, do some configuration tasks in WebSphere MQ. The WebSphere MQ administrator must do the following tasks:
Procedure
- Create the queue manager, using the crtmqm command.
- Start the queue manager, using the strmqm command.
- If we are using WebSphere MQ V6, start the Publish/Subscribe Engine of the queue manager, using the strmqbrk command.
- If we are using WebSphere MQ V7.1, publish/subscribe must be enabled. Use the ALTER QMGR for this queue manager.
- Create the queues required, by running:
runmqsc
queue-manager-name < mq-install-dir\java\bin\MQJMS_PSQ.mqsc
where mq-install-dir is the installation location of WebSphere MQ. - If we are configuring a cluster, create the extra queues required, by running:
runmqsc queue-manager-name < INSTALL_DIR\config\was\create_MQ_JMS_MQ_queues.mqsc
where INSTALL_DIR is the installation location of Decision Server Events.
Create profiles for a cluster that uses WebSphere MQ as the messaging provider
In this task, you create the WAS profiles augmented with Decision Server Events that are required for a cluster that uses WebSphere MQ as the messaging provider.
Configure WebSphere MQ for use as a messaging provider.
Procedure
- Install Decision Server Events on both Computer1 and Computer2.
- On Computer1, create a WAS management
profile.
- cd was_install_dir/bin/ProfileManagement directory and start pmt.sh by running the pmt.bat or pmt.sh command.
- On the Welcome page, select Launch Profile Management Tool then Create.
- On the Environment Selection page, under WebSphere Application Server, click Management then Next then Deployment manager.
- Click Typical profile creation or Advanced profile creation. For more information about typical and advanced profile creation, see Create management profiles with dmgrs.
- Clear Launch the First steps console and click Finish.
For command-line...
-
cd was_install_dir/bin
./manageprofiles.shTo create the dmgr, use the profile template...
-
was_install_dir/profileTemplates/management/
- Ensure that the dmgr is stopped, then augment the WAS management profile with Decision Server Events.
Select WebSphere MQ as the messaging provider and provide the appropriate connection details.
- Start the dmgr on Computer1:
-
cd was_install_dir/profiles/dmgr_profile_name/bin
./startManager.sh - On Computer1, create a WAS custom profile.
-
cd was_install_dir/bin/ProfileManagement
./pmt.sh
- On the Welcome page, select Launch Profile Management Tool then Create.
- On the Environment Selection page, under WebSphere Application Server, click Custom profile then Next.
- Click Typical profile creation or Advanced profile creation. For more information about typical and advanced profile creation, see Create custom profiles.
- On the Federation page, federate
the custom profile into the cell of the dmgr.
- Enter the connection details for the dmgr that you created in step 2.
- Clear Federate this node later.
- Click Next then click Create.
If federation is successful, we can skip step 7.
- Clear Launch the First steps console and click Finish.
For command-line...
-
cd was_install_dir/bin
./manageprofiles.sh
To create the custom profile, use the profile template...
-
was_install_dir/profileTemplates/managed/profile
-
cd was_install_dir/bin
- Start the WAS administrative console for the dmgr.
- Log in to the WAS administrative console and validate that the application server has been successfully federated to the dmgr. Click...
-
System administration | Nodes
./addnode -profileName profile_name <dmgr host> <dmgr port>
On Computer1, the custom profile is now federated into the cell of the dmgr.
- Stop the node agent...
-
System administration | Node agents node_agent | Stop
- Augment the custom profile with Decision Server Events.
Configure a cluster that uses WebSphere MQ as the messaging provider
In this task, you configure the cluster for which you have created profiles, to complete creating the cluster environment.
Before configuring the cluster, first create the profiles.
Procedure
- Create a WAS cluster and add two application servers as members of the cluster:
- Click...
-
Servers | Clusters | WebSphere application server clusters | New
- In the Cluster name field, enter a name for the cluster, for example DecisionServerCluster, then click Next.
- In the Member name field, enter a name for the first application server that you are adding to the cluster, for example eventruntime01.
- Select the name of the node on which the first application server runs, then click Next.
- In the Member name field, enter a name for the next application server that you are adding to the cluster, for example eventruntime02.
- Select the name of the node on which this application server runs. Click Add member, then click Next.
- To add more application servers to the cluster, repeat steps
- Click Finish and Save.
- Click...
- Create a JVM custom property that points to the Decision Server Events installation
directory.
Do this step for every application server in the cluster.
- Click...
-
Servers | Server Types | WebSphere application servers | server-name | Java and Process Management | Process Definition | Java Virtual Machine | Custom properties | New
- In the Name field, type wbe.home
- As the value, enter the location of the lib directory in your Decision Server Events installation.
-
C:\IBM\ODM801\ODM\lib
/opt/ibm/ODM801/ODM/lib - Click Apply and Save.
- Click...
- Enable the Startup Bean service for each application server in the cluster.
Do this step for every application server in the cluster.
-
Servers | Server Types | WebSphere application servers | server-name | Container Services | Startup beans service | Enable service at server startup | Apply | Save
- Install the event runtime application:
- Click Applications > New Application > New Enterprise Application.
- Click Remote file system.
- Click Browse and click a node or dmgr to browse its file system. Locate the wberuntimeear application file.
- Enter the full path of the location of the wberuntimeear
application file. For example, on Windows enter...
-
C:\IBM\ODM801\ODM\runtime\wberuntimeear.ear
...and on Linux and UNIX enter...
-
/opt/ibm/ODM801/ODM/runtime/wberuntimeear.ear
Click Next.
- In the Clusters and Servers field, click...
-
WebSphere:cell=cell-name,cluster=DecisionServerCluster
- Select both check boxes.
- Click Apply, then Next.
- Click Finish and Save.
- To ensure all these changes take effect, and that the cluster can be started correctly, start the node agents on all the computers in the cluster:
-
cd was_install_dir/bin
./startNode -profileName profile_name - Start all the application servers in the cluster:
- To do this step in the WAS administrative console, click Servers > Clusters > WebSphere application server clusters > <cluster-name> > Cluster members, where <cluster-name> is the name that you entered in step 1. Select the application server and click Start.
Results
The cluster that uses WebSphere MQ as the messaging provider is now configured and running. If the cluster fails to start, see Start clusters.
What to do next
Configure the technology connectors.
Define a highly available collection of catalog servers
The event runtime uses WebSphere eXtreme Scale during event processing. By default, the WebSphere eXtreme Scale catalog service runs only within the dmgr. If the deployment manager is unavailable, the WebSphere eXtreme Scale shard placement might be affected. If we define a catalog service domain, you increase the availability of your events runtime cluster if the dmgr is unavailable or restarts. Catalog service domains define a group of catalog servers that manage the placement of shards and monitor the health of container servers in your data grid.
Procedure
Follow the procedure described in Create catalog service domains in WebSphere Application Server to include the catalog service in multiple node agent processes or in an application server that is not hosting a WebSphere eXtreme Scale application.
Configure Rule Execution Server on Decision Center
To use Rule Execution Server on a new instance of WAS, establish your database credentials, deploy the archives, and follow a number of configuration steps. We can configure a cluster using a profile template.
Configure Rule Execution Server on Decision Center
To use Rule Execution Server on an instance of WAS, establish your database credentials, deploy the provided archives for this server, and follow a number of configuration tasks.
Before you start
To configure Rule Execution Server on WAS, follow specific steps.
The first 4 steps pertain to setting up a dedicated database and datasource. Then you activate security and deploy the Management Ear.
The Rule Execution Server console includes an Installation Settings wizard. If we sign in as the administrator, we can use it to create the database schema and run SQL drop statements that clear an existing Rule Execution Server database.
Specific integration extensions are available from this URL: WebSphere Operation Decision Management Integration SupportPacs
The following table summarizes the steps that you follow to configure Rule Execution Server on WAS, depending on the type of persistence that you choose.
| Installation Steps | Persistence | |||
|---|---|---|---|---|
| File | Data source | JDBC | ||
| Step 1: Selecting and applying the persistence type | X | Default persistence mode | X | |
| Step 2: Restrict database user permissions | X | X | X | |
| Step 3: Establishing the database credentials | Not applicable | X | X | |
| Step 4: Set up a data source and connection pool | Create a JDBC provider | Not applicable | X | X |
| Create a data source and connection pool | Not applicable | X | X | |
| Create J2C authentication data | Not applicable | X | X | |
| Not applicable | X | X | ||
| Test the connection to the database | Not applicable | X | X | |
| Step 5: Activate security on WAS | Create users and groups | X | X | X |
| Map the resAdministrators group to the Monitor role | X | X | X | |
| Security policies for the Rule Execution Server console | X | X | X | |
| Step 6: Deploy the Rule Execution Server Management EAR | X | X | X | |
| Step 7: Create a Rule Execution Server database schema | Not applicable | X | X | |
| Step 8: Deploy the Rule Execution Server MBean descriptors | X | X | X | |
| Step 9: Deploy the XU RAR | X | X | X | |
| Step 10: Deploy the hosted transparent decision service EAR | Optional | Optional | Optional | |
| Step 11: Set the DecodeUrlAsUTF8 custom property | Required if you deployed the EAR file for hosted transparent decision services (previous step). | Required if you deployed the EAR file for hosted transparent decision services (previous step). | Required if you deployed the EAR file for hosted transparent decision services (previous step). | |
| Verify the deployment and configuration | Optional | Optional | Optional | |
Step 1: Selecting and applying the persistence type
We can change the default datasource RuleApp and Java XOM persistence settings by running an Ant script that generates a new Rule Execution Server management archive.
Typically we do this if you are in development mode. This step does not apply to beginners using the embedded Derby database.
To change the persistence settings, the distribution provides an Ant script in the ODM_HOME/executionserver/bin/ressetup.xml file. Use it to create a new instance of the Rule Execution Server management archive and, in the case of a Java EE application server, the Execution Unit (XU).
- If we use file-based persistence on Solaris, your file system must support all characters used in directory and file names that are present in the ruleset path (RuleApp name and ruleset name). Set the LANG system property with the encoding that is compatible with your package and rule names, for example en_US.UTF-8.
- If we select the file persistence type for RuleApps, we cannot use Decision Warehouse.
- MySQL persistence: If we choose to use MySQL as a persistence
back end, add or set the following properties in the MySQL configuration
file my.ini (on Windows) or my.cnf (on
UNIX OSs):
sql-mode=STRICT_ALL_TABLES
max_allowed_packet=1073741824
For more information about these settings, see the MySQL 5.0 reference manual: Server SQL Modes and 5.1.3 Server System Variables.
Step 2: Restrict database user permissions
If Rule Execution Server data is stored in a database, the database administrator might require you to provide the specific permissions that you need when accessing this database.
This step applies when restrictions need to be implemented on the database. Skip to the next step if you are managing the database yourself, for example for test purposes using an embedded database, or do not need further restrictions.
Connection to the Rule Execution Server database, established in the data source credentials, and any subsequent requests to the database are handled through a database user. This database user (name and password), for example resdbUser, is defined by the database administrator and has no relation to the standard Rule Execution Server groups.
The following table gives the permissions that the database administrator must define on the Rule Execution Server database, with attention given to the type of operations that you want to perform:
| Database permission | Operation | |
|---|---|---|
| Browse and edit rulesets/RuleApps | Create the Rule Execution Server schema | |
| CREATE ANY INDEX | Not required | Required |
| DROP ANY INDEX | Not required | Required |
| CREATE ANY SEQUENCE | Not required | Required |
| DROP ANY SEQUENCE | Not required | Required |
| SELECT ANY SEQUENCE | Required | Not required |
| CREATE ANY TABLE | Not required | Required |
| DROP ANY TABLE | Not required | Required |
| INSERT ANY TABLE | Required | Not required |
| SELECT ANY TABLE | Required | Not required |
| UPDATE ANY TABLE | Required | Not required |
| DELETE ANY TABLE | Required | Not required |
| CREATE ANY TRIGGER | Not required | Required |
| CREATE ANY VIEW | Not required | Required |
| DROP ANY VIEW | Not required | Required |
Some supported databases do not require all the above permissions.
Step 3: Establishing the database credentials
Establish the credentials of the database dedicated to Rule Execution Server if you are using database persistence.
These credentials are required to establish the datasource, which you will do in the next step.
If a database does not already exist, create one now by following the instructions for that database type. The procedure below shows how to create an empty Derby database.
Skip to the next step if you are using the embedded Derby database.
If we set persistence to file, we can skip all the database-related tasks and proceed to Step 6: Deploy the Rule Execution Server Management EAR.
Procedure
- Stop the application server.
- Launch <DerbyInstallDir>/bin/ij.bat (or ij for Linux).
- Create the database and connect to it.
For example, to create the new database c:/resdb as the user resdbUser and connect to it, use the following command:
ij>connect 'jdbc:derby:c:/resdb;user=resdbUser;password=resdbUser;create=true';
- Close the ij utility.
ij> quit;
- Start the application server.
Step 4: Set up a data source and connection pool
Create a JDBC provider (data source) and connection pool for WAS.
Create a JDBC provider
To enable Rule Execution Server, you create a JDBC provider in WAS, as the first step in creating a data source.
We can install the JDBC provider on the cell, node, cluster, or server level. This procedure documents installation at node level.
Some drivers (such as Oracle OCI drivers) need to access additional libraries at run time (.dll or .so files). As a consequence, set up your working environment to access these libraries (PATH, LD_LIBRARY_PATH, and so on).
Procedure
- Log in to the Integrated Solutions Console.
- In the panel, open Resources > JDBC and click JDBC Providers.
- In the panel, under Scope select the Node=xxx, Server=yyy, where xxx is the name of your node and yyy the name of your server, and then click New.
- In Step 1, select the database type, provider type, and an implementation type that supports XA features.
Option Description Database type Derby Provider type Derby JDBC Provider Implementation type XA data source: Enter a name, for example Rule Execution Server JDBC Provider. - Click Next.
- Skip Step 2.
A summary is provided in Step 3.
- Check that the class path to the JAR file of your driver
and the implementation class are correct.
Default values are usually sufficient.
- Click Finish and Save to save the changes to the master configuration, making sure that the Synchronize changes with Nodes check box is selected.
- Restart your server to have these changes taken into account.
Create a data source and connection pool
Create a connection pool and a data source in WAS to enable Rule Execution Server.
Procedure
- In the Integrated Solutions Console, open Resources > JDBC and Data sources.
- Under Scope, select the scope that you selected for the JDBC provider
- In Step 1, enter Rule
Execution Server datasource as the name for the data source
and jdbc/resdatasource in the JNDI
name field, and click Next.
We can enter any name for the data source, but the JNDI name must be jdbc/resdatasource.
- In Step 2, choose Select an existing JDBC provider, select the JDBC provider and click Next.
- In Step 3, enter the specific database properties for the data source.
- Deselect Use this data source in container managed persistence (CMP).
- Click Next.
- In Step 4, set up any required security
aliases and click Next when done.
In Step 5, a summary of the data source is provided.
- Click Finish and then Save to save the changes to the master configuration.
Create J2C authentication data
In WAS, we can secure your enterprise information system by creating J2C authentication data.
After you have created your data source and connection pool, you create the J2C authentication data. J2C is a secure mechanism for integrating enterprise information systems to an application server and enterprise applications.
Procedure
- In the Integrated Solutions Console, open Resources > JDBC and Data sources.
- Click Rule Execution Server datasource.
- Under Related Items, click JAAS - J2C authentication data.
- Click New and set the fields Alias, User
ID, and Password. For example, this procedure uses the following values:
- Alias: ResDerbyUser
- User ID: resdbUser
- Password: resdbUser
- Click Apply and Save to save directly to the master configuration.
- Open Resources > JDBC and Data sources and click Rule Execution Server datasource.
- In the Security settings section, for Component-managed authentication alias, select the <NodeName>/ResDerbyUser alias, where <NodeName> is the name of the WAS node on which you are configuring Rule Execution Server.
- For Container-managed authentication alias, select <node name>/ResDerbyUser.
- Click Apply and Save to save directly to the master configuration.
Set custom properties
The database to which you want to connect might require that you set some custom properties. Depending on the database to which you want to connect, you have different properties to define. The table below presents the minimum set of properties required to define the supported databases. If the driver that you use is not listed, check the WAS documentation for more information.
Some of these properties might have be already defined. For example, if you are following this configuration procedure and have created a Derby database, all the properties for that database have already been defined.
| Database | Properties |
|---|---|
| DB2 Universal JDBC Driver |
|
| DB2 Universal JDBC XA Driver |
|
| DB2 legacy CLI-based Type 2 | databaseName: for example, Sample |
| Oracle JDBC Driver | URL: For example, jdbc:oracle:oci:@sample |
| Derby | databaseName: The path to the location of the database files. For more information, refer to the Derby documentation. |
We can also set custom properties for any of the resources listed in the Custom properties page.
Procedure
- In the Integrated Solutions Console, open Resources > JDBC and click Data sources.
- Click the data source that you want to customize.
- Under Additional Properties, click Custom properties.
- Change an existing property or create a new one by clicking New.
- Click createDatabase.
The General Properties page opens.
- Type create in the Value field.
For example, for a Derby data source, if you have not created the database yet, we can set the value of the createDatabase property to create. The database is created at the first database connection.
- Click createDatabase.
- Click OK and Save to save the changes to the master configuration.
Test the connection to the database
After you have created a data source and connection pool, and set the custom properties, we can test the connection to your database.
Procedure
- In the Integrated Solutions Console, open Resources > JDBC and click Data sources.
- Select the check box next to the data source that you want to test and click Test connection.
Results
The status of the connection is indicated at the top, as shown in the following example.
Example
The test connection operation for data source Rule Execution Server datasource
 on server server1 at node <NodeName> was successful.
Step 5: Activate security on WAS
WAS provides security infrastructure and mechanisms to protect sensitive Java. EE resources and administrative resources and to address enterprise end-to-end security requirements on authentication, resource access control, data integrity, confidentiality, privacy, and secure interoperability.
Introduction to WAS security
In WAS, security is organized in layers, from the platform security up to the WAS-specific layer, based on the Java. EE model, over the Java security layer.
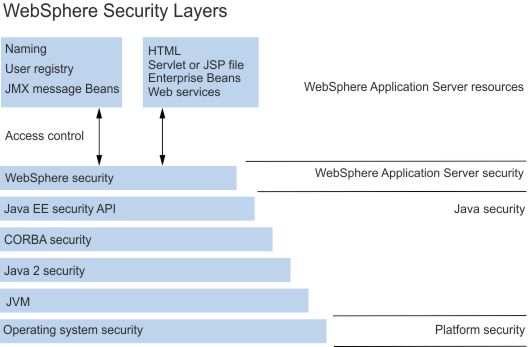
Map the resAdministrators group to the Monitor role
Create users and groups
Create users and groups and assign them roles using a user registry with a federated repository.
If we do not have groups and users defined or to define new groups and users, proceed with the following steps. If we already have suitable groups and users defined, skip this procedure and connect users to their appropriate roles when you deploy your applications.
WAS uses various kinds of user registries: OS, LDAP, or Custom. To configure a federated repository as a user registry, you work from the WAS Integrated Solutions Console. You control access to Rule Execution Server and enforce security by defining groups and users.
The main groups and their associated default user and password are summarized in the following table.
| Group | Use | Default user/password |
|---|---|---|
| resAdministrators |
Gives a user full administrator rights to:
| resAdmin/resAdmin |
| resDeployers | Gives a user the rights to:
| resDeployer/resDeployer |
| resMonitors | Gives a user the rights to:
| resMonitor/resMonitor |
Procedure
- In the side panel, open Security > Global security.
- Configure the repository security as follows:
- If Federated repositories is already selected under Current realm definition, make sure that Enable application security is selected. If we select Enable application security, click Apply and Save to save the changes to the master configuration.
- If Federated repositories is not already selected, click Security Configuration Wizard, and then complete the wizard as follows:
- In Step 1, to specify the level of protection, select Enable application security and click Next.
- In Step 2, select Federated repositories and click Next.
- In Step 3, type a name in the Primary administrative user name field and enter websphere in the Password field, and then click Next.
- In Step 4, review the security configuration summary and click Finish.
- Click Save to save the changes to the master configuration.
- Restart WAS.
Then log in to the Integrated Solutions Console as the primary administrative user.
- In the side panel, open Users and Groups > Manage Groups, and then click Create.
- Enter resAdministrators as the group name, then click Create.
- Click Create Like and create another group named resDeployers. Click Create.
- Click Create Like again and enter another group named resMonitors. Click Create, then click Close.
- In the side panel, open Users and Groups > Manage Users and then click Create.
- Enter resAdmin as the User ID and again resAdmin as the password. Also specify the given name and last name.
- Click Group Membership and proceed
as follows:
- Click Search, select the resAdministrators, resDeployers, and resMonitors groups.
- Click Add.
- Click Close, then click Create and Close again.
- Create users with deployer and monitor roles as follows:
- Create another user named resDeployer with password resDeployer.
- Assign the user to the resDeployers and resMonitors groups.
- Create a user named resMonitor with password resMonitor.
- Assign the user to the resMonitors group.
- Restart your application server or your dmgr.
Map the resAdministrators group to the Monitor role
We can give Rule Execution Server users access to the model MBeans by configuring a mapping between the resAdministrators group declared in the custom registry and the Monitor role.
To access the MBeans of the Rule Execution Server model, an application must have sufficient security credentials, restricted to the Monitor role in the WAS authentication system.
Procedure
- In the Integrated Solutions Console, open Users and Groups > Administrative group roles.
- Click Add.
- For Role(s), select Monitor, click Search, and move the entry beginning with resAdministrators from the Available column to the Mapped to role column, and then click OK.
- Click Save to save directly to the master configuration.
- Restart your application server or your dmgr.
Security policies for the Rule Execution Server console
To be able to record and manage sets of MBeans, you need to override the WAS security policies for the Rule Execution Server console.
When the global security of WAS is activated, the MBean server is not accessible from the deployed application. Override these security policies for the Rule Execution Server console so that it can record and manage a set of MBeans.
Rule Execution Server is packaged with a specific policy file, was.policy, which overrides the server policies. The was.policy file is packaged in the META-INF directory of the jrules-res-management-WAS<version_number>.ear file.
Step 6: Deploy the Rule Execution Server Management EAR
After you have activated the security, you deploy the Rule Execution Server EAR to WAS.
You deploy the Rule Execution Server management EAR to WAS to apply the persistence type you set in a previous step and you map security users groups.
Procedure
- Open the Integrated Solutions Console.
- In the side panel, open...
-
Applications | New Application | New Enterprise Application | Local file system | archive_file | Next
- INSTALL_DIR/executionserver/applicationservers/WebSphere7/jrules-res-management-WAS7.ear
- INSTALL_DIR/executionserver/applicationservers/WebSphere8/jrules-res-management-WAS8.ear
- INSTALL_DIR/executionserver/applicationservers/WebSphere85/jrules-res-management-WAS85.ear
- Select the check box...
-
Detailed - Show all installation options and parameters
- Expand...
-
Choose to generate default bindings and mappings
Select the check box...
-
Generate Default Bindings
- Click Continue to accept the security warning.
- In Step 1, click Next to accept the default settings.
- In Step 2, proceed as follows:
- If we have only one server, skip Step 2.
- If we have more than one server, select the server to which you want to deploy the application, and then select the check box for ILOG Rule Execution Server Console and click Next.
- In Step 3 through Step 8, click Next to accept the default settings.
- Click Step 9: Map security roles to users or groups. Here you map security roles to users and groups,
as follows:
- Select the check box next to the resAdministrators role.
- Click Map Groups and click Search. The groups are shown in a column titled Available.
- Click resAdministrators under Available, and then click the arrow button to move resAdministrators to the Selected column.
- Click OK to return to the Mapping Users to Roles page.
- Repeat steps 10.a through 10.d to map the roles resDeployers and resMonitors for the other groups, making sure that only the check box next to the role that you are assigning is selected.
Role Mapped groups resAdministrators resAdministrators resDeployers resDeployers resMonitors resMonitors
- Click Next.
- On WAS 7, Step 10 provides a summary.
- On WAS 8, proceed as follows:
- Click Next.
- In Step 10 and Step
11, click Next to accept the default
settings.
Step 12 provides a summary.
- Click Finish.
- After the installation has completed, click Manage Applications at the bottom of the panel.
- Click ILOG Rule Execution Server.
- Click Manage Modules.
- Click ILOG Rule Execution Server Console.
- Under General Properties, for Class loader order, select Classes loaded with local class loader first (parent last).
- Click OK, then click Save to save directly to the master configuration.
- In the side panel, open...
-
Applications | Application Types | WebSphere enterprise applications
- In the Enterprise Applications page, select the check box next to ILOG Rule Execution Server and click Start to start the application.
Step 7: Create a Rule Execution Server database schema
We can create the Rule Execution Server database schema by running SQL scripts, either from the Rule Execution Server console or from the SQL tool of your database.
Create a database schema using the Rule Execution Server console
To create a Rule Execution Server database schema, we can run the scripts from the Rule Execution Server console and use the Installation Settings wizard if you work on Windows and other supported distributed platforms.
2.2.1.8.1.1. Installation Settings wizard overview
On Windows and distributed platforms only, we can use the Installation Settings wizard of the Rule Execution Server console to choose a database and create the schema with the necessary tables and views.
You must know the credentials of the database before you use the Installation Settings wizard.
To configure the database to store managed Java. XOM, you follow the procedure twice, with a different target database each time.
The Installation Settings wizard creates all the required tables for Rule Execution Server and for Decision Validation Services, even if we do not have a license for Decision Validation Services.
If we are using file persistence or have an existing database schema, the Installation Settings wizard does not open when you sign in to the Rule Execution Server console. To modify the database schema after the database tables are created, run the SQL scripts in the database client.
The combination of persistence settings for RuleApps and managed Java XOMs affects the way in which you use the Installation Settings wizard.
- If RuleApp persistence and Java XOM persistence are both set to file: No wizard is presented.
- If RuleApp persistence and Java XOM persistence are both set to datasource, the process is in two steps:
- When you sign in to the Rule Execution Server console, the RuleApp persistence details part of the Installation Settings wizard is displayed for you to create the schema for RuleApps and the Decision Warehouse trace.
- After you have created the schema, the Java XOMs persistence details part of the wizard is displayed for you to configure the database for Java XOM persistence.
- If RuleApp persistence is set to file and Java XOM persistence is set to datasource: You see only Java XOMs persistence details and we cannot use the Decision Warehouse.
- If RuleApp persistence is set to datasource and Java XOM persistence is set to file or is not defined: When you sign in to the Rule Execution Server console, only RuleApp persistence details is displayed for you to create the schema for RuleApps. The Java XOMs persistence details part of the wizard is not shown.
The following table summarizes the cases.
| Persistence | RuleApps | ||
|---|---|---|---|
| file | datasource or jdbc | ||
| Java XOMs | file | No Installation Settings wizard | RuleApps persistence details only |
| datasource or jdbc | Java XOMs persistence details only
No Decision Warehouse | Complete Installation Settings wizard | |
2.2.1.8.1.2. Open the Rule Execution Server console
To open the Rule Execution Server console and the Installation Settings wizard, sign in with resAdministrators rights.
Procedure
To open the Rule Execution Server console and access the Installation Settings wizard:
- Start your database, if you are using data source persistence or you set persistence to JDBC.
- Open the Rule Execution Server console
in a Web browser by typing res at the root URL on the
host machine:
- If our browser is not running on the same host as the application server, replace localhost with the address of the machine.
- If the web application is mapped to a host which is defined on a port that is different from the default of the server, change the port number to the host port number.
- Sign in to the Rule Execution Server console as the administrator.
User ID resAdmin Password resAdmin
If we are using database persistence and the database schema is empty, the Installation Settings wizard opens and we can use it to complete the installation.
2.2.1.8.1.3. Step 1: Welcome to the Installation Settings wizard
If we open the Rule Execution Server console with datasource as the persistence setting and an empty database schema, the Installation Settings wizard opens.
The wizard can display two parts:
- It starts with RuleApp persistence details if you set datasource persistence for RuleApps, whatever the persistence type for managed Java. XOMs.
- If we have set datasource persistence for both RuleApps and Java XOMs, Java XOMs persistence details is displayed after RuleApp persistence details. In this case, you go through the same steps twice.
- The wizard starts with Java XOMs persistence details if you have set the persistence type to file for RuleApps and to datasource for managed Java XOMs.
Both parts of the wizard are similar and you use them in the same way:
- Click Next after you have read the Welcome page.
- Persistence details about the type of database used. This includes information about the driver and JDBC URL.
- A brief description of the purpose of the Installation Settings wizard.
- A diagnostic report that explains why the persistence check failed (because you have not yet created the database tables).
2.2.1.8.1.4. Step 2: Choose the database schema
After you have read the Welcome page, you choose the database schema. Specific settings are available for DB2. Optionally, we can select a customized SQL script.
Procedure
To choose the database schema:
- In the Database schema selected field,
select an available database schema type.
A type that corresponds to the type of database you are using is selected by default, but we can choose another type from the drop-down list.
If we select a db2 or db2_os390 schema, an extra field displays so that we can enter the name of the buffer pool, which is used to create the Decision Warehouse tablespace. This buffer pool must have a page size of 32K. Check the DB2 documentation for information about how to create a 32K buffer pool.
The scripts for creating the Decision Warehouse database on DB2 are written for databases that use automatic storage. When you use the Installation Settings wizard, you create both the Rule Execution Server and the Decision Warehouse database, so your database must use automatic storage.
If we have not configured your DB2 database to use automatic storage, we cannot use the Rule Execution Server Console to create the Rule Execution Server tables.
- Optional: Select custom if you want to use a customized SQL script, then click Browse to select the location of the custom script.
- Click Next to review the database schema.
2.2.1.8.1.5. Step 3: Review the database schema
After you have selected a database type, you confirm the creation of a schema for Rule Execution Server. You can also use SQL drop statements that flush data from an existing table and view the SQL statements.
Before using this option, ensure that you have a backup of database resources.
Procedure
To confirm the creation of a schema:
- Select from the following options:
Option Description Create SQL schema resdbUser Select this option to run the SQL statement for the schema type selected in the previous step. Keep drop SQL statements Select this option to flush data from an existing Rule Execution Server database. Show SQL statements Select this option to display the SQL statements. - Click Execute to start the options that you have selected.
2.2.1.8.1.6. Step 4: The Installation Settings wizard report
After you have confirmed the database schema, the Installation Settings wizard creates the schema. A report shows the status of the schema creation.
Procedure
To use the options in the report:
- Click Show execution details to view the list of SQL statements executed.
- Click Finish.
If we have just worked in RuleApps persistence details and the persistence setting for managed Java. XOMs is datasource, the Java XOMs persistence details part of the wizard displays now for you to repeat the procedure.
Create the database schema by running SQL scripts
After you create an empty database, you create the schema for the Rule Execution Server database. One way of doing so consists in running SQL scripts.
The script that creates the database schema is named repository_<DatabaseName>.sql.
To use Decision Warehouse, we can also create the required database tables by running the script trace_<DatabaseName>.sql. If we are also persisting the Java. XOM in a database, create these tables by running the xomrepository_<DatabaseName>.sql script.
If we use Command Editor to run the scripts, log in with the credentials you use for the data source for Rule Execution Server.
Use any tool that can handle SQL to import and run the SQL scripts. The tools provided for each database include:
| Database | Database tool |
|---|---|
| IBM DB2 | DB2 command line processor |
| Derby | ij command line processor |
| MySQL | mysql command line processor |
| Oracle | sqlplus command line processor |
| Postgre SQL | Postgre SQL command line tool |
| SQL Server | Query Tool |
| Sybase | isql command line processor |
To access the database, the database user must be granted the following credentials:
- A user ID
- A password
- Complete privileges on the tables and view of the schema (create, insert, delete)
- Privileges for index creation (create index)
- On Oracle, additional creation privileges create trigger and create sequence.
When you use an Oracle database, run all the scripts in the SQL Plus client.
When you use DB2, the scripts that create the Rule Execution Server database tables are written for databases that use automatic storage. The following constraints apply:
- BP32K is the buffer pool that is expected in
SYSCAT.BUFFERPOOLS. If BP32K is
not there, we can use the existing buffer pool or create a new buffer
pool named BP32K. Use the following command to query SYSCAT.BUFFERPOOLS for
the existing buffer pool:
Select * from SYSCAT.BUFFERPOOLS
Otherwise, use the following command to create a buffer pool named BP32K:
CREATE BUFFERPOOL BP32K SIZE 2000 PAGESIZE 32K
CREATE TABLESPACE RESDWTS PAGESIZE 32K BUFFERPOOL BP32K;
Here is an example of the tablespace specification in the script:
CREATE TABLESPACE RESDWTS PAGESIZE 32K MANAGED BY Database USING [ FILE 'C:\DB2\Container.file' 640 ] BUFFERPOOL BP32K;
Running the Derby SQL scripts
This example shows how to run the Derby SQL script to create the schema. It is assumed that the embedded version of Derby is used.
The following example describes how to create a Derby schema.
- Stop the application server.
- Connect to the database. For example, to create and connect to the database c:/resdb as the user resdbUser,
use the command:
ij>connect 'jdbc:derby:c:/resdb;user=resdbUser;password=resdbUser;';
- Create the database schema:
- ij> run 'INSTALL_DIR/executionserver/databases/repository_derby.sql';
If the script is being run for the first time, some errors related to the drop statements might occur.
If we have installed Decision Validation Services, also create the required database schema by running the script trace_derby.sql.
- Close the ij utility:
ij> quit;
- Start the application server.
Step 8: Deploy the Rule Execution Server MBean descriptors
To configure Rule Execution Server for WAS, also deploy the MBean descriptors.
Make sure you give the application server process enough access right to read the jrules-mbean-descriptors.jar file. For example, change the permissions on the file using a chmod 777 command.
The Rule Execution Server architecture is based on the Java Management Extension (JMX) API. MBeans are Java objects used by the JMX API. To configure Rule Execution Server for WAS, deploy the MBean descriptors, either globally for all Rule Execution Server instances or for a single Rule Execution Server instance.
To deploy globally...
-
cp INSTALL_DIR/executionserver/lib/jrules-mbean-descriptors.jar WAS_HOME/lib directory.
<.ul>
- Open the Integrated Solutions Console and go to...
-
Servers | Server Types | WebSphere application servers | servername | Server Infrastructure | Java and Process Management | Process definition | Additional Properties | Java Virtual Machine
- In the Classpath field, add...
-
INSTALL_DIR/executionserver/lib/jrules-mbean-descriptors.jar
- Click OK, then Save to save the changes directly to the master configuration.
- When the XU is deployed as a global connector:
- The deployed Java. EE applications might use its third-party libraries (such as ASM) instead of the libraries deployed in the application server.
- Use a parent last setting for the XU Java EE application if your Java EE application does not support the version of the third-party libraries distributed with Decision Server. If we cannot use a parent last setting, you might need to embed the XU into the EAR that executes the rules.
- If we choose an embedded XU packaging, use a parent last setting for the code library if the third-party libraries version deployed at the level of the application-server code library are not compatible with the XU.
- Open the Integrated Solutions Console.
- In the panel, open Resources > Resource Adapters, click Resource adapters, and then click Install RAR.
- In the panel, select Local file system and
browse to the resource archive file:
INSTALL_DIR/executionserver/applicationservers/WebSphere<version_number>/jrules-res-xu-WAS<version_number>.rar
- In Scope, select the node where you want to install the XU RAR file, and then click Next.
- In the General Properties page:
- Set the name for the XU, such as RES XU Resource Adapter
- For WAS version 8.5, select Isolate this resource provider
- Click OK
- cd new XU resource adapter and click on its name.
- Under Additional Properties, click J2C connection factories and New.
- Enter the following values:
- Name: xu_cf
- JNDI name: eis/XUConnectionFactory
- Click OK and Save to save the changes to the master configuration.
- Optionally, we can define more than one XU resource adapter.
You need additional XU resource adapters when you have more than one node in your environment or you want to isolate the development environment and testing environment in one single node. We can deploy a JCA resource adapter at any level, depending on the capability of the application server. On WAS, we can install the XU resource adapter at the cell, node, cluster, or server level. But install it at the node level before we can deploy it at other levels.
For example, to define a XU resource adapter on the server level:
- In the panel, open Resources > Resource Adapters and click Resource adapters, then click Install RAR.
- Select the scope Node=xxx, Server=yyy, where xxx is the name of your node, yyy is the name of your server.
- Click New and enter the name of the XU as XU.
- In Archive Path, select ${CONNECTOR_INSTALL_ROOT}/jrules-res-xu-WAS<version_number>.rar.
- For WAS version 8.5, select Isolate this resource provider.
- Click OK.
- Repeat 5 through 9 to define the connection factory.
- Restart the server.
Whenever you install or uninstall a XU, restart your application server.
- WebSphere Application Server Version 7.0 Information Center
- WebSphere Application Server Version 8.5 Information Center
- Open the Integrated Solutions Console.
- In the side panel, click Applications > New Application and New Enterprise Application.
- In the side panel, select Local file system and
browse to the archive file, and then click Next.
INSTALL_DIR/executionserver/applicationservers/WebSphere<version_number>/jrules-res-htds-WAS<version_number>.ear
- Select the check box Detailed - Show all installation
options and parameters.
- Expand Choose to generate default bindings and mappings.
- Select the check box Generate Default Bindings.
- Click Next.
- Click Continue to accept the security warning.
- For Step 1 to Step 10,
click Next to accept the default settings.
Step 11 provides a summary.
- Click Finish.
- After the installation completes, click Save to save directly to the master configuration.
- In the side panel, open...
-
Applications | Application Types | WebSphere enterprise applications | jrules-res-htds | Manage Modules | DecisionService | General Properties | Class loader order | Classes loaded with local class loader first (parent last)
- Click OK and Save to save directly to the master configuration.
- In the side panel, open...
-
Applications | Application Types | WebSphere enterprise applications
- In the Enterprise Applications page, select the check box next to...
-
jrules-res-htds
...and click Start to start the application.
- Sign in to the Rule Execution Server console.
- Click the Explorer tab.
- Click RuleApps in the Navigator panel to display the RuleApps View.
- Click the name of the RuleApp that contains the ruleset in the RuleApps View.
- In the RuleApp View, click the relevant ruleset.
- In the Ruleset View, click Add
Property.
A New Ruleset Property form opens.
- Select the predefined property ruleset.xmlDocumentDriverPool.maxSize in the drop-down list.
- Set the required value.
- Click Add.
- Open the Integrated Solutions Console.
- Click Servers > Server Types > WebSphere application servers, and then click the server name.
- Under Container Settings, click Web container settings > Web container.
- Under Additional Properties, click Custom properties.
- Click New and then type DecodeUrlAsUTF8 as the name and False as the value.
- Click Apply and Save to save directly to the master configuration.
- Queue: JRulesIn, JRulesOut
- Topic: JRulesTopicIn, JRulesTopicOut
- Log in to the Integrated Solutions Console.
- Open Resources > JMS and click JMS Providers.
- In the panel, select the WebSphere MQ messaging provider.
- Under Additional Properties, click Queue connection factories.
- Click New.
- In Step 1: Configure basic attributes,
set the fields Name and JNDI name as
follows, then Click Next.
Name JRules Queue Connection Factory JNDI name jms/BRESQueueConnectionFactory - In Step 2: Select connection method, select Enter all the required information into this wizard and click Next.
- In Step 2.1: Supply queue connection details, type the name of your queue manager or queue sharing group, then click Next.
- In Step 2.2: Enter connection details,
type the connection details to establish a connection to the queue
manager or queue sharing group, then click Next.
The default queue port is 1414.
- In Step 3: Test connection, click Test
connection.
If our message queue is running, you see the following message:
A connection was successfully made to WebSphere MQ.
- Click Next.
A summary opens showing the details of the connection factory.
- Click Finish and then click Save to save directly to the master configuration.
- In the Integrated Solutions Console, open Resources > JMS and click Queues.
- Set the scope to either Node level or Server level, then click New.
- In the panel, select WebSphere MQ messaging provider, then click OK.
- In General Properties, set the fields Name, JNDI
name, and Queue name as follows:
Name JRules Input Queue JNDI name jms/BRESQueueIn Queue name JRulesIn - Type in the name of your queue manager or queue sharing group name, then click OK.
- Click Save to save directly to the master configuration.
- In the Integrated Solutions Console, open Resources > JMS and click Queues.
- Set the scope to either Node level or Server level, then click New.
- In the panel, select WebSphere MQ messaging provider, then click OK.
- In General Properties, set the fields Name, JNDI
name, and Queue name as follows:
Name JRules Output Queue JNDI name jms/BRESQueueOut Queue name JRulesOut - Type in the name of your queue manager or queue sharing group name, then click OK.
- Click Save to save directly to the master configuration.
- In the Integrated Solutions Console, open Resources > JMS and click Topic connection factories.
- Set the scope to either Node level or Server level, then click New.
- In the panel, select WebSphere MQ messaging provider, then click OK.
- In Step 1: Configure basic attributes set
the fields Name, and JNDI name as
follows and click Next.
Option Description Name JRules Topic Connection Factory JNDI name jms/BRESTopicConnectionFactory - In Step 2: Select connection method, select Enter all the required information into this wizard and click Next.
- In Step 2.1: Supply queue connection details, type the name of your queue manager or queue-sharing group, then click Next.
- In Step 2.2: Enter connection details, type the connection details to establish a connection to the queue manager or queue sharing group (the default queue port is 1414), then click Next.
- In Step 3: Test connection, click Test
connection.
If our message queue is running, you see the following message: A connection was successfully made to WebSphere MQ.
- Click Next. A summary opens showing the details of the connection factory.
- Click Finish, then click Save to save directly to the master configuration.
- In the Integrated Solutions Console,
open...
-
Resources | JMS | Topics
- Set the scope to either Node level or Server level, then click New.
- In the panel, select WebSphere MQ messaging provider, then click OK.
- In General Properties, set the fields Name, JNDI name, and Topic name as follows, then click OK.
Option Description Name JRules Input Topic JNDI name jms/BRESTopicIn Topic name JRulesTopicIn - Click Save to save directly to the master configuration.
- In the Integrated Solutions Console, open...
-
Resources | JMS | Topics
- Set the scope to either Node level or Server level, then click New.
- In the panel, select WebSphere MQ messaging provider, then click OK.
- In General Properties, set the fields Name, JNDI
name, and Topic name as follows
and then click OK.
Name JRules Output Topic JNDI name jms/BRESTopicOut Topic name JRulesTopicOut - Click Save to save directly to the master configuration.
- In the Integrated Solutions Console, open...
-
Resources | JMS | Activation specifications
- Set the scope to either Node level or Server level, then click New.
- In the panel, select...
-
WebSphere MQ messaging provider
...then click OK.
- In Step 1: Configure basic attributes set the fields Name, and JNDI name as follows and then click Next.
Name JRules Activation Spec JNDI name eis/IlrRuleExecutionEJB - In Step 1.1: Specify MDB destination data.
Set the field Destination JNDI name to...
-
jms/BRESQueueIn
Set the Destination type to Queue.
- Click Next.
- In Step 2: Select connection method, select...
-
Enter all the required information into this wizard
- In Step 2.1: Supply queue connection details, type the name of your queue manager or queue sharing group, then click Next.
- In Step 2.2: Enter connection details,
type the connection details to establish a connection to the queue
manager or queue sharing group, then click Next.
The default queue port is 1414.
- In Step 3: Test connection, click Test
connection.
If our message queue is running, you see the following message:
A connection was successfully made to WebSphere MQ.
- Click Next.
A summary opens showing the details of the connection factory.
- Click Finish, then click Save to save directly to the master configuration.
- In the Integrated Solutions Console, open Resources > JMS and click Activation specifications.
- Set the scope to either Node level or Server level, then click New.
- In the panel, select WebSphere MQ messaging provider, then click OK.
- In Step 1: Configure basic attributes set
the fields Name, and JNDI name as
follows, and then click Next.
Name JRules Topic Activation Spec JNDI name eis/IlrRuleExecutionTopicEJB - In Step 1.1: Specify MDB destination data set the field Destination JNDI name to jms/BRESTopicIn, set the Destination type to Topic, then click Next.
- In Step 1.2: Configure Durable Subscription, select Nondurable subscription, then click Next.
- In Step 2: Select connection method,
select...
-
Enter all the required information into this wizard
- In Step 2.1: Supply queue connection details, type the name of your queue manager or queue sharing group, then click Next.
The default queue port is 1414.
- In Step 2.2: Enter connection details, type the connection details to establish a connection to the queue manager or queue sharing group, then click Next.
- In Step 3: Test connection, click Test
connection.
If our message queue is running, you see the following message:
A connection was successfully made to WebSphere MQ.
- Click Next.
A summary opens showing the details of the connection factory.
- Click Finish, then click Save to save directly to the master configuration.
- Open the Integrated Solutions Console.
- In the panel, open...
-
Applications | New Application | New Enterprise Application
- In the panel, select Local file system and Browse to the following path:
INSTALL_DIR/executionserver/applicationservers/WebSphere<version_number>/jrules-res-mdb-WAS<version_number>.jar.
- Click Next.
- Select the check box...
-
Detailed - Show all installation options and parameters.
- Expand Choose to generate default bindings and mappings and select the check box...
Deploy to a targeted server instance
To deploy MBean descriptors:
2.2.1.10. Step 9: Deploy the XU RAR
After you have deployed the MBean descriptors, you deploy resource adapter archive (RAR) for the Execution Unit (XU) onto WAS. The RAR file contains the XU and the persistence layer.
In some cases, because of your application constraints, you might have to deploy the XU inside the application. Choose the appropriate deployment mode of the XU: either embed it into the EAR or deploy it as a global connector. Be aware of the following consequences:
Procedure
To deploy the XU RAR:
What to do next
For more information, especially for instructions about packaging a connector into an EAR or about installing additional XU resource adapters, see one of the following information centers:
2.2.1.11. Step 10: Deploy the hosted transparent decision service EAR
We can optionally deploy the EAR file for hosted transparent decision services.
You must deploy the EAR file on the same node as the execution unit (XU).
Procedure
What to do next
The hosted transparent decision service requires that set the web container custom property DecodeUrlAsUTF8 to false to support a localized ruleset path.
By default, the ruleset.xmlDocumentDriverPool.maxSize ruleset property value is set to 1. This value might cause a bottleneck if you have several clients that execute a hosted transparent decision service concurrently. Increasing the value of this property is likely to significantly increase the performance. To optimize performance, set the value according to the number of concurrent executions of the ruleset. For example, if you have five concurrent clients, 5 might be a good value.
Set this value from the Ruleset View in the Rule Execution Server console as follows:
2.2.1.12. Step 11: Set the DecodeUrlAsUTF8 custom property
The hosted transparent decision service requires that set the web container custom property DecodeUrlAsUTF8 to False to support a localized ruleset path.
Procedure
To set the DecodeUrlAsUTF8 web container custom property:
Optional configuration steps
After completing the steps to configure Rule Execution Server, we can enhance your configuration by adding support for WebSphere MQ for example, or by setting up a multiserver configuration.
Integrating WebSphere MQ in WAS to support asynchronous execution
If we use the WebSphere MQ messaging provider support in WAS, we can deploy Java. EE applications that directly use the enterprise messaging capabilities of WebSphere MQ.
WebSphere MQ integration overview
The Java. Message Service (JMS) API enables access to rule services. To use a message-driven rule bean, create the necessary resources under the WebSphere MQ JMS provider. Both the publish-and-subscribe and the point-to-point models are supported.
A Decision Server rule service can be accessed by an asynchronous invocation pattern that uses the Java Message Service (JMS) API. When a JMS message arrives, the EJB container calls a message-driven rule bean (MDB). The MDB can reside locally or remotely from the client application. In turn, the message-driven rule bean calls the rulesets that are running in the Execution Unit (XU). The real call to the rule engine is delegated to a simple rule session.
In WAS, the client application is the scenario running in WAS that calls the rule service, the server is the application server where Rule Execution Server is installed. Rule Execution Server is usually running remotely to the client application.
To use a Decision Server message-drive rule bean, create the necessary resources under the WebSphere MQ JMS provider at the proper scope for both the client and the server side to make them visible for the client application and the Decision Server MDB respectively. Decision Server implements both standards of asynchronous messaging: the Publish-and-Subscribe Model and the Point-to-Point Model. The following procedure demonstrates how to set up both a point-to-point messaging model and a publish-and-subscribe model. If we need only one of them, we can comment out the resource reference in the deployment descriptor of Decision Server MDB.
Before installation, create the following resources in WebSphere MQ:
Use these resources to submit rule execution requests and obtain execution results.
You must perform the following tasks to integrate WebSphere MQ in WAS:
Create the WebSphere MQ queue connection factory
To create the WebSphere MQ queue connection factory, you create the queue, then you configure the connection factory by following the connection factory wizard.
Procedure
To create a queue connection factory to connect WebSphere MQ with the Decision Server MDB:
Create the WebSphere MQ input queue
After you have created the WebSphere MQ queue connection factory, we can now create the JMS queue destination for receiving a request message. To do so, set the scope to node or server level, you select the provider, name the queue, and finally save the configuration.
Procedure
To create the JMS queue:
Create the WebSphere MQ output queue
After you have created the input queue for request messages, also create the JMS queue destination for sending a response message. To do so, set the scope to node or server level, select the provider, name the queue, and save.
Procedure
To create the output queue:
Create a topic connection factory
After you have created the queue factory, input queue, and output queue, create a topic connection factory. To do so, set the scope to node or server, select the provider and JNDI name, enter the connection details, test the connection, and save.
Procedure
Create the WebSphere MQ input topic
After you have created the WebSphere MQ topic connection factory, we can create the JMS topic destination for receiving a request message. To do so, set the scope to node or server level, select the provider, set the JNDI and input topic names, and save.
Procedure
Create the WebSphere MQ output topic
After you have created the WebSphere MQ topic connection factory and input topic, also create the JMS queue destination for sending a response message. To do so, set the scope to node or server level, select the provider, set the JNDI and output topic names, and save.
Procedure
To create the JMS output topic:
Create the WebSphere MQ queue activation specification
After you have configured WebSphere MQ queues, you create the queue activation specification.
The queue activation specification manages the relationship between the Decision Server message-driven rule beans (MDB) running in WAS and a destination in WebSphere MQ. To create the activation specification, set the scope to node or server level, select the provider, set the specification and JNDI names, enter the connection details, and save.
Procedure
To create the activation specification:
Create the WebSphere MQ topic activation specification
After you have created the queue activation specification, you create the topic activation specification.
The topic activation specification manages the relationship between the Decision Server message-driven rule beans (MDB) running in WAS and a destination in WebSphere MQ. To create the activation specification, set the scope to node or server level, select the provider, set the specification and JNDI names, enter the connection details, and save.
Procedure
To create the topic activation specification:
2.2.3.1.10. Installing the message-driven rule bean
After you have created the queue and topic activation specifications, you install the Decision Server message-driven rule bean (MDB) in WAS as an enterprise application. To do so, you create a new enterprise application.
Procedure
To install the Decision Server message-driven rule bean:
- Type jms/BRESTopicIn as the Destination JNDI name for IlrRuleExecutionTopicEJB.
- Type jms/BRESQueueIn as the Destination JNDI name for IlrRuleExecutionEJB.
- Click Next.
Use the default binding for the referenced resources.
Step 7 provides a summary.
-
Applications | Application Types | WebSphere enterprise applications.
-
jrules-res-mdb-WAS<version_number>.jar
...and click Start to start the application.
2.2.3.1.11. Enabling server-wide Last Participant Support
To complete the integration of WebSphere MQ, enable Last Participant Support.
To finish integrating WebSphere MQ in WAS for asynchronous execution, enable Last Participant Support (LPS) so that a single one-phase commit resource is used with any number of two-phase commit resources in the same global transaction. To do so, set the ACCEPT_HEURISTIC_HAZARD custom property to true in the Integrated Solutions Console and then restart the application server.
Procedure
To enable server-wide LPS:
- Open the Integrated Solutions Console.
- Click...
-
Servers | Server Types | WebSphere application servers | server_name | Container Settings | Container Services | Transaction Service | Additional Properties | Custom properties | New |
...and set...
- Click Apply and Save directly to the master configuration.
- Restart your application server.
Configure Rule Execution Server in different environments in a single cell
The development lifecycle of a business rule application is similar to any other software development process, including stages for implementation, testing, deployment, and maintenance. At the very least, you are likely to need an environment for your development team, one for your QA team, and another one for in-production applications. In the cases where you configure Rule Execution Server in a single cell, it is good practice to isolate the rulesets that you use on each server, and ensure that the Execution Units (XUs) do not interfere with each other.
These instructions assume that we do not configure multiple instances of Rule Execution Server in a single cell.
To set up different environments in a single cell
- Set up different data sources.
- Deploy and configure a XU for each environment.
- Deploy the Rule Execution Server console for each environment.
Procedure
To configure Rule Execution Server in different environments:
- Set up different data sources.
Use a unique JNDI name. For example:
- jdbc/resdatasourceEnv1
- jdbc/resdatasourceEnv2
- Deploy a XU for each environment and define a J2C connection factory.
- In the side panel, open...
-
Resources > Resource Adapters | J2C connection factories | name of the connection factory xu_cf
- Modify the JNDI name to...
-
eis/XUConnectionFactoryEnv1
Modify the execution components that call this XU so that they use this JNDI instead of the default.
- Under Additional Properties, click Custom properties.
- Click the plugins property.
- In the Value field, change xuName=default in the property to xuName=xuEnv1, and then click OK.
- Click the persistenceProperties property.
- In the Value field, change JNDI_NAME=jdbc/resdatasource to JNDI_NAME=jdbc/resdatasourceEnv1.
- Click OK and Save to save the changes to the master configuration.
- Repeat the same process for XUs in other environments.
- In the side panel, open...
- Deploy the Rule Execution Server console
for each environment.
- To modify the deployment descriptor of the Rule Execution Server console EAR: in the web.xml file, uncomment the JMX_XU_QUERY_PART parameter and specify xuName=xuEnv1.
- Deploy the Rule Execution Server console
EAR on the server in the resource reference settings in the application
server.
- Set the JNDI for the data source to jdbc/resdatasourceEnv1.
- Set the JNDI name for the XU to eis/ConnectionFactoryEnv1.
- Repeat the process to deploy the Rule Execution Server console for the other environments.
- Restart the node agents after you complete the configuration
- Call the XU instances to register the XU with the Rule Execution Server console.
Troubleshooting Rule Execution Server
Various paths are available for you in case of poor performance: you activate the Execution Unit (XU) log to study the execution trace, configure the XU memory profiler, explore database driver issues, or allocate more memory to applications.
- To let a scalable number of users access resources through the Java. components, JCA assigns the task of implementing connection pooling to application server vendors.
- If the diagnostics are performed before any Execution Units (XU) have been started, the test is passed and a message displays to report that no Execution Unit (XU) has been initialized.
- OnWAS, the pool size is not instantiated beforehand and therefore prevents the server diagnostics from validating a Rule Execution Server before the first execution of a rule engine. The diagnostics remain useful to validate a configuration, especially in a cluster, and to check which Execution Units registered with the management model have been started.
Activate the XU log in WAS
After you have made sure that the jdkLoggingEnabled property is set to false, we can activate the execution unit (XU) log in WAS, specify a trace, and change the trace level.
Activate the log
You activate the execution unit (XU) log in the WAS console.
The log for the Rule Execution Server console is stored in the same location as the other application server logs. The default directory is ${SERVER_LOG_ROOT}/trace.log.
Activating the log makes sense only if the jdkLoggingEnabled XU property is set to false. Its default value for WAS is true.
Procedure
To activate the log in the WAS console:
- Click Servers > WebSphere application servers.
- In the Application Servers page, click ServerName.
- Under Troubleshooting, click Change log detail levels.
- In the Configuration tab, enter com.ibm.rules.res.execution=all=enabled into the trace specification and click OK.
- Click Save to save the change to the master configuration.
Specify a trace
When you activate the XU log, we can specify the trace level.
We can specify a trace only if the jdkLoggingEnabled XU property is set to false. Its default value for WAS is true.
Procedure
To specify a trace in the WAS console:
- In the Application Servers page, click ServerName.
- Under Troubleshooting, click Change log detail levels.
- In the Configuration tab, replace *=info with *=info: com.ibm.rules.res.execution=all in the trace specification, and click OK.
- Click Save to save the change to the master configuration.
Change the trace level
When you specify a trace for the XU log, we can later change the trace level.
We can change the trace level only if the jdkLoggingEnabled XU property is set to false. Its default value for WAS is true.
Procedure
To change the trace level of the XU:
- Select Resources > Resource Adapters > XU RAR file > J2C Connection Factories > XU_CF > Custom Properties.
- Modify the traceLevel property.
The valid values are: FINE, INFO, WARNING, SEVERE, OFF.
- Save the server configuration.
- Restart the application server.
Configure the XU memory profiler
The XU memory profiler provides information about the memory usage of the Execution Unit (XU). The XU memory profiler is a Java. Agent.
When the memory profiler is enabled, performance can be poorer. Use it when memory issues have to be investigated. Do not use the memory profiler on a production server.
When the XU memory profiler is enabled, we can use it to retrieve usage information:
- In the XU Dump
If we have memory issues, enable the memory profiler before you send the XU memory dump to IBM Support.
- Using IlrRulesetUsageInformation#getEstimatedMemorySize
The method getEstimatedMemorySize gives a size estimation of the memory usage of a ruleset. We can retrieve information on how a ruleset is used from the instance of the IlrRulesetUsageInformationMonitor class.
Get the IlrRulesetUsageInformationMonitor instance in one of the following ways:
- From the XU plug-in, when the method setRulesetUsageInformationMonitor is called.
- From the XU custom ruleset cache. The IlrRulesetUsageInformationMonitor instance is passed as a parameter of the method initialize
The method getEstimatedMemorySize in IlrRulesetUsageInformation gives a size estimation of the memory usage of a ruleset. We can retrieve information on how a ruleset is used from the instance of the IlrRulesetUsageInformationMonitor class.
Get the IlrRulesetUsageInformationMonitor instance from either:
- The XU plug-in, when the method setRulesetUsageInformationMonitor in IlrDefaultPlugin is called.
- The XU custom ruleset cache. The IlrRulesetUsageInformationMonitor instance is passed as a parameter of the method initialize in IlrRulesetCache.
To configure the XU memory profiler...
- Set the XU configuration parameter rulesetUsageMonitorEnabled to true in
the ra.xml deployment descriptor file of the
XU RAR.
The XU RAR files with the default configuration properties are located in the respective WebSphere folders under INSTALL_DIR/executionserver/applicationservers. Modify the ra.xml file, and then update the RAR in the Administrative console.
- In the WAS console,
open...
-
Servers | Server Types | WebSphere application servers | servername | Server Infrastructure | Java and Process Management | Process definition | Additional Properties | Java Virtual Machine
- Add the following line to the parameter Generic JVM arguments:
-javaagent:INSTALL_DIR/executionserver/lib/jrules-res-memory-agentclient.jar
Rule Execution Server database driver issues
Lists the known database driver issues.
JDBC not bound
A JDBC not bound error message is raised when an error occurs during the creation of the data source.
Refer to the traces to locate the original cause. In the vast majority of cases one of the following is likely:
- A directory does not exist or cannot be read or written.
- There is a missing schema or table.
- There are missing privileges to access the database resource.
Provide more memory for applications
If we experience core dumps or Java. out-of-memory errors, we can make more memory available to WAS by increasing the maximum heap size for the JVM.
Procedure
To increase the WAS memory settings:
- In the WAS console, open...
-
Servers | Server Types | WebSphere application servers | Application servers panel | servername | Server Infrastructure | Java and Process Management | Process definition | Additional Properties | Java Virtual Machine
- Set the Initial heap size and Maximum heap size fields to the appropriate values.
For example, we can enter the following values:
- For a 32-bit configuration: 512 and 1024 MB respectively
- For a 64-bit configuration: 1024 and 4096 MB respectively
- Click OK, then Save to save the changes directly to the master configuration.
Verify the deployment and configuration
- To let a scalable number of users access resources through the Java components, JCA assigns the task of implementing connection pooling to application server vendors.
- If the diagnostics are performed before any Execution Units (XU) are started, the test is passed and a message reports that no Execution Unit (XU) are initialized.
- On WAS, the pool size is not instantiated beforehand and therefore prevents the server diagnostics from validating a Rule Execution Server before the first execution of a rule engine. The diagnostics remain useful to validate a configuration, especially in a cluster, and to check which Execution Units are registered with the management model.
Procedure
- Open the Rule Execution Server console
by typing res at the root URL on the host machine:
http://<machine_name>:<PORT>/res
If security is enabled, the prefix is https://.
To find the value of <PORT>:
- In the Integrated Solutions Console, click Servers > Server types > Websphere application servers.
- Select the name of your server.
- Under Communications, click Ports.
- Sign in to the Rule Execution Server console.
- Click the Diagnostics tab.
- Click Run Diagnostics.
Results
You see a report listing the diagnostic tests. A check mark is shown next to each test to indicate whether the test is successful. Click Expand All to show more details about the tests.
Configure Decision Server Events on WAS
The following sections describe how to configure Decision Server Events after installation.
You must have installed Decision Server Events and optionally Decision Center. The following components are available to you in Decision Server Events:
| Component | Description | Default installation |
|---|---|---|
| Event Capture and Replay widgets | In the Event Capture widget and the Event Replay widget, you capture events from a production system, and replay a sequence of one or more of them, typically on a test system. | Yes |
| Event Connectors | Event connectors provide data connections between the event runtime and external systems. We can configure the event connectors in Event Designer. | Yes |
| Event Designer | A development environment based on Eclipse to design, develop, test, deploy, and monitor event applications. Event Designer is available from the Event perspective in Eclipse. | Yes |
| Event Runtime | The event runtime is an execution platform that manages real-time business event coordination. The event runtime requires WebSphere eXtreme Scale and can be deployed and configured on WAS. | Yes |
| Event Tester widget | The Event Tester Widget provides a way to test the event logic in a business process. This widget is aimed at testing and is used only on a test installation. Do not use it on a production installation as it might affect the performance. | Yes |
| Integration Components | We can install integration components into the tooling of WebSphere ESB and WebSphere Message Broker to allow these products to send and receive data from Decision Server Events. | No |
| Samples and Tutorials | Installs the projects for the samples and tutorials, and provides a server profile to run the samples and tutorials on WAS. For more information about the sample server, see Use the Sample Server. | Yes |
If we install Decision Center, the following chart widgets are also available to you:
- Event Chart Manager to create and edit charts.
- Event Chart to view charts. Chart data is periodically refreshed to present a real-time view of system activities.
- Event Layout to view legacy layouts.
Decision Server Events supports three types of profiles:
| Application server profile | An application server profile defines a separate stand-alone WAS application server that has its own administrative interface and enables you to make applications available to external websites or intranet websites, depending on the applications and server configurations. This profile is ideal for single server environments. For this type of profile, we can:
|
| Management profile | A management profile creates a deployment manager, which is a server that manages operations for a logical group of other servers and is the central location for administering the servers and clusters in the cell. If we are setting up a network deployment environment, create this profile first. For this type of profile, augment only an existing WAS management profile with Decision Server Events. |
| Custom profile | A custom profile provides an empty node that does not contain an administrative console or servers. The typical use for a custom profile is to federate its node to a dmgr. After federating the node, we can use the dmgr to create a server or a cluster of servers within the node. For this type of profile, augment only an existing WAS custom profile with Decision Server Events. |
Plan your Decision Server Events environment
There are a number of factors that you might want to consider when you decide how to configure your Decision Server Events environment.
Create a Decision Server Events environment
To create a Decision Server Events environment, we can either create your own profile or we can use the sample server provided (if installed). The sample server provides a preconfigured single server Decision Server Events environment using embedded Apache Derby and WAS default messaging.
In the following procedure, you create your own profile.
- Install Decision Server Events. For more information, see Configure Decision Server Events on WAS.
- Create a WAS profile augmented with Decision Server Events.
- Access the widgets.
- Perform any additional customization to your event runtime environment.
Results
You have a running Decision Server Events environment. To verify that your environment has been configured correctly, see Verify your Decision Server Events configuration.
Choosing a Decision Server Events topology
ODM topologies
| Single Server | For simplicity and ease of deployment, you might want to configure a single server Decision Server Events environment. This topology is the simplest topology to configure and manage, but it is not highly available or scalable. |
| Clustering | To configure a highly available and scalable Decision Server Events environment, cluster the event runtime. Depending on whether you want to use WAS default messaging as your messaging provider or WebSphere MQ as the messaging provider, we can select from the following two topologies:
|
Customize the event runtime
You must consider various separate components when customizing your event runtime:
- Database: The event runtime uses a database to store runtime and configuration data. You must have a database configured for the event runtime to operate. Five database providers are supported:
- Embedded Apache Derby. The event runtime creates a database using the instance of Apache Derby that is embedded in WAS. This option does not require any additional configuration, but is not supported for use in a production environment.
- IBM Apache Derby Network Server.
- IBM DB2 Universal Database..
- Microsoft SQL Server.
- Oracle.
If we do not select embedded Apache Derby, create the database before creating your Decision Server Events profile.
- Messaging: Decision Server Events uses JMS messaging to receive events and send actions from the event runtime. Two messaging providers are supported:
- WAS default messaging.
- WebSphere MQ
To ensure that no messages are lost if the server fails, configure a durable event destination. For more information, see Configure the durable event queue. You must also configure your messaging provider to ensure that JMS messages persist and can be recovered in the event of server failure.
If our messaging provider is clustered, ensure that any persistent store is configured so that if a cluster member fails, another cluster member retrieves any persisted messages. Configuring a Decision Server Events cluster can provide high availability and scalability of JMS messaging. Clustering of the messaging separately from the event runtime, in a gold topology cluster, is not typically necessary unless the messaging is performance bottleneck for the system.
- Technology Connectors: Event connectors provide connections to and from external systems by various protocols:
- Email (POP3, SMTP)
- File System
- FTP
- HTTP
- JDBC
- JMS
- REST
- SOAP over HTTP
You configure the technology connectors in the Event Designer user interface.
The File System, HTTP, JDBC, JMS, REST, and SOAP connectors run as applications within WAS and can be deployed to a cluster for high availability and scalability.
Other technology connector protocols run as a stand-alone process and can be installed on a different computer to the event runtime. For more information, see Configure technology connectors on a separate computer. These connectors cannot be configured to be highly available or scalable.
- Steps Table: Step data is the data used to track all context information, which is used in the evaluation of event rules. By default, the event runtime stores step data in a table in the database you selected when configuring your Decision Server Events profile. Storing step data in the database provides persistence of context data in the case of server failure. Or, we can:
- Configure the event runtime to store step data in memory for higher performance, but no persistence.
- Configure the event runtime to store step data in ObjectGrid.
This Provides in-memory storage and can (if used in a clustered runtime environment) also provide failover capabilities for context data.
Configure a stand-alone Decision Server Events environment
For simplicity and ease of deployment, we can configure a single server Decision Server Events environment. This topology is the simplest topology to configure and manage, but it is not highly available or scalable.
To configure a stand-alone Decision Server Events environment, we can either:
- Create a new ODM Decision Server Events application server profile.
- Augment an existing WAS application server profile with ODM Decision Server Events.
Create a new Decision Server Events application server profile
To create a new stand-alone Decision Server Events environment, first create a ODM Decision Server Events profile. We can create a profile using pmt.sh or using manageprofiles.sh.
During profile creation, you are asked to select the database manager which hosts the tables for the event runtime. Unless you are using Apache Derby, create this database before starting profile creation. We can create a new profile as follows:
- On a 32-bit OS, we can use pmt.sh graphical user interface.
- On a 32-bit OS or any other OS, we can use manageprofiles.sh.
Create a new profile using pmt.sh
To invoke pmt.sh directly:
- On Windows only, click...
-
Start | All Programs | IBM WebSphere | Application Server | Network Deployment V8.0 | Profile Management Tool
- On multiplatforms...
-
WAS_HOME/bin/ProfileManagement
./pmt.sh
To create a new application server profile augmented with ODM Decision Server Events:
- On the Welcome page, click Launch Profile Management Tool.
- On the Profiles page, click Create.
- On the Environment Selection page, under ODM, select Application server profile augmented with ODM Decision Server Events .
- On the Profile Creation Options page, we can select one
of the following options:
- Typical profile creation: Create a profile with default WAS configuration settings.
- Advanced profile creation: Specify your own values or take default settings. For additional WAS configuration settings, see Create application server profiles information in the WAS information center
- On the Installation Location page, enter or browse for the fully-qualified location where Decision Server Events is installed.
- On the Administrative Security page, select whether to enable security on WAS. If we do enable security, both administrative and application security for WAS is turned on. Supply a new user ID and password of your choice, and enter the password a second time to confirm it.
- On the Database Configuration page,
- Select a database manager from the list and specify
the appropriate connection details. This database manager hosts the
tables for the event runtime.
If we select embedded Apache Derby, the repository database is created for you. In all other cases, have already created the database for the repository.
- If we did not select embedded Apache Derby,
provide connection details including the fully-qualified location
and name of the JDBC driver JAR file for your chosen database manager.
Enter the following details for the database server:
Database name Name of the database that hosts the Decision Server Events event runtime tables. Database server host name or IP address Name of the computer where the database server is located. The default is localhost. Database TCP/IP service port or listener port Connection port number for the database manager. Fully-qualified location and name of the JDBC driver file Enter the file name and location. User name User name that is used by Decision Server Events to connect to the database server. This user name must have administrative privileges. Password Password associated with the user name. Confirm the password. - Validate the connection to the database
-
Test Connection
- Select a database manager from the list and specify
the appropriate connection details. This database manager hosts the
tables for the event runtime.
- On the Messaging Provider Configuration page, select one
of:
WAS default messaging Decision Server Events is configured to use the default messaging provider that is embedded in WAS as the JMS provider. WebSphere MQ JMS messaging Supply the WebSphere MQ related information and Decision Server Events is configured to use WebSphere MQ as the JMS provider. Do not configure a messaging provider No messaging provider is configured during profile creation. You must configure a single JMS provider before starting Decision Server Events. After profile creation has completed, we can change JMS providers, or configure the JMS provider of your choice, but configure a single JMS provider before starting Decision Server Events.
To use, or to switch to, WAS default messaging as the JMS provider, see Configure WAS default messaging to be the JMS provider
To use, or to switch to, WebSphere MQ as the JMS provider, see Configure WebSphere MQ to be the JMS provider
- On the Profile Creation Summary page, review the information and click Create to create the new profile.
Results
A new application server profile augmented with ODM Decision Server Events is created.
Create a new profile using manageprofiles.sh
-
cd was_install_dir/bin
manageprofiles.sh
Parameters...
| -create | To create the new profile. |
| -templatePath <template_path> | Location of the profile template. Provide a value for the application server profile of was_install_dir/profileTemplates/wbe/default. |
Optional parameters:
| -wbeHome installation location | Fully-qualified path that is the installation location for Decision Server Events. Specify if you have installed Decision Server Events in a nondefault location. |
| -profileName profile_name | Name of the profile. |
| -cellName cell_name | Name of the cell that is created. |
| -nodeName node_name | Name of the node that is created. |
| -hostName host_name | Host name of the computer hosting the profile. |
| -serverName server_name | wServer name that is created. |
| -enableAdminSecurity true|false | true turns on WAS administrative security. If provided, also provide -adminUserName and -adminPassword. Default is false. |
| -adminUserName username | User ID that is used to access WAS. Only required if enableAdminSecurity is enabled. |
| -adminPassword password | Password for the user ID that is used to access WAS. Only required if enableAdminSecurity is enabled. |
| -wbeDbType database_type | Database
product. Valid values are:
|
| -wbeDbName database_name | Database. Required unless -wbeDbType is Derby_Embedded. |
| -wbeDbUserId database_user_name | User ID that is used to access the database server. Required unless -wbeDbType is Derby_Embedded. |
| -wbeDbPassword password | Password for the user ID that is used to access the database server. Required unless -wbeDbType is Derby_Embedded. |
| -wbeDbJDBCClasspath database_jdbc_classpath | Path to the JDBC class path files. Required unless -wbeDbType is Derby_Embedded. |
| -wbeDbHostName host_name | Host name for the database server. Required unless -wbeDbType is Derby_Embedded. |
| -wbeDbServerPort port_number | Port where the TCP/IP service is assigned or the port on which the database is listening. Required unless -wbeDbType is Derby_Embedded. |
| -wbeMsgingType messaging_type | Which JMS provider is to be configured. Valid values are:
|
| -wbeMqMsgingQmgrName queue_manager_name | WebSphere MQ queue manager name. Required only if -wbeMsgingType is MQ_JMS_Messaging. |
| -wbeMqMsgingQmgrHostName host_name | Host name of the WebSphere MQ queue manager. Required only if -wbeMsgingType is MQ_JMS_Messaging. |
| -wbeMqMsgingQmgrPort port_number | Port on which the WebSphere MQ queue manager is listening. Required only if -wbeMsgingType is MQ_JMS_Messaging. |
| -wbeMqMsgingTransType transport_type | WebSphere MQ client transport type, either BINDINGS or CLIENT. Required only if -wbeMsgingType is MQ_JMS_Messaging. |
| -enableTester true|false | true installs and configures the Event Tester runtime. Default is false. Only applicable for the application server profile and cannot be used in a production environment. |
| -disableBusSecurity | Disable bus security for the service integration bus, WbeBus, when the bus is created. |
Examples
Create a new application server profile using embedded Apache Derby and WAS default messaging.manageprofiles.sh -create -templatePath "/opt/ibm/ODM801/ODM/WAS/profileTemplates/wbe/default"
Augment an existing WAS application server profile with Decision Server Events
To create a new stand-alone Decision Server Events environment from an existing WAS stand-alone environment, augment a WAS application server profile with ODM Decision Server Events. We can augment a profile using pmt.sh or using manageprofiles.sh.
Before augmenting an existing WAS application server profile, ensure that all application servers in the profile are stopped.
During profile creation, you are asked to select the database manager which hosts the tables for the event runtime Unless you are using Apache Derby, create this database before starting profile creation. We can augment an existing profile as follows:
- On a 32-bit OS, we can use pmt.sh graphical user interface.
- On a 32-bit OS or any other OS, we can use manageprofiles.sh.
Augmenting an existing application server profile using pmt.sh
To invoke Profile Management Tool directly:
- On Windows only, click...
-
Start | All Programs | IBM WebSphere | IBM WebSphere Application Server Network Deployment V8.0 | Tools | Profile Management Tool
- On multiplatforms...
-
cd WAS_HOME/bin/ProfileManagement
./pmt,.sh
To augment an existing application server profile with ODM Decision Server Events:
- On the Welcome page, select Profile Management Tool, then click Launch Selected Tool.
- On the Profiles page, highlight an existing application server profile and click Augment.
- On the Augment Selection page, select Application server profile augmented with ODM Decision Server Events.
- On the Installation Location page, enter or browse for the fully-qualified location where Decision Server Events is installed or accept the default location if correct.
- On the Database Configuration page,
- Select a database manager from the list and specify
the appropriate connection details. This database manager hosts the
tables for the event runtime.
If we select embedded Apache Derby, the repository database is created for you. In all other cases, have already created the database for the repository.
- If we did not select embedded Apache Derby,
provide connection details including the fully-qualified location
and name of the JDBC driver JAR file for your chosen database manager. Enter the following details for the database server:
- Database name: The name of the database that hosts the Decision Server Events event runtime tables.
- Database server host name or IP address: The name of the computer where the database server is located. The default is localhost.
- Database TCP/IP service port or listener port: The connection port number for the database manager.
- Fully-qualified location and name of the JDBC driver file: Enter the file name and location.
- User name: The user name that is used by Decision Server Events to connect to the database server. This user name must have administrative privileges.
- Password: The password associated with the user name. Confirm the password.
- Click Test Connection to validate the connection to the database. Ensure that the connection is successful before proceeding with profile creation.
- Select a database manager from the list and specify
the appropriate connection details. This database manager hosts the
tables for the event runtime.
- On the Messaging Provider Configuration page, select one
of:
- WAS default messaging. Decision Server Events is configured to use the default messaging provider that is embedded in WAS as the JMS provider.
- WebSphere MQ JMS messaging. Supply the WebSphere MQ related information and Decision Server Events is configured to use WebSphere MQ as the JMS provider.
- Do not configure a messaging provider. No messaging provider is configured during profile creation. You must configure a single JMS provider before starting Decision Server Events.
After profile augmentation has completed, we can change JMS providers, or configure the JMS provider of your choice, but configure a single JMS provider before starting Decision Server Events.
To use, or to switch to, WAS default messaging as the JMS provider, see Configure WAS default messaging to be the JMS provider
To use, or to switch to, WebSphere MQ as the JMS provider, see Configure WebSphere MQ to be the JMS provider
- If WAS administrative security is turned on in the profile, the Security Configuration page is displayed. Enter the user ID and password for your application server
- On the Profile Augmentation Summary page, review the information and click Augment to augment the profile.
Results
The existing application server profile is augmented with ODM Decision Server Events.
Augmenting an existing application server profile using manageprofiles.sh
-
cd was_install_dir/bin
manageprofiles.shParameters...
-augment To augment the existing profile. -templatePath <template_path> Location of the profile template. Provide the following value for the application server profile: was_install_dir/profileTemplates/wbe/default. -profileName profile_name Name of the existing application server profile that you are augmenting. Optional parameters:
-wbeHome installation location Fully-qualified path that is the installation location for Decision Server Events. Specify if you have installed Decision Server Events in a nondefault location. -hostName host_name Host name of the computer hosting the profile. -adminUserName username User ID that is used to access WAS. Only required if WAS administrative security is turned on. -adminPassword password Password for the user ID that is used to access WAS. Only required if WAS administrative security is turned on. -wbeDbType database_type Database product. Valid values are: - Derby_Embedded: the default for the application server profile
- DB2_Universal
- Derby_NetworkServer
- Oracle
- MS_SQL_Server
-wbeDbName database_name Database. Required unless -wbeDbType is Derby_Embedded. -wbeDbUserId database_user_name User ID that is used to access the database server. Required unless -wbeDbType is Derby_Embedded. -wbeDbPassword password Password for the user ID that is used to access the database server. Required unless -wbeDbType is Derby_Embedded. -wbeDbJDBCClasspath database_jdbc_classpath Path to the JDBC class path files. Required unless -wbeDbType is Derby_Embedded. -wbeDbHostName host_name Host name for the database server. Required unless -wbeDbType is Derby_Embedded. -wbeDbServerPort port_number Port where the TCP/IP service is assigned or the port on which the database is listening. Required unless -wbeDbType is Derby_Embedded. -wbeMsgingType messaging_type Which JMS provider is to be configured. Valid values are: - Default_Messaging: Decision Server Events is configured to use WAS default messaging. Default
- MQ_JMS_Messaging: Decision Server Events is configured to useWebSphere MQ
- No_Messaging: No JMS provider is configured. Configure a JMS provider manually.
-wbeMqMsgingQmgrName queue_manager_name WebSphere MQ queue manager name. Required only if -wbeMsgingType is MQ_JMS_Messaging. -wbeMqMsgingQmgrHostName host_name Host name of the WebSphere MQ queue manager. Required only if -wbeMsgingType is MQ_JMS_Messaging. -wbeMqMsgingQmgrPort port_number Port on which the WebSphere MQ queue manager is listening. Required only if -wbeMsgingType is MQ_JMS_Messaging. -wbeMqMsgingTransType transport_type WebSphere MQ client transport type, either BINDINGS or CLIENT. Required only if -wbeMsgingType is MQ_JMS_Messaging. -enableTester true|false Install the Event Tester runtime. Default is false. This parameter is only applicable for the application server profile and cannot be used in a production environment. -disableBusSecurity Disable bus security for the service integration bus, WbeBus, when the bus is created. Examples
Augment an existing application server profile called AppSrv01 using embedded Apache Derby and WAS default messaging.manageprofiles.sh -augment -templatePath "/opt/ibm/ODM801/ODM/WAS/profileTemplates/wbe/default" -profileName AppSrv01
Unaugment an existing application server profile using manageprofiles.sh
To undo the augmentation of an existing profile using manageprofiles.sh:
- cd was_install_dir/bin
- manageprofiles.sh using the following parameters:
-unaugment To unaugment the existing profile. -templatePath <template_path> Location of the profile template. Provide the following value for the application server profile: was_install_dir/profileTemplates/wbe/default. -profileName profile_name Name of the existing application server profile that you are unaugmenting.
Examples
Unaugments an existing Decision Server Events application server profile called WODMSrv01 on Linux and UNIX.
manageprofiles.sh -unaugment
                  -templatePath "/opt/ibm/ODM801/ODM/WAS/profileTemplates/wbe/default"
                  -profileName WODMSrv01
Customize the event runtime environment
Before starting the event runtime for the first time, you might want to make configuration changes to some of the components in the runtime environment.
Configure the event runtime database for Decision Server Events
The event runtime requires the use of a database. There are various configuration tasks that you might need to do to the database, depending on your environment.
The configuration tasks in this section refer to configuring the event runtime database.
Create the event runtime database
Decision Server Events requires a database for the event runtime. This event runtime is the shared, secured location that contains assets such as data connections, business objects, events, and actions.
The configuration tasks in this topic refer to configuring the event runtime database for distributed platforms.
If we want to use the Apache Derby database that is embedded in WAS as the event runtime database, the database (called event runtime) and tables are created and configured for you during the installation process. To use another supported database manager (including another installation of Apache Derby), create the event runtime database before you start the installer.
Apache Derby is not supported in a production environment.
To use a remote DB2 database as the database for the event runtime, install the supplied DB2 Client Support.
- Start the DB2 installer wizard.
- Select Custom Installation
- Select the Client support feature and clear all the other features.
- Complete the installation.
The full list of supported database managers is available on the web at System requirements.
Procedure
When you create the event runtime database, record the following information:
- Event runtime database name of your choice
- Host name of the server where the database is located
- Port used to access the database
- Database user ID to be used to access the database
- Password associated with the database user ID
This information is used when configuring the event runtime database.
- To install, have full administrative privileges for the event runtime database.
For example, for DB2, be authorized to CONNECT, CREATETAB, and so on. For Oracle have authority to ALTER DATABASE, CREATE ANY TABLE, and so on. These full administrative privileges are only required to install Decision Server Events, not to use it. If we do not have full administrative privileges, we can still install if your Database Administrator (DBA) creates the event runtime tables in the database using the manual instructions before you run the installer. After installation, you only need read, write, and delete access as a user.
- For all database managers except embedded Apache Derby: the database manager must be running before the installation starts and have available the JDBC .jar file for the database manager.
Manually creating event runtime tables
We can opt to tailor existing scripts and create the event runtime tables yourself, as a manual task. If we do not create these tables, they are automatically created for you during the startup of Decision Server Events.
The configuration tasks in this topic refer to configuring the event runtime database for distributed platforms.
Before you create the event runtime tables, ensure that you have created the event runtime database.
Decision Server Events supplies a copy of the scripts used to create the event runtime tables, in...
-
INSTALL_DIR/config/db
The scripts are database dependant, one script for each supported database:
- For DB2, use db2.sql
- For Apache Derby, use derbydb.sql
- For Oracle, use ora.sql
- For Microsoft SQL Server, use mssql2k.sql
Procedure
Take a copy of the appropriate script, tailor it to meet your requirements, and use it to create the tables.
You must take a copy of the script and execute it manually. Even if you edit and save the script that is in...
-
INSTALL_DIR/config/db
...it is not used to create the event runtime tables.
Deploying tables in separate databases
By default, the event runtime tables are created in a single database, but we can deploy sets of tables in separate databases.
The event runtime database stores assets (such as data connections, business objects, events, actions, and event rules) that are used by the event runtime to receive events and initiate the actions based on event rule groups.
The event runtime consists of several sets of tables and a number of views, which can be used to report on history. They are built by running a database manager-specific script. At installation time, you specify a single database and by default, all tables, and views are located in that database. The tables are created in this database at installation time.
To deploy sets of tables in separate databases and reference those databases:
Procedure
- Create a database to hold the tables.
- Use the appropriate CREATE statements with the
SQL tool for your database manager and create the tables.
The table shows the SQL statements to create separate databases. Only partial statements are shown. For the complete syntax, see the documentation supplied with your chosen database manager.
If we are using history, always ensure that the history and asset definition tables, and the resources, are created and used in the same database.
SQL statements to create each table... Table name SQL statement Asset definitions (maestro_asset, properties) CREATE TABLE maestro_asset ALTER TABLE maestro_asset
CREATE TABLE properties
CREATE TABLE labels
ALTER TABLE labels
Time delays CREATE TABLE time_based_asset CREATE INDEX FIRETIME_IDX
Event Flows CREATE TABLE steps CREATE CLUSTERED INDEX STREAM_IDX
CREATE TABLE csio_entry
CREATE INDEX csio_entry_idx on csio_entry
CREATE INDEX csio_entry_times
User Console CREATE TABLE actions ALTER TABLE actions
CREATE TABLE actions_prefs
ALTER TABLE actions_prefs
CREATE TABLE auth_users
CREATE TABLE auth_groups
History CREATE TABLE history_event CREATE INDEX history_e_idx
CREATE TABLE history_action
CREATE INDEX history_a_idx
CREATE TABLE history_ent_obj
CREATE INDEX history_eo_idx
CREATE TABLE history_ent_obj_values
CREATE INDEX history_eo_v_idx
CREATE TABLE history_filter
CREATE TABLE history_rule
CREATE INDEX history_rule_idx
CREATE TABLE history_watch_time
CREATE VIEW as_director_events
CREATE VIEW as_director_actions
CREATE VIEW as_director_ent_objs
CREATE VIEW as_director_ent_objs_values
CREATE VIEW as_director_filters
CREATE VIEW as_director_rules
CREATE VIEW as_director_watch_times
- Create a new datasource using WAS administrative
console:
- Click JDBC > Data sources.
- Ensure that the scope is the same as the event runtime datasource and click New.
- Enter a name in the Datasource Name field, for example, Event Runtime History Datasource.
- Enter a name in the JNDI Name field, for example, jdbc/wbe/history.
- Click Select an existing JDBC provider and select Event Runtime JDBC Provider.
- Enter the database-specific properties that point to the database where the tables were created in step 2.
- Select an authentication alias, or create a new one with credentials for the database, then click Finish.
- Set the following properties to the value that you specified
in JNDI Name, depending on which tables you have moved:
Properties Table name Property Asset definitions as.director.common.db.asset.instance Time delays as.director.common.db.timebased.instance Event Flows as.director.common.db.eventflow.instance User Console as.director.connectors.pem.instance History as.director.common.db.history.instance For more information, see .
Deploying the event runtime in a case-sensitive database manager
If we are using a case-sensitive database manager, event runtime table names must be changed to be all in uppercase.
If the event runtime database is created in a case-sensitive database, references to table names that are defined as properties must be changed to be all in uppercase.
Procedure
Results
The changes are applied the next time the wberuntimeear application is restarted.
Edit the setenv files
As part of the configuration steps to complete your installation, edit...
-
component_dir/config/setenv.sh
When you install a product fix pack after editing the setenv files, the setenv files are overwritten. If we want to keep your changes, create backups of the files before installing the fix pack.
Procedure
- Change to the component_dir/config/was directory, and edit the setenv file, to add the appropriate values for the WAS instance on which ODM is going to run. Ask your WAS administrator for these values.
- cd component_dir/config/db
- Edit the setenv file to add the appropriate values for the DB2 instance that is going to host the event runtime. Ask your DB2 database administrator for these values.
- Edit...
-
component_dir/config/wbe/setenv
and set WBE_INSTALL to point to the ODM product installation in the read-only file system. For example:
- WBE_INSTALL=INSTALL_DIR
Change the event runtime messaging provider
If we have configured your event runtime to use one messaging provider but you want to change to another messaging provider, or if you chose not to configure a messaging provider when creating or augmenting your Decision Server Events profile, do some additional configuration.
Configure WAS default messaging to be the JMS provider
To use WAS default messaging as the JMS provider for the event runtime, and you either did not select the JMS provider or you selected WebSphere MQ when you created or augmented the Decision Server Events profile, do some additional configuration of WAS and Decision Server Events.
The event runtime can be configured to work with only one JMS provider: either the WAS default messaging or WebSphere MQ, but not both.
The .sh and .bat files referenced in this topic rely on settings in the setenv file. Check and confirm your settings before doing the following steps.
Procedure
- If, when you created or augmented the Decision Server Events profile, you chose to use WebSphere MQ but now you want to use WAS default messaging as the JMS provider instead, remove the configuration that was done by the profile:
Command to remove the configuration Operating system Location in which run the command Commands Windows INSTALL_DIR\config\was\ configure_MQ_JMS_Messaging.bat -undo Linux and UNIX INSTALL_DIR/config/was/ configure_MQ_JMS_Messaging.sh -undo If, when you created or augmented the Decision Server Events profile, you did not select the JMS provider, we do not need to do this step.
- To complete configuration of WAS default
messaging as the JMS provider, run the following commands:
Command to complete the configuration Operating system Location in which run the command Commands Windows INSTALL_DIR\config\was\ configure_bus.bat
configure_messaging.batLinux and UNIX INSTALL_DIR/config/was/ configure_bus.sh
configure_messaging.shThe configure_bus.sh script configures the service integration bus, WbeBus. If application server administrative security is enabled, the bus is secured. To disable bus security, supply the optional argument, -disableBusSecurity.
If the service integration bus is secured, specify two arguments for the configure_messaging.bat (or configure_messaging.sh) script, to supply the user ID and password that the activation specifications use to connect to the secured bus. For example:
- configure_messaging.bat <user_id> <password>
...or...
- configure_messaging.sh <user_id> <password>
If security is not enabled for the service integration bus, do not specify a user ID or password.
- Restart WAS.
Configure WebSphere MQ to be the JMS provider
To use WebSphere MQ as the JMS provider for the event runtime, and you either did not select the JMS provider or you selected WAS default messaging when you created or augmented the Decision Server Events profile, do some additional configuration of WebSphere MQ, WAS, and Decision Server Events.
The event runtime can be configured to work with only one JMS provider: either the WAS default messaging or WebSphere MQ, but not both.
You must have the WebSphere MQ client installed on the same computer as Decision Server Events.
- Create the queue manager, using the crtmqm command.
- Start the queue manager, using the strmqm command.
- If we are using WebSphere MQ V6, start the Publish/Subscribe Engine of the queue manager, using the strmqbrk command.
- If we are using WebSphere MQ V7.1, publish/subscribe must be enabled. Use the ALTER QMGR for this queue manager.
- Create the queues required, by running:
runmqsc
queue-manager-name < mq-install-dir\java\bin\MQJMS_PSQ.mqsc
where mq-install-dir is the installation location of WebSphere MQ. - If we are configuring a cluster, create the extra queues required, by running:
- runmqsc queue-manager-name < INSTALL_DIR\config\was\create_MQ_JMS_MQ_queues.mqsc
Configure Decision Server Events to use WebSphere MQ
If, when you created or augmented the Decision Server Events profile, you chose to use WAS default messaging but now you want to use WebSphere MQ as the JMS provider instead, execute the procedure below.The configure_messaging and configure_MQ_JMS_messaging files referenced in this topic rely on settings in the setenv file.
- Determine values for the following WebSphere MQ settings...
- Know the appropriate queue manager name
- The WebSphere MQ host name and port
- Client transport type
- Remove the messaging configuration that was done by the profile:
-
INSTALL_DIR/config/was/configure_messaging.sh -undo
If, when you created or augmented the Decision Server Events profile, you did not select the JMS provider, we do not need to do this step.
- Configure Decision Server Events and WAS:
- cd INSTALL_DIR/config/was
configure_MQ_JMS_messaging -q queue-manager-name
[-p queue-manager-port]
[-h queue-manager-host]
[-s scope]
[-t transport]
[-c channel-name]
...where...
queue-manager-name is the name of the queue manager that you created when configuring your installation of WebSphere MQ queue-manager-port is the port on which the queue manager is listening (the default value is 1414) queue-manager-host is the host name of the computer on which the queue manager is hosted (the default value is localhost) scope is a valid WAS scope transport is BINDINGS or CLIENT channel-name is the name of the server connection channel For example:
-
configure_MQ_JMS_messaging -q QM_PSG -p 1415 -h localhost
The script creates the following objects in WAS:
Connection factories... Connection factories JNDI name Queue connection factory jms/WbeQueueConnectionFactory Topic connection factory jms/WbeTopicConnectionFactory Connection factory jms/WbeConnectionFactory Topics... Topics JNDI name Action topic jms/actionTopic Command topic jms/commandTopic CbeListener topic jms/WBE/CbeListener Durable action topic jms/durableActionTopic Durable event topic jms/durableEventDestination Event topic jms/eventDestination History topic jms/historyModuleDestination Activation specifications... Activation specification name JNDI name wbe_events jca/wbe_events wbe_events_durable jca/wbe_events_durable wbe_history jca/wbe_history wbe_reset_watch jca/wbe_reset_watch wbe_ute_receive jca/wbe_ute_receive - Ensure that the names of these objects are consistent with the corresponding properties.
If we are using Properties, these properties are in the JMS Server Settings and the Topics subsections of the JMS section.
- Restart WAS to apply the changes.
- cd INSTALL_DIR/config/was
configure_MQ_JMS_messaging -q queue-manager-name
[-p queue-manager-port]
[-h queue-manager-host]
[-s scope]
[-t transport]
[-c channel-name]
Decision Server Events is now configured to use WebSphere MQ as the JMS messaging provider.
Make sure that the queue names created by create_MQ_JMS_MQ_queues.mqsc are consistent with the queue names that are specified by your WebSphere MQ JMS event destination, durable event destination, and history module destination queue definitions. These queue definitions can be found in the WAS administrative console under Resources > JMS > Queues.
Although the names of these resources reference topics, these resources are actually queues for clusters.
By default, the WebSphere MQ queues are called:
- eventQueue for the event destination
- durableEventQueue for the durable event destination
- historyModuleQueue for the history module destination
Set properties
Configuration properties for the event runtime are stored in WAS. You might want to change properties because they determine the configurable behaviour of Decision Server Events. There are three ways to set event runtime properties. We can use different tasks depending on the platform that you are using.
| Method | Platforms |
|---|---|
| Configure properties using the WAS administrative console | Multiplatforms and z/OS |
| Configure properties using wsadmin.sh | Multiplatforms and z/OS |
| Configure properties using the Properties tool | Multiplatforms only |
Configure properties using the WAS administrative console
When you configure event runtime properties (for example, if you move the event runtime to a different database manager, or you want to change to a different JMS messaging provider), we can make the changes in WAS administrative console. When you edit the value of a property, ensure that the value is appropriate and spelled correctly because it is not validated.
Procedure
- Start the WAS administrative console.
- Log in to the WAS administrative console. If authentication is enabled, use a valid user ID and password. If authentication is not enabled, type any user ID and log in.
- In the navigation tree of the WAS administrative console, click Resources > Resource Environment > Resource environment entries.
- On the Resource environment entries page, click WbeSrv01 to open the Configuration page. The general properties for that entry are displayed.
- On the Configuration page, click Custom properties. The properties are listed.
- Modify the properties as required.
If the property name is prefixed by ! (for example !as.director.common.authentication.server), the property is disabled. Edit the name field to remove the "!", then set the remaining fields.
- Save your changes.
- Restart the event runtime to apply your changes.
Results
When the event runtime restarts, the changes you made to the properties are applied.
Configure properties using wsadmin.sh
When you configure event runtime properties (for example, if you move the event runtime to a different database manager, or you want to change to a different JMS messaging provider), we can make the changes using the WAS administrative scripting tool, wsadmin. We can modify the properties using wsadmin, or we can use the supplied AdminTask object to set a single property.
To modify multiple properties, use the wsadmin tool. To modify a single property, use the AdminTask object as follows:
Procedure
- Start wsadmin.
- Set a single property:
- Use Jacl:
wsadmin
 $AdminTask wbeSetProperty {-jndiName com/ibm/wbe/wbeProperties01
 -propertyName propertyName
 -propertyValue propertyValue}
- Use Jacl:
- Use Jython:
wsadmin -lang jython
 AdminTask.wbeSetProperty('[-jndiName com/ibm/wbe/wbeProperties01
 -propertyName propertyName
 -propertyValue propertyValue]')
Where propertyName is the name of the property you want to change, and propertyValue is the value that you want to set for that property.
- Save your changes:
- Use Jacl:
$AdminConfig save
- Use Jacl:
- Use Jython:
AdminConfig.save()
- Restart the event runtime to apply your changes.
Results
When the event runtime restarts, the changes you made to the properties are applied.
Configure properties using the Properties tool
Settings for system properties are stored in an encrypted properties file. The file is managed through the use of the Properties tool or the WAS administrative console. When using the Properties tool, properties are displayed by folder, and most folders contain subsections that consist of groups of related properties.
During installation, a base properties file is installed and configured to reference the event runtime database and JMS provider. We can use the Properties tool to change property settings to accommodate your environment and preferences for system operation. There is no validation of the property that you have set. By default, a field holding a property values has a length of 64 characters. When you reach the limit, press ENTER and click to the end of the field to reset the focus. Properties then gives you up to five lines of 72 characters (by repeatedly pressing ENTER). Therefore, the maximum usable length is 360 characters.
Properties provides two entry modes:
- The Configurator wizard, which is the default entry mode, presents a series of screens containing only those properties you are most likely to want to edit.
- The Full Configurator presents all properties and is appropriate for more customized installations. We can also add custom properties to describe certain environment-specific conditions
Newly-configured property settings do not become operational until the next time you start the wberuntimeear application. We can make additional changes to property settings as required. Apply those changes by stopping this application and restarting it.
Procedure
- Start Properties by invoking the properties script (propertiesui.bat on Windows, propertiesui.sh on Linux and UNIX).
The syntax is :
propertiesui.bat/propertiesui.sh

[-conntype
SOAP [-host host_name] [-port port_number] |
RMI [-host host_name] [-port port_number] |
NONE]

[-jndiName jndi_name]
Where conntype specifies the type of connection to be used, the default value being "SOAP"
A conntype of "NONE" means that no server connection is made and certain operations are performed in local mode
host specifies the name of the host used for the SOAP or RMI connection, the default value being "localhost"
port is the number of the port used for the SOAP or RMI connection
jndiName is the JNDI name that is in the entry for event runtime properties, as shown under the Resource environment entries section of the WAS administrative console.
- Enter a user ID and password:
- If security is enabled on WAS, enter a valid user ID and password.
- If the user specified is not an Administrator, the user must
have one of the following security roles:
- adminsecuritymanager
- deployer
- configurator
- If security is disabled on WAS, we can enter a user ID of your choice or leave the field blank. A password is not required.
- Modify the existing properties as required.
- To add a custom property:
- Select Full Configurator
- Click Edit > Add a Custom Property
- Click A new property and change it to the name of the custom property.
- Click value? and enter the value of the custom property.
- To remove a custom property, right-click the property name and click Delete Custom Property. The property is deleted without confirmation.
- Click File > Save Properties to save your changes.
- Restart the event runtime to apply your changes.
Results
When the event runtime restarts, the changes you made to the properties are applied.
Configure the event runtime to record history
To record history, configure the event runtime to record history. Otherwise, we cannot monitor events, actions, filters, or data in real time through user-defined charts, nor can you run reports or use track events. Recording history preserves the delivery of real-time history records across system restarts.
We can set the event runtime history to be persistent, or non-persistent. By default, the history is non-persistent. Non-persistent history messages that are currently being processed but have not yet been written to the history database might be lost when the event runtime restarts. To ensure that all history data is preserved when the event runtime is restarted, enable persistent history by setting history properties.
You must configure the event runtime to record history if you are planning to:
- Use the event widgets to monitor events, actions, filters, and data in real time, either using the Event Tester widget or through visualization of user-defined charts.
- Run reports from Administration.
- Use track events to count the number of events or keep running totals for thresholds and alerts.
History is stored in a set of history tables that were created when you installed Decision Server Events.
If we enable persistent history, there is a significant performance impact.
Procedure
- Edit the following properties:
- as.director.server.history.enableModule - Determines whether the history module is loaded when the event runtime starts. Ensure that the property value is set to true.
- as.director.server.history.enableRecording - Determines whether history is recorded in the history tables. Set the property value to true to record history. Set this value to false to stop recording history.
- as.director.server.history.useJMS - Determines whether history messages that are being processed but have not been written to the history database are non-persistent or persistent. Set this value to true to ensure that all history data is preserved when the event runtime is restarted. Setting this property to true has a significant impact on performance.
- as.director.bet.install - Set the value to true if the Event Tester widget is installed. This setting ensures that all history records required by the tester widget are captured. This property overrides the Record this data in history option, which we can set in the Event Designer editors.
Properties are displayed in the History Settings subsection of the Server section.
- You must restart the wberuntimeear application, using the WAS Network Deployment administrative console, to ensure that changes to the properties are in effect.
- Optional: In the Event Designer Action Editor, Event Editor, Filter Editor and Rule Editor, the Record this data in History option is selected by default. To increase product performance and reduce unused history data, we can clear this option in one or all of the editors. However, if you clear the Record this data in History setting in the editors, but the as.director.bet.install property is set to true, then the property setting overrides the editor setting, and history is recorded.
Configure the durable event queue
Decision Server Events uses a file system based event queue to ensure that durable events are not lost if a server fails.
The default location for this property is was_install_dir/profiles/profileName /wbe/nodeName/serverName/queue_data where
- profileName is the name of your WAS profile.
- nodeName is the name of the WAS node.
- serverName is the name of the WAS server.
The location of the durable event queue can be changed using the following property:
as.director.server.durabledirectory
If we experience disk contention, you might want to change the location of this queue to move it to a faster disk subsystem. If we are using Decision Server Events in a cluster, ensure that each cluster member has access to the path you specify. For example, if you change the location to be a path on the E: drive every server needs access to the E: drive.
In a clustered environment, events that were stored in this queue are not failed over to other servers in the cluster. These events are only processed when the server they were being processed on is started again.
Configure the log size of the durable event queue
To change the size of the durable event queue log, use the following property:
| Property name | Default | Units |
| as.director.server.DurableEventQueue.size | 20 | MB |
The default durable event queue log size of 20 MB is suitable for most workloads. However, if you see com.ibm.wbe.objectManager.TransactionCapacityExceededException in your SystemOut.log file then you might benefit from increasing the default size for this property.
For details of how to set this
property, see .
The evaluation of events and actions is typically done
as soon as possible, but we can delay the evaluation based on user-defined
criteria. If a server shuts down, there might be event rules and actions
scheduled to fire while the server was down. We can configure how
the event runtime handles these time-delayed event rules and actions
when it restarts.
We can tell the event runtime how to deal with queued
events and actions after a shutdown. Time-delayed event rules and
actions are stored as scheduled tasks in the time_based_asset table
that was created in the database manager of your choice when installing.
Edit the following properties:
Configure how time-delayed event rules and actions are handled after a shutdown
Procedure
| Property | Value |
|---|---|
| For event rules:
as.director.server.timebased.event.maxtardiness.minutes | The maximum amount of time, in minutes, beyond
the scheduled time when a time-delayed event rule is still run.
The default value is -1. |
| For actions:
as.director.server.timebased.action.maxtardiness.minutes | The maximum amount of time, in minutes, beyond the scheduled time when a time-delayed action is still run. Default is -1. |
For details of how to set these properties, see .
If we are using
Properties, these properties are in the Timebased Events and Actions subsection
of the Server section.
Two values of these properties have special meaning:
For example : if a task is scheduled to run at 9:00 a.m. and the server is shut down at 8:50 a.m. and restarted at 9:05 a.m., then the task is discarded. If the server was restarted at 8:58 a.m., then the task starts at 9:00 a.m. as originally scheduled.
For performance reasons, you might choose to store step
data in memory.
In Decision Server Events,
we can define complex events, where one event has a dependency on
another event or action. A complex event is a set of events linked
through a common context ID, using the system context, or a context
definition.
When a context is initiated, each activity in the
process is stored as a step in the context table that was created
during the installation, using persistent storage.
Storing
a step in a database table entails a certain amount of database access
and the context does not go away unless it is manually purged from
the table, or the context is ended by a terminating condition in a
context definition. If we know that your contexts generally have
a short life and then disappear, we can store all steps in memory,
avoiding the database access.
In a clustered environment, if
as.director.server.eventflow.persistentStepStore is
set to false and Decision Server Events is
using the default memory store (as opposed to an ObjectGrid cache,
which can be set using another property), then any context table
information is lost on server failover, although the event processing
fails over to another server. This situation is also the case on server
startup: if servers are still starting, and therefore ObjectGrid is
rebalancing its partitions, it is possible for the partitions to move
from server to server, and therefore context table information might
be lost.
To store contexts in memory instead of a database table,
add the following custom properties:
Configure the event runtime to store step data in memory
Procedure
| Property | Value | Purpose | Required |
| as.director.server.eventflow.persistentStepStore | false | Turns off persistent storage and causes step data to be stored in memory | yes |
| as.director.server.eventflow.cacheStepStoreTimeout.ms | 5000 milliseconds (default) | Determines amount of time, in milliseconds, for which an instance of step data is kept in memory | no . default is 5000 ms (5 seconds) |
Configure the event runtime to store context data in ObjectGrid
The context table uses the default cache. As a potentially higher-performing alternative, we can configure the context table to use ObjectGrid. We cannot use ObjectGrid as the context table on z/OS.
Procedure
- To use ObjectGrid as an in-memory cache for the context table, set as.director.server.eventflow.gridStepStore to true.
- Switch off database backing by setting as.director.server.eventflow.persistentStepStore to false.
- Optionally, configure ObjectGrid to provide data replication
capabilities:
- Locate objectGridDeployment.xml in wberuntime.jar,
which is in was_install_dir/profiles/profileName /installedApps/cellName/wberuntimeear.ear,
where
- profileName is the name of your WAS profile.
- cellName is the name of the WAS cell.
- Modify the file to include <mapSet name="mapSet" numberOfPartitions="10" minSyncReplicas="0" maxSyncReplicas="1" maxAsyncReplicas="0" numInitialContainers="1">
If we have configured the event runtime in a cluster, we can configure ObjectGrid to provide data replication capabilities.
- Locate objectGridDeployment.xml in wberuntime.jar,
which is in was_install_dir/profiles/profileName /installedApps/cellName/wberuntimeear.ear,
where
2.3.3.10. Tuning your event runtime configuration
Some tuning of the system might lead to higher performance when processing events. When considering how you tune your system, there are two main areas to look at:
- The event runtime and WAS
- JMS messaging
- Turn off logging.
- Turn off the recording of history, if not required.
- Use connectors only if required.
If events are already in Decision Server Events format, better performance might be achieved by avoiding the use of connectors. Send events directly to the event destinations and receive actions directly from the action destinations. For example, consider using the destinations jms/eventDestination, jms/durableEventDestination, jms/actionTopic and jms/durableActionTopic.
- Ensure that there are sufficient event rule processing threads. If we are unable to achieve full processor utilization on the Decision Server Events server, consider increasing the value of the property as.director.server.ruleProcessorInstances.
- Tune the Decision Server Events database:
- Ensure that the database is tuned (or auto tuned) for the workload. The sizes of Log File and Buffer Pool are important.
- Consider using a remote database with fast disk subsystems for data and logs. Ideally place data and logs on separate devices.
- Tune the JVM:
- The default heap settings (minimum 512MB, maximum 1024MB) are
acceptable for many applications. The optimal tuning depends on the
available free memory and the nature of the workload, but the following
configurations are suitable for a wide range of ODM workloads.
We can set these parameters using the WAS administrative
console (Application Servers > server1 > Java and Process Management > Process Definition > Java Virtual Machine):
- In this configuration, a 32-bit JVM with 2 GB of free memory,
the first and second parameters set the minimum and maximum heap size. The third parameter sets a generational garbage collection policy with
a 1024 MB nursery heap, meaning that 1024 MB of the heap is used for
short lived objects and the remainder of the heap is used for longer
lived objects:
- Initial heap size: 1280 (MB).
- Maximum heap size: 1280 (MB).
- Generic JVM arguments: -Xgcpolicy:gencon -Xmn1024M
- In this configuration, a 64-bit JVM with 8 GB of free memory,
you set a 4096 MB heap with a 2048 MB nursery:
- Initial heap size: 4096 (MB).
- Maximum heap size: 4096 (MB).
- Generic JVM arguments: -Xgcpolicy:gencon -Xmn2048M
- In this configuration, a 32-bit JVM with 2 GB of free memory,
the first and second parameters set the minimum and maximum heap size. The third parameter sets a generational garbage collection policy with
a 1024 MB nursery heap, meaning that 1024 MB of the heap is used for
short lived objects and the remainder of the heap is used for longer
lived objects:
- For more information, see Tuning the JVM.
- The default heap settings (minimum 512MB, maximum 1024MB) are
acceptable for many applications. The optimal tuning depends on the
available free memory and the nature of the workload, but the following
configurations are suitable for a wide range of ODM workloads.
We can set these parameters using the WAS administrative
console (Application Servers > server1 > Java and Process Management > Process Definition > Java Virtual Machine):
- Increase the concurrency:
If we are using the File System, HTTP, JDBC, JMS, or SOAP action connectors and you see messages for actionTopic or durableActionTopic, increasing the concurrency might improve the rate at which actions are processed.
- In the navigation tree of the WAS administrative
console, click Resources > JMS > Activation specifications, then
select the activation specification that you want to modify. Activation
specifications for the action connectors are:
- File System: wbeca_file_as
- HTTP: wbeca_http_as
- JDBC: wbeca_jdbc_as
- JMS: wbeca_jms_as
- SOAP: wbeca_soap_as
- Modify the activation specification according to the messaging
provider that you are using:
- If we are using WAS default messaging, modify the Maximum concurrent MDB invocations per endpoint.
- If we are using WebSphere MQ as the messaging provider, modify the value of Maximum server sessions on the Advanced properties window.
- In the navigation tree of the WAS administrative
console, click Resources > JMS > Activation specifications, then
select the activation specification that you want to modify. Activation
specifications for the action connectors are:
Tune with JMS messaging
For persistent messaging, consider using fast disk subsystems for data and logs. Ideally place data and logs on separate devices.If we are using WebSphere MQ as the JMS provider:
- The key tuning parameters relate to queue manager logs, channels, and listeners and queue buffer size.
- Consider delivering the messages in batches from the input topic to Decision Server Events. This method is useful for non-persistent, non-durable WebSphere MQ JMS events. The batch size is configured using the WAS administrative console (Servers > Application servers > server1 > Messaging > Message Listener Service > Listener Ports > wbe_events > Maximum Messages). However, if one of the messages in the batch fails, the whole batch is put back on the queue for processing.
If we are using WAS default messaging as the JMS provider:
- The key tuning parameters relate to the choice of message reliability level, activation specifications, and size of the discardable data buffer.
- Activation specification: Particularly for non-durable JMS events, consider delivering the messages in batches from the input topic to Decision Server Events. This method can deliver events more efficiently. Use the WAS administrative console (for example, Resources > JMS > Activation specifications > wbe_events, and set Maximum batch size).
2.3.3.11. Configure multiple Decision Server Events profiles to coexist
If we have multiple profiles of Decision Server Events on one computer, configure the WebSphere eXtreme Scale catalog service for the profiles to coexist. If we have a Decision Server Events profile and you have created a second profile on the same computer, configure the second profile for either profile to work correctly.
Procedure
- Start the WAS administrative console. Ensure that you connect to the new WAS profile.
- Click System administration > WebSphere eXtreme Scale > Catalog service domains.
- Click New and enter values for the
properties:
- Name: Enter a name for the catalog service domain, for example, WODM Catalog Service.
- Select Existing application server under Catalog Server Endpoint, then select your WAS server from the drop-down list.
- Client Port: Enter a port number that is not in use. Do not use the port that is used by the catalog server on the first profile, which is 6601 by default. You might use 6602 for the second profile, for example.
- Click OK, then click Save to save your changes.
- Restart WAS for the changes to take effect.
2.3.3.12. Configure technology connectors on a separate computer
Technology connectors can be run on the same computer as the event runtime, or they can be run on a separate computer or operating system. To run the technology connectors on a separate computer to the computer where the event runtime is installed, and you have already installed the connectors on another computer, you need to configure the connectors on the second computer to connect to the event runtime.
In the following instructions, to differentiate between the two computers involved, the computer on which the event runtime is to be installed is referred to as the Runtime computer, and computer where the connectors operate remotely is referred to as the Connectors computer.
Before installing a connector, verify you have a copy of Application Client for WAS installed on the Connectors computer. The client software must be pointing to the same instance of WAS on which the event runtime is deployed.
If we are planning to use WebSphere MQ as the JMS provider, also have the WebSphere MQ client installed.
To set up the event runtime and the technology connectors on separate computers:
Procedure
- You must modify the environment script on the Connectors computer
to point to the WAS on
the Runtime computer:
- On the Connectors computer, locate a directory called config, which is in the home directory of Decision Server Events (by default on Linux and UNIX /opt/ibm/ODM801/ODM and on Windows C:\IBM\ODM801\ODM).
- In the config directory, locate a script called setenv.sh (Linux and UNIX) or setenv.bat (Windows). You must set the values of the two variables in the script on the Connectors computer.
- Edit the setenv script. On the WASADMINHOST line, enter the host name for the Runtime computer (for example, on Linux and UNIX this host name might be "WASADMINHOST=computer1.MyCompany.com").
- Continue to edit the setenv script. On the WASBOOTSTRAPPORT line, enter the bootstrap port number of the Runtime computer (for example, on Windows this bootstrap port number might be WASBOOTSTRAPPORT=2809).
- Save the setenv script
- On the Runtime computer, if the database server definition uses localhost as the setting for hostname (as.director.common.db.default.dbhost), modify the setting of this property to point to the full hostname of the Runtime computer.
2.3.3.13. Configure the User Console connector to use a WAS data source
The User Console connector accesses its tables using data connections. If we have configured Decision Server Events to use a WAS data source when accessing the event runtime, make further configuration changes to enable the User Console connector to function. You must do this task if you are using an embedded Apache Derby database.
You must define the User Console connector. If you have not configured Decision Server Events to use a WAS data source when accessing the event runtime, no further configuration is required. If the event runtime database is an embedded Apache Derby database, create a separate database to host the tables for the User Console and then change some property settings so that the User Console connector accesses its tables in the separate database.
If the event runtime database is hosted by any other supported database manager (including Derby Network Server, which is included in your WAS installation), we can change property settings so that the User Console connector uses the Decision Server Events data connections to connect to the User Console tables. We can still, for performance reasons, access the event runtime database using WAS data sources.
To change the configuration so that the User Console connector accesses its tables using the Decision Server Events data connections, and not the WAS data sources:
Procedure
- If the event runtime database is hosted by embedded Apache
Derby, create a new database for the User Console tables. The new
database can be hosted by any supported database but the instructions
in this step assume that you are using Derby Network Server, which
is already installed as part of WAS.
- Start Derby NetworkServer. In the was_install_dir/derby/bin/networkServer directory, run startNetworkServer.bat (Windows) or startNetworkServer.sh (Linux and UNIX). Derby NetworkServer starts in a command window with the following message: Server is ready to accept connections on port 1527. . Port 1527 is the default port number on which Derby NetworkServer listens for connections.
- In the was_install_dir/derby/bin/networkServer directory, start the ij command environment by running ij.bat (Windows) or ij.sh (Linux and UNIX).
- In the ij command window, create
a new database for the User Console tables by running the following
command (all on one line):
CONNECT 'jdbc:derby:INSTALL_DIR\derby\userconsole;create=true'; (on Windows) or
CONNECT 'jdbc:derby:INSTALL_DIR/derby/userconsole;create=true'; (on Linux or UNIX)
- In the ij command window, create the tables in the new database, by running the derbydb.sql that is located at:
-
INSTALL_DIR/config/db/derbydb.sql
The script creates all the tables required of the User Console.
- Configure the User Console to use the new database by setting
the following properties (if you use Decision Server Events Properties,
the properties are on the Connector page):
- If we are using Derby Network Server:
Property values to set... Property Value as.director.connectors.pem.dbclass com.ibm.wbe.db.DerbyDB as.director.connectors.pem.instance INSTALL_DIR/derby/userconsole as.director.connectors.pem.dbport 1527 as.director.connectors.pem.dbhost localhost as.director.connectors.pem.username APP as.director.connectors.pem.password derbyadmin - In you are using another other supported database:
Property values to set... Property Value as.director.connectors.pem.dbclass com.ibm.wbe.db.DB2DB (DB2) com.ibm.wbe.db.OracleDB (Oracle)
com.ibm.wbe.db.MssDB (SQL Server)
as.director.connectors.pem.instance The name of the database as.director.connectors.pem.dbport Port on which the database is listening as.director.connectors.pem.dbhost The host name of the database as.director.connectors.pem.username User ID that Decision Server Events uses to access the database as.director.connectors.pem.password Password associated with the user ID - Enable each of the fields listed in the table in the previous step. You must enable fields as well as entering the property values.
- Ensure that you have enabled history before you continue, otherwise no data is produced for the User Console to display.
- If we are using Derby Network Server:
- Stop then restart WAS to apply the properties changes.
- Ensure that database is running, then start the Connectors.
What to do next
Now you are ready to use the User Console.
Verify your Decision Server Events configuration
We can verify that Decision Server Events, and the event widgets, are correctly installed and configured before you use them.
Verify the event runtime
Check that Decision Server Events is properly installed and configured by loading the supplied verification event project and sending an event through the event runtime.
Install and configure Decision Server Events, including configuring a JMS messaging provider.
Ensure that you have installed Event Designer. The event runtime can be installed on a separate computer.
If we turned on WAS security during installation, configure user authentication to the event runtime before verifying the installation.
Procedure
- On the computer on which you have installed the event runtime, ensure that WAS is running.
- Check that the event runtime application has been installed
and started on WAS:
- Start the WAS administrative console.
- Log in to the WAS administrative console with a user ID of your choice.
- In the navigation tree of the WAS administrative
console, click Applications > Application Types > WebSphere enterprise
applications. Ensure that the
following application is listed and shown as started:
- wberuntimeear
- EventWidgetsEar
Ensure that the following application is listed and shown as started if you have prepared the environment for testing:
- wbetesterear
- On the computer on which you installed the event runtime, create a directory called DecisionServerTest and make a note of the location in which you created the directory.
- In Event Designer, right-click in the Event Explorer view then click Import. The Import wizard opens.
- In the Import wizard, click Event Project from XML File > Next.
- Click Browse, navigate to INSTALL_DIR\connectors\validation and select the event project called installValidation.xml. Click Next. Accept the default settings for the rest of the wizard and click Finish to import the event project into your workspace.
- In the Event Explorer view, expand the event project, expand
the Outgoing folder, and open the Outgoing action,
shown in the following screen capture:

- In the Action editor, click the Connector tab,
shown in the following screen capture:

- In the Folder on that computer field, replace the existing value with the complete path that points to the location of the DecisionServerTest directory that you created. Save your changes.
- To deploy the event project, right-click the event project in the Event Explorer view
and select Deploy. The Deploy wizard
opens, shown in the following screen capture:

- Select Deploy all assets and click Next.
- Enter the connection details for your event runtime, shown
in the following screen capture:
 Ensure that
the host name and port values are correct for the WAS instance
in which the event runtime is deployed (the port value is the WC_defaulthost
port, which can be determined through the WAS administrative
console). Enter the user ID and password, if security is enabled.
Ensure that
the host name and port values are correct for the WAS instance
in which the event runtime is deployed (the port value is the WC_defaulthost
port, which can be determined through the WAS administrative
console). Enter the user ID and password, if security is enabled.
- Click Finish to deploy the event project. A message is displayed indicating that the event project is deployed successfully. Close Event Designer.
- Start the stand-alone technology connectors.
An example of a successful connector startup on Windows:
C:\IBM\ODM801\ODM\connectors\bin>connectors.bat
*********************************************************
IBM Decision Server technology connectors (c)Copyright IBM Corp. 2003, 2012
Version: IBM ODM 8.0.1
Locale: en_GB
Java version: 1.6.0
*********************************************************
BEER0561I: The technology connectors are waiting for wberuntimeear.
BEER0644I: The technology connectors established communication with
 wberuntimeear
BEER0590I: Connector event runtime checkpoint: 2009-04-14 08:58:10.718
BEER2608I: Authentication mode: None
BEER2609I: Event Runtime users group: WBEUsers
BEER2610I: Event Runtime administration group: WBEAdmins
BEER2611W: *** WARNING: SECURITY IS NOT ENABLED ***
BEER2612W: User maestro is granted full access to the event runtime
BEER0611I: Initialization is complete
BEER0670I: JNDI provider URL: corbaloc:iiop:localhost:2809
Connectors>
- Open a command window (Windows)
or a terminal emulator (Linux and UNIX),
-
cd INSTALL_DIR/connectors/bin
...and send a test event to the event runtime by running a cmdline command:
-
INSTALL_DIR/connectors/bin/cmdline.sh -uid userid -pwd password <test-event-file>
...where...
- Either, edit the setenv.sh file to include a parameter that specifies the location of the component directory.
- Or, copy the connectors directory into the component directory. If we use this solution, change the directory path to INSTALL_DIR/connectors/bin/cmdline.sh .
- Enable WAS security.
- Configure Decision Server Events to use WAS for user authentication
- Map users and user groups to Decision Server Events roles.
- Configure WAS administrative roles.
- Start the WAS administrative console.
- Enable WAS security:
- In the WAS administrative console, click Security > Global security.
- Select Enable administrative security.
- Ensure Enable application security is selected.
- Ensure Use Java 2 security to restrict application access to local resources is selected.
For more information, see Enabling security.
- To configure Decision Server Events to use WAS for
user authentication, change these properties:
Properties to be changed... Property Value to set as.director.common.authentication.method AppServer This value is the default value for Decision Server Events but no authentication or authorization takes place unless you have also enabled security in the previous step.
as.director.server.authentication.username A user ID that is the primary administrative user for WAS. as.director.server.authentication.password Password associated with the user ID. For details of how to set these properties, see .
If we are using Properties, the properties are displayed in the Authentication minor section of the Common section.
- Set the user ID of the primary administrator:
- In the WAS administrative console, click Security > Global security.
- Ensure that Available realm definitions is set to Local OS.
- Click Configure
- In the Primary administrative user name field, type the user ID that is used to log in to the WAS administrative console to do administrative tasks after security is enabled.
- Apply your changes.
- Configure WAS administrative roles.
- In the WAS administrative console, click Security > Global security > Administrative user roles > Add
- In the Search string field, search for the user IDs to which you want to assign the roles, and click Search
- In the Available field, select the user IDs to which you want to assign the roles and move them to the Mapped to role field, using the arrows.
- Under Role(s), click ether Operator or Administrator.
- Click OK and Save.
- Map users and user groups to Decision Server Events roles.
Various roles can be assigned to users and groups.
When you are using WAS as the security provider, we cannot change the role names.
- In the WAS administrative console, click Applications > Application Types > WebSphere enterprise applications.
- Click wberuntimeear, then click Security role to user/group mapping.
- From the list of the roles, select the roles that you want to map (assign) to users, click Map Users. For more information about mapping users to roles, see Security role to user or group mapping.
- In the Search string field, search for the user IDs to which you want to assign the roles, and click Search.
- In the Available field, select the user IDs to which you want to assign the roles and move them to the Selected field, using the arrows.
- Click OK and Save.
- After you have made these configuration changes, restart WAS to ensure that the changes are in effect.
- Set the user ID of the primary administrator:
- Use the appropriate
LDAP administrative utility to create the following groups:
Groups to be created... Access level Name of group to be created Example Administrator WBEAdmins. If we want the admin group to reference a different name, create a custom property called as.director.common.authentication.adminGroup with a value of the group name.
However, if you define this property, then the WBEAdmins group is no longer an admin group, and any users in that group no longer have administrative privileges (unless they are also a member of the new admin group).
WBEAdmins User Choose any name, but the name must match the value of as.director.common.authentication.userGroup set in Properties. WBEUsers - For details of how to set these properties, see .
- Change the following properties:
Properties to be changed... Property Action as.director.common.authentication.method Select LDAP. as.director.common.authentication.server Replace <HOST-NAME> with the name of the server where LDAP resides. Multiple server names can be entered, separated by a comma. If the first server in the list is unavailable, authentication is attempted against the next and subsequent servers in the list.
as.director.common.authentication.namecontext Remove dc=<MYDOMAIN> and replace <MYCOMPANY> with company name. as.director.server.authentication.member.filterEEE Enable. as.director.server.authentication.member.attribute Enable. as.director.server.authentication.userid.format Only for internal use, do not change. as.director.server.authentication.security.method Set to one of: - none (default)
- simple
- strong
as.director.common. authentication.security.protocol Set to one of: - unspecified (default)
- ssl
as.director.common.authentication.userGroup Set the value to match the name of the user group defined in the Active Directory (the default is WBEUsers). as.director.server.authentication.username Replace admin with a user ID that is registered in Active Directory in the Administrator or User groups (set up in step 1). as.director.server.authentication.password Replace admin with the password associated with the user ID. If we are using Properties, the properties are in the Authentication minor section of the Common section.
- Change the following properties:
- In Active Directory,
create the following groups:
Groups to create in Active Directory... Access level Name of group to be created For example Administrator WBEAdmins. If we want the admin group to reference a different name, create a custom property called as.director.common.authentication.adminGroup with a value of the group name.
However, if you define this property, then the WBEAdmins group is no longer an admin group, and any users in that group no longer have administrative privileges (unless they are also a member of the new admin group).
WBEAdmins User Choose any name, but the name must match the value of as.director.common.authentication.userGroup set in Properties. WBEUsers - For details of how to set these properties, see .
- Change these properties:
Properties to change... Property Action as.director.common.authentication.method Select Active Directory as.director.common.authentication.server Replace <HOST-NAME> with the name of the server where Active Directory resides. Multiple server names can be entered, separated by a comma. If the first server in the list is unavailable, authentication is attempted against the next and subsequent servers in the list.
as.director.common.authentication.namecontext Replace <MYDOMAIN> with domain name and <MYCOMPANY> with company name. as.director.common.authentication.userGroup Set the value to match the name of the user group defined in the Active Directory (the default is WBEUsers). as.director.server.authentication.username Replace admin with a user ID that is registered in Active Directory in the Administrator or User groups (set up in step 1). as.director.server.authentication.password Replace admin with the password associated with the user ID. If we are using Properties, the properties are in the Authentication minor section of the Common section.
- Change these properties:
- Enable authentication using the event runtime database:
- Define new groups:
- Start User Console by logging from the common login
panel at:
http://server:port/wbe/common/login.jsp
where server is the name of the WAS server where Decision Server Events is installed and port is the port number of WC_defaulthost of this server (typically 9080). This value can be determined from the table displayed when you use the Application Server Network Deployment administrative console, click Servers, then Application servers, click the name of the server, and then on Ports.
- Move the mouse pointer over the User Accounts button and select Groups from the menu to display the Groups window.
- Click the Add a New Group button to display the New Group window. Complete the fields and click Add. Repeat for each group you want.
- Click Save configuration to save your changes.
- Start User Console by logging from the common login
panel at:
- Define new users:
- Start User Console by logging in from the common login
panel at:
http://server:port/wbe/common/login.jsp
- Move the mouse pointer over the User Accounts button and select Users from the menu to display the Users window.
- Click the Add a New User button to display the New User window. Complete the fields, including the groups to which the user belongs, and click Add. Repeat for each user you want.
- Click Save configuration to save your changes.
- Start User Console by logging in from the common login
panel at:
- Add a user to or remove a user from a group:
- Start User Console by logging in from the common login
panel at:
http://server:port/wbe/common/login.jsp
- Move the mouse pointer over the User Accounts button and select Users from the menu to display the Users window.
- Click the Edit button for the relevant user, to display the Edit User window.
- Select or clear a group as required, and click Update to complete the edit.
- Click Save configuration to save your changes.
- Start User Console by logging in from the common login
panel at:
- Disable user authentication:
If we no longer want to do user authentication, or if Active Directory or LDAP is not available to support authentication, then we can disable the authentication.
Change the as.director.common.authentication.method property to none.
For details of how to set this property, see .
If we are using Properties, the property is in the Common section, in the Authentication subsection. Disabling user authentication means that anyone can access the event runtime and change assets.
- Ensure that WAS security is enabled.
- Assign the user to the 'WBEDashboardUsers' role.
- Either, when a management or custom profile is created or when the profile is augmented with Decision Server Events.
- Or, at a later time using the procedure described in Configure WAS default messaging to be the JMS provider.
- Ensure that security is enabled for the service integration bus WbeBus.
- Review the users and groups in the bus connector role.
- Remove the special groups AllAuthenticated and Everyone if these groups are in the role.
- Restrict access to only those users and groups that are used to connect to the bus.
Depending on your requirements, we can add a single user ID to the bus connector role that is shared by the components of the event runtime that connect to the bus.
- Review the authentication aliases used by the activation
specifications to connect to WbeBus.
If the service integration bus is secured when the activation specifications are configured, the activation specifications are configured to use a single authentication alias, WbeBusAlias. This alias must be configured with a user ID and password in the bus connector role.
- Review the authentication credentials used by the event runtime and connector components to connect to the JMS provider, which
are set using the following event runtime properties:
as.director.server.jms.username
as.director.server.jms.password
These properties must be configured with a user ID and password in the bus connector role. For more information about configuring event runtime properties, see .
- Enterprise
- Business
- InstallDir/teamserver/jcl/HBRDCCDB.jcl
- InstallDir/teamserver/jcl/HBRDCGNR.jcl
++DB2USER++ is the user ID to access DB2.
- Log in to the Integrated Solutions Console.
- In the side menu, open Resources > JDBC, and click JDBC Providers.
- In Scope, select Node=x, Server=y, where x is the name of your node and y the name of your server.
- Click New.
- In Step 1, select the database type, provider type, and a non-XA implementation type. For example, Derby, Derby JDBC Provider, and Connection pool data source.
- Click Next. A summary opens.
- Click Finish.
- Click Save to save the changes directly to the master configuration.
- In the Integrated Solutions Console, open Resources > JDBC, and click Data sources.
- In the Scope section, select the scope that you selected for the JDBC provider
- In Step 1, enter a name for the
data source in the Data source name field and jdbc/ilogDataSource in
the JNDI name field, and click Next.
By default, Decision Center requires the value jdbc/ilogDataSource in the JNDI name field. However, if you need several data sources for your installation, specify multiple JNDI names and will need to use a URL in the form <hostName>:<portNumber>/teamserver?datasource=<jndiName> to start the console.
- In Step 2, select Select an existing JDBC provider, and then select the non-XA JDBC provider
- In Step 3, enter database properties
specific to the data source and click Next.
The following table shows the minimum set of properties required to define the supported databases. If the table does not include your driver, check the WAS documentation for more information.
Database Properties DB2 Universal JDBC Driver Properties include: - databaseName: Database name if driverType is set to 4, or a locally catalogued database name if driverType is set to 2
- driverType: 2 or 4
The following properties are required if driverType is 4:
- serverName: TCP/IP address or host name
- portNumber: TCP/IP port number
DB2 legacy CLI-based Type 2 databaseName: for example, Sample. Oracle JDBC Driver URL: for example, jdbc:oracle:oci:@sample Derby - databaseName: path to the location of the database files. This directory must not exist already. For example, c:\derbydata.
- Clear the option Use this data source in container managed persistence (CMP).
For more information, refer to the Derby documentation.
- In Step 4, click Next to accept the default values.
Step 5 displays a summary of your settings.
- Click Finish.
The connection pool is created and is associated with the data source.
- Click Save to save the changes directly to the master configuration.
- In the Integrated Solutions Console, open Resources > JDBC and Data sources.
- Click the name of your data source.
- Under Related Items, click JAAS - J2C authentication data.
- Click New and set the fields Alias, User
ID, and Password. For example, this procedure uses the following values:
- Alias: RtsDerbyUser
- User ID: rtsAdmin
- Password: rtsAdmin
- Click Apply and then click Save to save directly to the master configuration.
- Open Resources > JDBC and Data sources and click the name of your data source.
- In the Security settings section, for Component-managed authentication alias, select the <NodeName>/RtsDerbyUser alias, where <NodeName> is the name of the WAS node on which you are configuring Rule Execution Server.
- For Container-managed authentication alias, select <NodeName>/RtsDerbyUser.
- Click Apply and then click Save to save directly to the master configuration.
- In the Integrated Solutions Console, open Resources > JDBC, and click Data sources.
- Click the name of the data source that you want to customize.
- Under Additional Properties, click Custom properties.
From here, we can make custom changes to the data source.
- Click createDatabase. The General Properties page opens.
- Type create in the Value field.
- Click OK, and then click Save to save the changes to the master configuration.
- In the Integrated Solutions Console, open Resources > JDBC, and click Data sources.
- Select the check box next to the data source that you want
to test, and click Test connection.
The status of the connection is indicated at the top in a message such as the following one:
The test connection operation for data source <data_source> on server <server_name> at node <node_name> was successful.
- If we already have suitable groups and users defined, skip this procedure and connect users to their appropriate roles when you deploy your applications.
- If we do not have groups and users defined or to define new groups and users, do the following steps.
- Federated repository
- Local OS
- Stand-alone Lightweight Directory Access Protocol (LDAP) registry
- Stand-alone custom registry
- Every user of Decision Center must belong to at least one of the mandatory groups rtsAdministrator, rtsConfigManager, rtsInstaller, or rtsUser. Membership in these groups determines the parts of Decision Center that a user can access.
- You must create all these groups in the application server.
- For testing purposes, create a default user and password for each of the mandatory groups.
- To perform the Decision Center permissions tutorial in your own installation, create the custom groups Validator and Eligibility.
- In the side panel of the Integrated Solutions Console, open Security > Global security.
- Configure the repository security as follows:
- If Federated repositories is already selected under Current realm definition, verify Enable application security is selected. If we select Enable application security, click Apply and then click Save to save the changes to the master configuration.
- If Federated repositories is not already selected, click Security Configuration Wizard and complete the wizard:
- In Step 1, select Enable application security and click Next
- In Step 2, select Federated repositories and click Next.
- In Step 3, type the name in the Primary administrative user name field, type websphere in the Password field, and click Next.
- In Step 4, review the security configuration summary and click Finish.
- Click Save to save the changes to the master configuration.
- Restart WAS, and then log in to the Integrated Solutions Console as the primary administrative user.
- In the side panel, open Users and Groups > Manage Groups.
- Click Create and enter rtsUser as the group name. Click Create.
- Click Create Like and create another group named rtsAdministrator. Click Create.
- Click Create Like and create another group named rtsConfigManager. Click Create.
- Click Create Like and create another group named rtsInstaller. Click Create. Click Close.
- To perform the Decision Center permissions tutorial in your own installation, create two additional groups: Validator and Eligibility.
- In the side panel, open Users and Groups > Manage Users.
- Click Create.
- Enter rtsUser1 as the
User ID and assign this new user to a group. To do so:
- Click Group Membership. The page that enables you to select a group opens.
- Click Search. The list of existing groups is displayed.
- Select the rtsUser group and click Add.
- Click Close.
- Enter a given name and surname for rtsUser1, then enter the rtsUser1 password, and click Create.
- Click Close.
- Create another user named rtsAdmin with password rtsAdmin, and assign this user to the rtsAdministrator and rtsInstaller groups.
- Create another user named rtsConfig with password rtsConfig, and assign this user to the rtsConfigManager group.
- Optional: Create a user named Val with password Val, and add the user to the rtsUser, Validator, and Eligibility groups. We can skip this step if we do not intend to perform the Decision Center permissions tutorial.
- Optional: Create another user named Eli with password Eli and add the user to the rtsUser and Eligibility groups. We can skip this step if we do not intend to perform the Decision Center permissions tutorial.
- Restart your application server.
- The EAR file is compressed. You must open it to extract the files that must be changed, and then replace the files in the EAR. We can use Ant commands to repackage the EAR file.
- Back up the EAR file before you modify it.
- To use the Decision Center permissions mechanism, upload groups to the database.
- Add each custom group as a role in the...
-
SECURITY - ROLE
...of the file...
-
jrules-teamserver-WAS<version_number>.ear/teamserver.war/WEB-INF/web.xml
For example:
- <security-role> <role-name>Validator</role-name> </security-role><
- If we are configuring Decision Center for WAS V8.0 or V8.5, add the groups similarly in...
-
decisioncenter.war/WEB-INF/web.xml
- Add each custom group to...
-
EAR_FILE/META-INF/application.xml
- Repackage the EAR.
- The class loading sequence is lost. WAS reverts to the default parent first setting.
- All users, such as rtsUser1, rtsAdmin, lose their role, even though they belong to the correct group. When you sign in to the Decision Center console, a message is displayed, such as rtsUser1 does not have the correct role.
- In the side panel of the Integrated Solutions Console, click Applications > New Application and then New Enterprise Application.
- Click Browse and navigate to the Decision Center EAR file that corresponds to your version of WAS. For example, on V8.0: ODM_HOME/teamserver/applicationservers/WebSphere8/jrules-teamserver-WAS8.ear
- Click Next.
- Select Detailed - Show all installation options and parameters.
- Expand Choose to generate default bindings and mappings and select the Generate Default Bindings check box, then click Next.
- If a security warning is displayed, click Continue.
- In Step 1, click Next to accept the default settings.
- In Step 2, select the target server and the WAR files and click Next. Keep the default setting if you only have one server.
- For Step 3 to Step 8, click Next to accept the default settings.
- In Step 9, map security roles to users and groups. The application server uses the roles
that are defined in the deployment descriptors. You must map these
roles to the groups found in the security settings.
- Select a check box next to a role in the table and click Map groups.
- Click Search in the middle of the page to display the groups.
- Map the group to the role that you are editing by moving that role to the Selected column.
- Click OK and repeat steps for all roles.
- In addition, to follow the Decision Center permissions tutorial in your own installation, create two custom groups: Validator and Eligibility.
After you have completed the assignments, they are shown as in the following table. If we have groups or users, we can map those to the existing role instead.
Role Mapped groups rtsUser rtsUser rtsAdministrator rtsAdministrator rtsConfigManager rtsConfigManager rtsInstaller rtsInstaller Validator Validator Eligibility Eligibility - If our application server is WAS V8.0
or V8.5, click Next for Step 10 and Step
11 to accept the default settings.
A summary is displayed.
If WebSphere eXtreme Scale is also installed, additional settings are displayed as Step 12 in the side panel of the Integrated Solutions Console. See the WebSphere eXtreme Scale Information Center for more information on administering WebSphere eXtreme Scale with WAS.
- Click Finish.
- Click Save to save your workspace changes to the master configuration.
- In the Integrated Solutions Console, open...
-
Applications | Application Types | WebSphere enterprise applications.
- Click ILOG Rule Team Server or the name you specified for the Decision Center application.
- In the Modules section, click Manage Modules.
- Click teamserver.
- In the Class loader order menu, select Classes loaded with local class loader first (parent last), and then click OK.
- If we are configuring WAS V8.0 or V8.5, click decisioncenter and repeat the same action.
- Click Save to save the changes directly to the master configuration.
- In the side panel, open...
-
Applications | Application Types | WebSphere enterprise applications
- Select the check box next to ILOG Rule Team Server and click Start to start the application.
- Make sure your application server is running.
- Start a new browser instance and enter the default URL
to access Decision Center in
a web browser:
-
http://localhost:<PORT_NUMBER>/teamserver
Set <PORT_NUMBER> to the port number of your web application. If our browser is not running on the same host as the application server, replace the localhost with the address of the host.
The Decision Center log in page opens in your browser.
- Sign in with rtsAdministrator rights (for example rtsAdmin/rtsAdmin when testing).
- Model description: This file usually has the filename extension .brmx.
- Initialize enumerations and hierarchies: This file usually has filename extension .brdx.
- When the Installation Settings wizard opens in Decision Center, click Next.
- Select one of the extension files: Default extensions (already selected), Custom extensions (brmx/brdx), or Custom extensions (Zip).
- Click Generate SQL to generate the script that creates the database tables based on the contents of your rule model files.
- After generating the script, select the Execute the SQL script check box, and then click Next.
- Click New.
- Enter a locale.
- Browse to the location of the message file for this locale.
- Click Apply.
- Click New.
- Type the group name.
- Click Apply.
- When you have added all the groups, proceed in one of the following
ways:
- Click Next to set a different persistence locale, or configuration parameters.
- Click Finish if we do not want to change these settings.
- Enter a locale in the Locale field.
- Click Apply.
- Do one of the following actions:
- Click Next to set the configuration parameters.
- Click Finish if we do not want to change these settings.
- teamserver.server.port: the port number
- teamserver.server.isSecure: true if the connection is secure
- teamserver.server.hostname: the name of the host.
- Use this property with the name of the user who launched the server as the root for the cache (<build.path>_<username>).
- If it is not defined, use the system property java.io.tmpdir and add rtscache (for example, <temp dir>/rtscache_<username>).
- If the system property is not defined, use the server directory and add rtscache (for example, <server dir>/rtscache_<username>).
- Do one of the following actions:
- To create a new parameter, click New.
- To change an existing parameter:
- Select the check box next to the parameter.
- Click Modify to change the parameter, or click Delete to remove the parameter.
- Click Apply to implement your changes.
- Do one of the following actions:
- Click Previous to make changes to previous settings.
- Click Finish. The Installation log opens with a summary of the operations that you performed in the Installation Settings wizard.
- Click OK to finish.
- You must have version 1.7.1 (or later) of Ant set up on your system. If Ant is not installed or your version is older than version 1.7.1, set up your environment to use the correct version of Ant.
To test your current version of Ant, type the following command in a Windows Command Prompt or UNIX shell: ant -version
We can download Ant from the Apache web site, or we can use the Ant 1.7.1 distribution packaged at ODM_HOME/shared/tools/ant, where ODM_HOME is your ODM installation directory.
- Make sure that any environment variables required by WAS are correctly set up.
To do so, use the setupCmdLine.bat or setupCmdLine.sh script in...
-
<WAS_Install_Dir>/profiles/<profile_name>/bin
This script sets up a full WAS environment, including the WAS_HOME, WAS_LOGGING, and WAS_CLASSPATH variables.
- Set the ANT_HOME environment variable to ODM_HOME/shared/tools/ant.
- Add the directory ODM_HOME/shared/tools/ant/bin to your PATH environment variable.
- -Dserver.url=<server url>
Specifies the URL of the target application server.
- -DdatasourceName=<data source name>
Specifies the JNDI name of the data source to use for the task. The default value is...
-
jdbc/ilogDataSource
- -Dserver.url=<server url>
- -DdatasourceName=<data source name>
- -DextensionModel=<model file>
The model description (.brmx extension).
- -DextensionData=<data file>
The model data description (.brdx extension).
- [-DdbSchemaName=<database schema name>]
An optional parameter that can be used to specify the database schema name. Decision Center uses the database user name as the schema name if this parameter is not specified. However, some databases allow for a given user to access several schemas, and the default schema is not always named as the user.
- [-Droles=<role list>]
An optional parameter that uploads the list of roles to Decision Center. This list is specified as "role1 role2". For example:
ant upload-roles -Droles="rtsUser rtsConfigManager Eligibility Validator"
- -Dserver.url=<server url>
- -DdatasourceName=<data source name>
- -DextensionModel=<model file>
The model description (.brmx extension).
- -DextensionData=<data file>
The model data description (.brdx extension).
- [-DdbSchemaName=<database schema name>]
An optional parameter that can be used to specify the database schema name in which the Decision Center tables are stored. Decision Center uses the database user name as the schema name if this parameter is not specified. However, some databases allow for a given user to access several schemas, and the default schema is not always named the same as the user.
- [-DoutputFile=<SQL file>]
The name of the file that stores the generated SQL script. If this parameter is not given, the task creates a file named output.sql in the directory defined as basedir in build.xml.
- -Dserver.url=<server url>
- -DdatasourceName=<data source name>
- [-Dfile=<SQL file>]
- -Dserver.url=<server url>
- -DdatasourceName=<data source name>
- -DextensionModel=<model file>
The model description (.brmx extension).
- -DextensionData=<data file>
The model data description (.brdx extension).
- -Dserver.url=<server url>
- -DdatasourceName=<data source name>
- -Droles=<role list>
- Create the SQL script required to remove the database schema.
- Execute the SQL script that you created.
- -Dserver.url=<server url>
- -DdatasourceName=<data source name>
- -DextensionModel=<model file>: The description of the database schema to remove.
- [-DdbSchemaName=<database schema name>]
We can use an optional parameter to specify the database schema name. If we do not specify this parameter, Decision Center uses the database user name as the schema name. However, in some databases, users can access several schemas and the default schema is not always named as the user.
- [-DoutputFile=<SQL file>]
The name of the file that stores the generated SQL script. If we do not specify this parameter, the task creates a file named output.sql in the directory defined as basedir in build.xml.
- -Dserver.url=<server url>
- -DdatasourceName=<data source name>
- [-Dfile=<SQL file>]
- -Dserver.url=<server url>
- -DdatasourceName=<data source name>
- -Dlocale=<locale>
- -DmessageFile=<message file>
- Edit...
-
INSTALL_DIR/teamserver/bin/teamserver-anttasks.properties file,
...and add your locale to the persistenceLocale property. For example:
-
persistenceLocale = fr_FR
- Run the Ant task using the form:
-
ant taskName parameters_list
Alternatively, we can add the parameter to the command line. For example:
-
ant taskName -DpersistenceLocale=fr_FR
- teamserver.server.port
The port number.
- teamserver.server.isSecure
True if the connection is secure.
- teamserver.server.hostname
The name of the host.
- -Dserver.url=<server url>
- -DdatasourceName=<data source name>
- [-Duser=<username>]
- -Dkey=<parameter key>
- -Dvalue=<parameter value>
- -Dserver.url=<server url>
- -DdatasourceName=<data source name>
- [-Duser=<username>]
- -Dkey=<parameter key>
- -Dserver.url=<server url>
- -DdatasourceName=<data source name>
- [-Duser=<username>]
- -Dkey=<parameter key>
- Install the Apache Solr search engine on another computer, or as part of a dedicated web application on your computer. (For information on installing the Solr server, visit the Apache Solr web site.)
- Locate the decisioncenter-solr-home.zip file in the Decision Center teamserver folder on your computer. (The Decision Center installation program placed the folder on your computer.)
- Unzip the file in a directory in the remote instance of the Solr server.
- Configure the home directory of the remote Solr server to use the location of the unzipped configuration files (see documentation on the Apache Solr web site).
- Configure the Decision Center preferences.properties file to point to the URL of the Solr server.
- SolrEmbedded: Use to select the embedded Solr search engine.
- SolrRemote: Use to select a remote instance of the Solr search engine.
- Optionally, install Rule Designer.
- Install Rule Execution Server and Decision Center, and configure both of these applications.
- BP32K is the buffer pool that is expected in SYSCAT.BUFFERPOOLS. If BP32K is not there, we can use the existing buffer pool or create a new buffer pool named BP32K. Use the following command to query SYSCAT.BUFFERPOOLS for the existing buffer pool:
- Select * from SYSCAT.BUFFERPOOLS
Otherwise, use the following command to create a buffer pool named BP32K:
- CREATE BUFFERPOOL BP32K SIZE 2000 PAGESIZE 32K
- You must update the trace_db2.sql script
and select the custom option in the Installation Settings wizard to run it. Modify the following line in the script to specify storage
for the table space:
- CREATE TABLESPACE RESDWTS PAGESIZE 32K BUFFERPOOL BP32K;
Here is an example of the table space specification in the script:
- CREATE TABLESPACE RESDWTS PAGESIZE 32K MANAGED BY Database
USING [ FILE 'C:\DB2\Container.file' 640 ] BUFFERPOOL BP32K;
- You might have to further modify the script based on your database settings.
- A user ID and a password
- Complete privileges on the tables and view of the schema (create, insert, delete)
- Create index privileges
- On Oracle, create trigger and create sequence privileges
When using an Oracle database, run all the scripts in the SQL Plus client.
- Open the Integrated Solutions Console.
- In the side panel, open...
-
Applications | Websphere Enterprise Applications | Install | Local file system | INSTALL_DIR/executionserver/applicationservers/WebSphere8/jrules-ssp-WAS8.ear | Next
- Select the check box Detailed - Show all installation options and parameters.
Expand Choose to generate default bindings and mappings and select the check box Generate Default Bindings. Click Next.
- Click Continue to accept the security warning.
- In Step 1 through Step 8 click Next to accept the default settings.
- In Step 9 if you have activated security select resAdministrators and click Map groups.
- Click Search.
- Select the resAdministrators group. To do this, click the group name under Available, then click the arrows to move it to the Selected column.
- Click OK to return to the Map security roles to users or groups page.
- Repeat Steps 8 to 11 for the resDeployers group, selecting resDeployers.
- Click Next.
- Click Finish. After the installation has completed click Save directly to the master configuration.
- In the side panel, open...
-
Applications | Application Types | WebSphere enterprise applications, and click jrules-ssp-WAS7. | Manage Modules | Scenario Service Provider | General Properties | Class loader order | Classes loaded with local class loader first (parent last) | OK
- In the side panel, open...
-
Applications > Application Types > WebSphere enterprise applications.
- In the Enterprise Applications page
select the check box next to...
-
jrules-ssp-WAS8
...and click Start to start the application.
- Enter the URL...
-
http://<host>:<port>/testing
- Log in to the (Scenario Service Provider) SSP application using
a Rule Execution Server role.
The application displays a home page, which contains information about the SSP server.
- A Job ID is listed in the table when a user clicks Run in Decision Center.
- The Created column records the date and time when each job is initialized.
- The Status column shows the number of scenarios that have already been tested compared to the total number of scenarios.
- The Start time records the time when a resource is allocated for the job.
- The Parts column records the number of parts in the job:
- A job that is not executed in parallel has one part.
- A job that is executed in parallel has one or more parts.
- The End time records the time when the execution of the job is complete, that is, all of the scenarios in the job have been tested.
- Define the Ant task in your build file using the <taskdef> Ant element in one of the following ways:
- Define the task at the top level, or within a specific target:
-
<taskdef resource="res-tasks.properties"
classpath="${INSTALL_DIR}/executionserver/lib/jrules-res-setup.jar"/> - If the JAR file is available in your system, we can use:
- <taskdef resource="res-tasks.properties"/>
- Define the task at the top level, or within a specific target:
- Use the <ssp-setup> Ant task to update an SSP artifact to your specific configuration and XOM.
- Run the Ant task in one of the following ways:
- From the command line: Execute Ant in the required directory, followed by the name of the build file if necessary.
- From Eclipse: Right-click the Ant file and click Run.
- Open the Integrated Solutions Console.
- In the side pane, open...
-
Applications | Websphere Enterprise Applications | SSP_application | Uninstall
- Deploy the new SSP.
- The Execution Object Model (XOM) in the database contains only dynamic classes, that is, classes that do not necessarily map to Java classes on a one-to-one basis.
- Both Java and EJB rule sessions work with XOMs that contain EJBs, that is, rules that use EJB objects.
- Configure the application for the operational environment by modifying the deployment descriptor.
- Change or redirect the bindings used in the execution components
to the real JNDI names of your application servers.
For more information see the http://java.sun.com/products/ejb/docs.html#specs Sun Developer Network web site.
Java EE applications use JNDI as the "switchboard" for making connections between loosely coupled components. Java EE components use JNDI to find other components that they want to use, such as EJB components, and to find resources, such as JDBC and JMS connections. You define interconnections between Java EE components by declaring them in the deployment descriptor of the component. The container automatically binds the objects at the specified place in the namespace and ensures that all resource dependencies between components are satisfied before deploying the components.
We can map the names used inside the execution components to real JNDI names.
- Verify that the contents of the Java EE application EAR or WAR file are well
formed and comply with the Java EE
specification.
For more information, see the http://java.sun.com/j2ee/1.3/download.html#platformspec Sun Developer Network web site.
- Deploy the EAR file or WAR file onto the Java EE server.
- Write and compile the source code, including the basic tasks of the client, and your business logic.
- Specify the deployment descriptors.
- Package the .class, .jsp, and .html files, deployment descriptors, and the Rule Execution Server .rar file into a Java EE application EAR file. Do not modify the RAR.
- Declare the RAR module inside the application.xml file, as follows:
<application> .... <module> <connector>jrules-res-xu-<appserver>.rar</connector> </module> .... </application>We can use the class IlrPOJOSessionFactory as we do to deploy the XU to a server.
It is also possible to package the rule session JAR in the same Java EE application EAR file. In this case, the application uses the local EJB binding and we do not have to define the JNDI name in the application server EJB descriptor file (ejb-jar.xml). The global JNDI tree is used to resolve external references, but it is not necessary to resolve a JNDI name relative to the component environment java:comp/env.
If our descriptor contains <ejb-local-ref>, the JNDI lookup uses the value defined in the <ejb-link> attribute to find the EJB. There is no confusion with other EJBs deployed in other EAR files and no issue with mixed class loaders.
In the deployment phase of the EAR file, create a Java 2 connection factory (J2C). This step is necessary to add the JNDI name of the resource adapter.
If we package a rule session factory inside an application EAR, we can remove the JNDI definitions from the rule session JAR.
userid and password valid user ID and password combination that grants access to WbeBus <test-event-file> complete path to installValidation_event.xml. For example
INSTALL_DIR/connectors/bin/cmdline.sh -uid myname -pwd mypassword/opt/ibm/ODM801/ODM/connectors/validation/installValidation_event.xml.
A new file called ValidationTest random-number .xml is put in the DecisionServerTest directory, where random-number is a system-generated number that makes the file name unique.
In cmdline.sh there are relative paths (/../../) to setenv.sh files. You previously modified these relative paths in the component directory, but not in ODM installation directory that the relative path references (the component directory is a copy of part of ODM installation directory). We can fix this issue in one of two ways:
Secure Decision Server Events
To secure Decision Server Events, both WAS security and Decision Server Events security settings must be configured.
The default and preferred security provider is WAS.
If we are migrating from a previous version of Decision Server Events where you used a different security provider, we can continue to use this provider, but complete additional steps when configuring Decision Server Events and the event widgets.
User authentication
User authentication to the event runtime can be implemented for Decision Server Events by using WAS. This method is the default and the preferred method.
User authentication controls who has access to the event runtime.
We can permit access to the event runtime without any user authentication, though this permission does mean that anyone can access the event runtime and change assets.
If we are migrating from a previous version of Decision Server Events where you used a different security provider, we can continue to use that security provider.
Configure user authentication using WAS
To secure access to the event runtime, configure Decision Server Events to use WAS to define authorized users and groups. This method is the default and the preferred method.
To enable security using WAS, :
Procedure
Results
Decision Server Events is now configured to use WAS to authenticate users.
Configure user authentication using LDAP
If we are migrating from a previous version of Decision Server Events where you used LDAP (Lightweight Directory Access Protocol), we can continue to use it.
User authentication to the event runtime can be configured using WAS. This method is the default and preferred method. WAS supports the use of LDAP for user registries. For more information, see Configure Lightweight Directory Access Protocol user registries in the WAS information center and Configure user authentication using WAS.
To continue using the LDAP support as provided in earlier versions of Decision Server Events, use the following steps.
Procedure
Configure user authentication using Microsoft Windows Active Directory
If we are migrating from a previous version of Decision Server Events where you used Windows Active Directory, we can continue to use it.
On Windows, user authentication to the event runtime can be configured using WAS. This method is the default and the preferred method.
To continue using Windows Active Directory, use the following steps.
Procedure
Configure user authentication using User Console
Alternatively, we can use User Console to authorize users and groups by adding them to certain event runtime tables.
To provide security of access to the event runtime, the default and preferred method is to use WAS security.
The tasks relating to user authentication using User Console are as follows.
Procedure
Secure access to charts
By using WAS security, we can ensure that only authenticated can access charts through the use of the chart widgets.
To ensure that a user must authenticate before accessing chart widgets...
Procedure
Securing the service integration bus
If we are using WAS default messaging as the JMS provider for the event runtime, secure the service integration bus to prevent unauthorized access.
This information applies only if you are using default messaging as the JMS provider for the event runtime. If we are using WebSphere MQ as the JMS provider, see Configure WebSphere MQ to be the JMS provider for more information.
You must configure the event runtime to use default messaging as the JMS provider:
When the event runtime is configured to use default messaging as the JMS provider, the service integration bus WbeBus and a number of messaging destinations and activation specifications are configured. If WAS administrative security is enabled when WbeBus is configured, the bus is secured and all authenticated users are authorized to connect to the bus. We can change the configuration of the bus to restrict access to specific user IDs.
Use the WAS administrative console
Configure the Decision Center consoles on WAS
To be able to use the Decision Center consoles on an instance of WAS, you deploy the provided archives and go through a series of configuration steps.
To configure a cluster, use a profile template.
Configure the Decision Center consoles
Decision Center includes two consoles:
Only the Enterprise console works on WAS V7.0. Both consoles work on WAS V8.0 and V8.5.
A specific integration extension for the IBM Process Server platform is available.
Step 1: Restrict database user permissions
Decision Center data is stored in a database. The database administrator might require you to provide the specific permissions that you need when accessing this database.
This step applies when restrictions need to be implemented on the database. Skip to the next step if you are managing the database yourself, for example for test purposes using an embedded database, or do not need further restrictions.
Connection to the Decision Center database, established in the data source credentials, and any subsequent requests to the database are handled through a database user. This database user (name and password), for example rtsdbUser, is defined by the database administrator and has no relation to the standard Decision Center groups.
The following table gives the permissions that the database administrator must define on the Decision Center database, with attention given to the type of operations that you want to perform:
Database permission Operation Use Decision Center Create the database schema using the Decision Center console or Ant tasks Modify the database schema using the Decision Center console or Ant tasks Migrate the database schema ALTER TABLE Not required Not required Required Required CREATE INDEX Not required Required Required Required CREATE ROLE Not required Not required Not required Required CREATE SEQUENCE Not required Required Required Required CREATE TABLE Not required Required Required Required CREATE VIEW Not required Required Required Required DROP INDEX Not required Not required Required Required DROP SEQUENCE Not required Not required Required Required DROP TABLE Not required Not required Required Required DROP VIEW Not required Not required Required Required INSERT TABLE Required Required Required Required SELECT SEQUENCE Required Required Required Required SELECT TABLE Required Required Required Required UPDATE TABLE Required Required Required Required Some supported databases do not require all the above permissions.
Step 2: Configure database connectivity
In this set of tasks, you create a JDBC provider, a data source, and a connection pool, and do other optional tasks. You then establish and test the database connection. in the comments within each PDSE member, before you run them on the z/OS system. We can customize the JCL either using a manual search and replace, or using an ISPF macro.
After you have customized the JCL variables for your configuration, we can submit the jobs to create a database for Decision Center.
Procedure
On the z/OS computer where DB2 is installed, run the following JCL scripts to create the database tables and grant authority to the tables. The database administrator typically performs this task.
Create a JDBC provider
Before we can create a data source and connection for Decision Center, you first create a JDBC provider in WAS.
Procedure
Create a data source and a connection pool
You must create a data source and a connection pool in WAS V8.0 and V8.5 to enable Decision Center.
If WAS is used in cluster mode, define the data source at node level in the cluster (as opposed to cluster level).
Procedure
To create a data source and a connection pool:
Create J2C authentication data
In WAS, we can secure your enterprise information system by creating J2C authentication data.
After you have created your data source and connection pool, you optionally create the J2C authentication data. J2C is a secure mechanism for integrating enterprise information systems to an application server and enterprise applications.
This procedure uses rtsAdmin as the user ID and rtsAdmin as the password. Your user ID and password might be different, depending on the user or schema that is used to execute the Rule Execution Server SQL script. If we perform the procedure as described, tables are created under the rtsAdmin schema.
For a Derby database, if the connect command does not contain the user ID, the user ID and password are the default values APP and APP. If we create the tables under the APP schema, we do not need to do this procedure.
Procedure
Change the custom properties of your data source
Before you connect to the database, we can change the custom properties of your data source.
To change the custom properties of your data source:
Example
For example, for a Derby data source, if you have not created the database, we can set the createDatabase property to create. The first database connection creates the database.
To create the database:
Connecting to the database
After you have created a data source and connection pool, you connect to the data source to test the connection to the database.
Procedure
To test the connection to your database:
Step 3: Configure security
Access to Decision Center is managed by the application server security. To access Decision Center in WAS, define a user registry. We can also manage the security policies.
Create users and groups
Security relies on users and user groups. You define the groups to which the users belong in the application server. For this purpose, you configure a federated repository as a user registry.
At this stage of the configuration, creating users and groups is optional:
Information about users and groups resides in a user registry. In WAS, a user registry authenticates a user and retrieves information about users and groups to perform security-related functions, including authentication and authorization. WAS supports the following types of user registries:
A federated user repository serves as the active user registry.
The following rules apply:
The following table summarizes the groups, their uses, and the default user names and passwords.
Group Use Default user name and password rtsAdministrator Mandatory, gives the user administrator access. rtsAdmin, rtsAdmin rtsConfigManager Mandatory, gives the user configuration manager access. rtsConfig, rtsConfig rtsUser Mandatory, gives a user standard access. rtsUser1, rtsUser1 rtsInstaller Mandatory, gives the user access to the Installation Manager. rtsAdmin, rtsAdmin Validator Optional custom group, used in the Decision Center permissions tutorial. Val, Val Eligibility Optional custom group, used in the Decision Center permissions tutorial. Eli, Eli Procedure
To configure a federated repository:
Updating the security policies
If we enable Java 2 security on WAS, override the global security policies of the application server so that the deployed application can access the MBean server.
If we enable Java 2 security in the Global Security window of the Integrated Solutions Console, update the was.policy file that is packaged in the Decision Center EAR file.
-
INSTALL_DIR/teamserver/applicationservers/WebSphere<version>/jrules-teamserver-WAS<version>.ear/META-INF/was.policy
The EAR file is a compressed file. Open it to extract the files that must be changed, and then replace the files in the EAR. We can use Ant commands to repackage the EAR file
Update the was.policy file to give read and write permissions on each directory that contains published RuleDocs. For example:
permission java.io.FilePermission "<path to my ruledoc folder>${/}-", "read, write, delete";
If we use Java 2 security but do not update the was.policy file, users cannot synchronize RuleDocs to the file system.
Step 4: Deploy the Decision Center EAR file
Before you deploy the Decision Center EAR file, we can declare custom groups, and after you deploy it, change the class loader sequence.
Declaring custom groups
If we have created custom groups, declare them before you deploy the EAR file.
The Decision Center EAR file references the groups rtsUser, rtsConfigManager, rtsAdministrator, and rtsInstaller.
You must add any custom groups that you declared. This includes the Validator and Eligibility groups created for the Decision Center tutorials.
You add custom groups by editing the deployment descriptor files in INSTALL_DIR/teamserver/applicationservers/WebSphere<version_number>/jrules-teamserver-WAS<version_number>.ear.
Procedure
To add your custom groups to the Decision Center deployment descriptor:
Deploy the EAR
After you have added custom groups, you deploy the Decision Center EAR file.
After you have added your custom groups to the deployment descriptors in the Decision Center EAR, you deploy the EAR file on WAS to be able to map security roles to users and groups.
When you deploy the Decision Center EAR file, the process sets the persistence locale. After you have saved a rule to the database, you are no longer allowed to change the persistence locale.
If we redeploy the Decision Center EAR file, the redeployment has the following consequences:
Procedure
To deploy the EAR file:
Change the class loading sequence
After you deploy the EAR file, set the class loading sequence to parent last.
The Decision Center application does not support the default parent first configuration.
Procedure
To change the class loading sequence:
What to do next
Verify the deployment of Decision Center.
Step 5: Verify the deployment of the Decision Center Enterprise console
After you have finished configuring Decision Center for your application server, verify that you have deployed the archive successfully. You start your application server, and then use your web browser to open the Decision Center Enterprise console.
Procedure
Step 6: Complete the configuration of the Decision Center consoles
You complete the configuration either from the Decision Center console or by running Ant tasks.
Complete the configuration from the Decision Center Enterprise console
We can work from the Decision Center Enterprise console to complete or modify the configuration after you have deployed the Decision Center archive to your application server.
2.4.1.7.1.1. Installation Settings wizard overview
You use the Installation Settings wizard in the Decision Center console to create or modify the database schema, set up message files or groups, or change the persistence locale or configuration parameters.
The Installation Settings wizard opens automatically when you launch the Decision Center console to complete an installation.
We can also open the Installation Settings wizard by clicking Configure > Installation Settings Wizard in the Decision Center console after you have completed your initial installation. If we open Decision Center after following the steps to install the module, only the Install tab is available.
To access the Installation Settings wizard, have both administrator privileges and the rtsInstaller role when you sign in.
You use the Installation Settings wizard to perform the actions in the following table.
Actions in the Installation Settings wizard Action Description Configure the database This step is mandatory when you complete the configuration with a database on a distributed platform. For more information, see Step 1: Configure the database. Set up message files This step is mandatory during the installation only if you have some custom rule model extension files. For more information, see Step 2: Set up message files. Set up groups You must set up the same groups declared in the application server to use the Decision Center security and permissions mechanisms. For more information, see Step 3: Set up groups. Change the persistence locale You must perform this step if the persistence locale is different from the locale en_US. For more information, see Step 4: Set the persistence locale. Change configuration parameters This step is optional. You will change some configuration parameters when customizing Decision Center. For more information, see Step 5: Set configuration parameters. After you have completed the installation, Decision Center is ready to use but does not contain rule projects. If we open Decision Center and there are no rule projects, a message in the Configure tab informs you that no project has been found and that you should either publish a rule project using Rule Designer or contact the administrator.
If we see this message, publish a rule project from Rule Designer.
More information about using the Installation Settings wizard is available from the Decision Center console online help. To access the online help, click Help in the top banner after you have signed in to Decision Center.
2.4.1.7.1.2. Step 1: Configure the database
You use the Installation Settings wizard to configure the database.
You store the extensions to the Decision Center rule model in two XML files:
See the customization topics for more information about defining common model extensions.
Procedure
2.4.1.7.1.3. Step 2: Set up message files
Message files contain the display text that is associated with the extensions to the rule model contained in the .brmx and .brdx files. For example:
-
status=Status
effectiveDate=Effective Date
expirationDate=Expiration Date
new=New defined=DefinedThe contents of the message files must respect the ISO-LATIN-1 standard.
We can find the default message file in...
-
ODM_HOME/teamserver/bin/defaultextensionmessages_<LOCALE>.properties
If we use the default rule model when creating your database, the default message file is automatically sent to the database. To upload your own message files, use the Installation Settings wizard as explained below.
You must have a message file for each locale that you use. Message files are identified by their locale.
To declare a message file in the Installation Settings wizard:
If Decision Center supports this locale, the Installation Settings wizard assigns a locale code.
Click Next to access Step 3: Set up groups.
2.4.1.7.1.4. Step 3: Set up groups
In addition to creating groups in your application server when you set up security access, use the Setup Groups page in the Installation Settings wizard to upload groups to the database.
You do this step only to use the Decision Center project access and permission mechanisms. You have to have added all the groups that you want to see in the available list when enforcing project security or setting permissions in Decision Center. For more information, refer to the topics on Groups and Permissions in the Decision Center help.
In Decision Center, the groups are the roles in the application server, not the groups defined in the user registry. Decision Center uses the group information to verify whether a user belongs to a role in the application server.
To set up groups:
Using the Setup Groups page in the Installation Settings wizard, upload the default groups for rtsUser and rtsConfigManager, and any custom groups (Validator and Eligibility to do the permissions tutorial) as follows:
You do not have to upload the rtsAdministrator or rtsInstaller group. The administrator group has access to everything, and an installer user must belong to another group.
2.4.1.7.1.5. Step 4: Set the persistence locale
The persistence locale determines the language in which we store rules in the Decision Center database.
You set the locale when you deploy the Decision Center EAR file to your application server. As a consequence, we store the rules in the database in the locale of the Decision Center application.
Changing the persistence locale does not change the language in which Decision Center displays rules. Changing it in Decision Center is necessary only to match the locale of Rule Designer when synchronizing your rule projects, and to access the tutorials in your locale.
You must not change the persistence locale after you have saved a rule to the database.
To set the persistence locale:
2.4.1.7.1.6. Step 5: Set configuration parameters
Many tasks related to customizing Decision Center require you to add or remove configuration parameters.
Decision Center uses the following configuration parameters to generate complete URLs in permalinks:
You generate these parameters when you sign in to the Decision Center console for the first time after configuring the database. We can use the Installation Settings wizard to change these parameters at any time.
The following table gives a description of the main configuration parameters available in teamserver.war/WEB-INF/lib/teamserver-model-XXX.jar/ilog/rules/teamserver/preferences.properties.
Parameter Used to teamserver.<extractorValidator>.class Specify a ruleset extractor validator class to use for the given extractorValidator name. The class must implement the IlrExtractorValidator interface. After you define this class, specify this name as the extractor validator to use when defining a ruleset extractor. teamserver.build.path Define the location of the IRL cache in the file system. Compute the path as follows: teamserver.brl.verbalizers Specify the list of locales for which a BAL verbalizer is defined. teamserver.brl.verbalizer.<locale> Specify the verbalizer class for the given locale. The class must implement the ilog.rules.vocabulary.verbalization.IlrVerbalizer interface. The parameters in the table include the teamserver prefix, which is not in the preferences.properties file. You must include the prefix when setting configuration parameters in the Installation Settings wizard.
To set configuration parameters:
Use the Set configuration parameters page in the Installation Manager wizard to create, modify, or delete configuration parameters.
You now have to sign in to the Decision Center console.
Complete the configuration using Ant tasks
Ant tasks provide an alternative method for completing or modifying the configuration. These tasks perform the same configuration steps as the Installation Settings wizard in the Decision Center console.
2.4.1.7.2.1. Set up the Ant tasks environment
To run Decision Center Ant tasks, first set up the appropriate environment variables.
When preparing to run Ant tasks, verify the following conditions are met:
Communication between the Ant tasks and Decision Center supports the HTTP or HTTPS communication protocols.
Procedure
To set up your environment to use Ant:
Results
The Decision Center Ant tasks are defined in...
-
<WODM_InstallDir>/teamserver/bin/build.xml
...and executed using...
ant <taskName> <parameters list>
To execute these Ant tasks, use the same JVM version and vendor as the one used by the application server.
Ant task parameters start with -D. Use them to set values such as the following ones:
For example...
ant execute-schema -Dserver.url=<protocol://host:port>/teamserver/
                   -DdatasourceName=jdbc/ilogDataSource
                   -Dfile=my_sql_file.sql
The <protocol://host:port> URL is defined in the file...
-
<installDir>/teamserver/bin/teamserver-anttasks.properties
If our browser is not running on the same host as the application server, replace localhost with the address of the machine. If our web application is mapped to a host on a port that is different from the port number shown, change the port number to your host port number.
The file...
-
ODM_HOME/teamserver/bin/teamserver-anttasks.properties
...defines the value of some common parameters and others that depend on the application server used. You do not have to include these parameters in your Ant task command if they are properly defined in this file.
The content of teamserver-anttasks.properties is as follows:
# Default properties
# ------------------------------------
rtsAdmin.login=rtsAdmin
rtsAdmin.password=rtsAdmin

protocol=http
server.host=localhost
server.port=8080
server.url=${protocol}://${server.host}:${server.port}/teamserver

datasourceName=jdbc/ilogDataSource

outputFile=output.sql

languagePackPath = .
languagePackOutputPath = ./generated

persistenceLocale =
selector =
branch =
override = false
2.4.1.7.2.2. Create the database schema
We can create the database schema in a single operation using the set-extensions Ant task or choose to create it step by step.
2.4.1.7.2.2.1. Create the schema using the set-extensions Ant task
For convenience, we can create the database schema using the set-extensions Ant task.
Extensions to the Decision Center rule model are stored in two XML files. One of the files contains the model description itself (usually, the .brmx extension is used), and the second one contains data to initialize enumerations and hierarchies (usually, the .brdx extension is used). We can use Ant tasks to load the rule model from the two XML files and build the SQL script required to get the proper database schema.
For convenience, we can run the set-extensions Ant task, which runs gen-create-schema + execute-schema + upload-extensions + upload-roles, with these parameters:
Alternatively, we can create the database schema step by step, which is useful to look at the generated SQL schema.
To execute these Ant tasks, use the same Java. Virtual Machine version and vendor as the one used by the application server.
2.4.1.7.2.2.2. Create the schema using a step-by-step sequence
To look at the generated SQL schema, we can create it step-by-step.
2.4.1.7.2.2.2.1. Create the database schema script
We can create the database schema script using the gen-create-schema Ant task.
To create the SQL script required to create or update the database schema, run the gen-create-schema Ant task with these parameters:
For example:
ant gen-create-schema -DextensionModel=my_model_file.brmx -DextensionData=my_data_file.brdx -DoutputFile=my_sql_file.sql
The task connects to the given data source from the application server. The task checks if this data source points to an existing Decision Center database. If a database does not exist, the task builds the SQL script to create a fresh database schema to store the model. If a database does exist, the task builds the SQL script required to update the existing database schema.
2.4.1.7.2.2.2.2. Execute the database schema script
You execute the database schema script.
To execute the SQL script that you created, run the execute-schema Ant task with these parameters:
For example:
ant execute-schema -Dfile=my_sql_file.sql
2.4.1.7.2.2.2.3. Uploading the database schema extension
You upload the database schema extension.
To store the rule model description in the database schema, run the upload-extensions Ant task with these parameters:
ant upload-extensions -DextensionModel=my_model_file.brmx -DextensionData=my_data_file.brdx
The description is stored in the database so that Decision Center applications can load it when they start. It is also used by gen-create-schema to get the current model description to run a diff with the new schema.
In a cluster, restart the servers and close all current sessions.
2.4.1.7.2.2.2.4. Uploading a list of roles or groups to the database
In addition to creating groups in your application server when you set up security access, upload groups to the database.
You must perform this task only to use the Decision Center project access and permissions mechanisms. For more information, see the topics on Groups and Permissions in the Decision Center online help.
Add all the groups that you want to see in the available list when enforcing project security or setting permissions in Decision Center. Create the default groups for rtsUser and rtsConfigManager, and upload your custom groups.
You do not have to upload the rtsAdministrator group or the rtsInstaller group. The Administrator group has access to everything and an Installer user must belong to another group.
To store in the database the list of roles or groups to be used by the application, run the upload-roles Ant task with the following parameters:
<role list> is the list of roles or groups to upload to Decision Center, specified as "group1 group2".
Example:
ant upload-roles -Droles="rtsUser rtsConfigManager Eligibility Validator"
To execute these Ant tasks, use the same Java. Virtual Machine version and vendor as the one used by the application server.
2.4.1.7.2.2.3. Removing a database schema
We can create an SQL script to remove (drop) a database schema using the gen-drop-schema Ant task.
To remove a database schema, you proceed in two steps:
Create the SQL script
To create the SQL script required to delete a database schema, run the gen-drop-schema Ant task with the following parameters:
ant gen-drop-schema -DextensionModel=my_model_file.brmx -DoutputFile=my_sql_file.sql
Run the SQL script
The task connects to the given data source from the application server. It reads the model description given in the parameters, and generates the SQL script required to remove the existing schema. Because many database tables are linked through foreign keys, these tables must be removed in a specific order and the script generation handles these constraints.
To execute the SQL script that you created, run the execute-schema Ant task with these parameters:
For example...
ant execute-schema -Dfile=my_sql_file.sql
If file not specified, the task attempts to execute a file named output.sql in the directory defined as basedir in build.xml.
2.4.1.7.2.3. Define and upload message files
We can define and upload message files to Decision Center using the upload-messages Ant task.
Message files contain the display text associated with the extensions to the rule model contained in the .brmx and .brdx files. For example:
-
status=Status
effectiveDate=Effective Date
expirationDate=Expiration Date
new=New
defined=DefinedThe default messages file is provided in: ODM_HOME/teamserver/bin/defaultextensionmessages_<LOCALE>.properties
The contents of the messages files must conform to the ISO-LATIN-1 standard.
You must have a messages file for each locale that you use. Upload the messages file to Decision Center by running the upload-messages Ant task with these parameters:
ant upload-messages -Dlocale=en_US -DmessageFile=mymessages.properties
2.4.1.7.2.4. Set the persistence locale
The persistence locale is used to determine the language in which rules are stored in the Decision Center database.
The persistence locale is set when you deploy the Decision Center archive to your application server, which means that the rules in the database are stored in the locale of the Decision Center application.
Changing the persistence locale does not change the language in which rules display in Decision Center. Changing the persistence locale in Decision Center is necessary only to match the locale of Rule Designer when synchronizing your rule projects, and to access the tutorials in your locale.
You must not change the persistence locale after you have saved a rule to the database.
To set the persistence locale by running an Ant task:
2.4.1.7.2.5. Add or remove configuration parameters
Many tasks related to customizing Decision Center require configuration parameters to be added or removed.
The following configuration parameters, used to generate complete URLs in permalinks, are generated the first time you sign in to Decision Center after configuring the database. We can use the Installation settings wizard to set these beforehand or change them afterwards:
The following table gives a description of the main configuration parameters available in teamserver.war/WEB-INF/lib/teamserver-model-XXX.jar/ilog/rules/teamserver/preferences.properties.
Parameter Use teamserver.<extractorValidator>.class Specify a ruleset extractor validator class to use for the given extractorValidator name. The class must implement the IlrExtractorValidator interface. After this class has been defined, specify this name as the extractor validator to use when defining a ruleset extractor. teamserver.build.path Define where the cache of the IRL is located on the file system. The path is computed as follows: first, use this property with the name of the user who launched the server as the root for the cache (<build.path>_<username>). If it is not defined, use the system property java.io.tmpdir and add rtscache (for example, <temp dir>/rtscache_<username>). If the system property is not defined, use the server directory and add rtscache (for example, <server dir>/rtscache_<username>). teamserver.brl.verbalizers Specify the list of locales for which a BAL verbalizer is defined. teamserver.brl.verbalizer.<locale> Specify the verbalizer class for the given locale. The class must implement the IlrVerbalizer interface. The following Ant tasks can be used to add or remove configuration parameters:
set-config-param Sets a configuration parameter for a given user. If the user is not specified, it sets a global parameter. Parameters:
For example:
ant set-config-param -Dkey=locale -Dvalue=en_US
remove-config-param Drops the given configuration parameter for a given user. If the user is not specified, it drops the global configuration parameter. Parameters:
print-config-param Print the global parameters or given user parameters if username is specified. If no key is specified, all keys are printed. Parameters:
2.4.1.7.2.6. Repackaging the Decision Center archive
We can repackage the Decision Center archive using an Ant task.
Add new .jar files to the Decision Center archive by running the repackage-ear or repackage-war Ant task with these parameters:
-DtargetEar=<target ear>
-DtargetWar=<target war>-DsourceEar=<source ear>
DsourceWar=<source war>-DdescriptorsDir=<descriptors directory> Directory that is copied into the META-INF directory of the target EAR (not mandatory). -DadditionalJars=<"myjar1.jar,myjar2.jar, myjarn.jar"> Additional .jar files to store in the lib directory of the target archive (not mandatory). -DtmpDir=<directory> Directory that can be specified to store temporary files (not mandatory). -DwebResourcesDir=<web resources directory> Directory that is copied into the WAR library (not mandatory). -Dconsole=both|enterprise|business Whether to repackage the Business or Enterprise WAR files. The default is both. This task does not use the server.url and datasourceName parameters. If we have customized Decision Center package the custom .jar files before you repackage the Decision Center archive using this task.
Additional steps to configure the Decision Center Business console
The search function in the Decision Center Business console is based on the Solr search engine. You must configure the engine to provide this functionality.
Use a remote Solr search engine
You set up the search function in Decision Center Business console to work with a remote instance of the Apache Solr search engine.
The search function in Decision Center Business console uses an embedded instance of the Apache Solr search engine. Alternatively, we can have the search function work with a remote instance of the search engine, which we can run on another computer, or the same computer but in a dedicated web application.
To configure the search function to run with a remote instance of the Solr search engine:
Set parameters for the Solr search engine
Configure the search function in the Decision Center Business console to run with the Apache Solr search engine.
Decision Center Business console provides a function for searching rule projects. When you install this feature, it uses an embedded instance of the Apache Solr search engine. Alternatively, we can have the search function run with a remote instance of the search engine, which we can install on another computer, or the same computer but in a dedicated web application
There are three parameters to set for the search engine:
Search parameters Parameter Description search.SearchProvider This parameter takes one of the following values: search.SolrEmbeddedDataDir Use this optional parameter to direct the index of the embedded version (SolrEmbedded) to a specific directory on the Decision Center. search.SolrRemoteUrl Use with SolrRemote to provide the URL of the remote Solr search engine. You set the configuration parameters for the search engine within the preferences.properties file for Decision Center.
The following table provides examples for setting the parameters in preferences.properties to work with the Solr search engine:
Configuration table for search properties... Solr server Parameter settings External server (The URL of the external server depends on the installation. For this example, the remote address of the search engine is...
-
http://mysearchserver:8983/solr
Set the preferences.properties file as follows: - search.SearchProvider=SolrRemote
search.SolrRemoteUrl=http://mysearchserver:8983/solrEmbedded server. In this example, we store the index in... -
c:/temp/DC-SearchIndex
Set the preferences.properties file as follows:
- search.SearchProvider=SolrEmbedded
search.SolrEmbeddedDataDir=c:/temp/DC-SearchIndexIf we do not specify a directory for search.SolrEmbeddedDataDir, Decision Center stores the search index in a temporary directory. When the server stops running, it also stops using the temporary directory. When the server restarts, it creates a new temporary directory, and completely reindexes the repository.
If we specify a directory for search.SolrEmbeddedDataDir, the directory and its content persist across server restarts, and the server does not reindex the repository with each restart.
Additional steps to configure Decision Validation Services
Optionally, we can deploy, configure, and test Decision Validation Services to complement your Decision Center configuration on WebSphere Application Server.
Before you start
Tasks that perform before configuring Decision Validation Services, and a list of steps that you should take to ensure a successful configuration.
Before following the instructions to deploy and configure Decision Validation Services, install the following elements:
On WAS, Decision Validation Services uses the default Work manager wm/default to run simulations and tests in managed threads. Therefore, verify it is defined in the application server where you configure Decision Validation Services.
Step 1: Create Decision Warehouse database resources
We can use SQL scripts to create a dedicated schema in the database.
If we set the Rule Execution Server persistence to datasource or jdbc and you intend to use Decision Warehouse to store your test execution results, create a dedicated schema in the database containing these tables and views. To do so, we can use the provided SQL scripts, located in ODM_HOME/executionserver/databases. A readme file in this directory provides additional information about the scripts.
The script that creates the Decision Warehouse database schema is named trace_<database_name>.sql.
The Installation Settings wizard in the Rule Execution Server console creates all the required tables for Rule Execution Server and for Decision Warehouse. If we are configuring Decision Validation Services and you have already run the Installation Settings wizard to create the tables, we do not have to create database resources manually. However, if you did not use the wizard to create database resources, run the script to create the Decision Warehouse database schema.
When you use DB2, the scripts that create the Rule Execution Server database tables are written for databases that use automatic storage.
If we completed this task as part of the Rule Execution Server configuration, we do not have to do this a second time. It is included here solely for completeness.
If we use Command Editor to run the scripts, log in with the credentials that you use for the data source for Rule Execution Server.
Use any tool that can handle SQL to import and run the SQL scripts. The tools provided for each database include:
Database Database tool IBM DB2 DB2 command line processor Derby ij command line processor MySQL mysql command line processor Oracle sqlplus command line processor Postgre SQL Postgre SQL command line tool SQL Server Query Tool Sybase isql command line processor To access the database, the database user must have the following credentials:
Install a database client for the database that you use. Refer to the documentation of the database for more information.
The default CLOB size might not be sufficient for the FULL_EXECUTION_TRACE field in the EXECUTION_TRACES table. You might need a size qualifier if SQL raises exceptions with the <Lob-Value> reason code.
Step 2: Deploy the Decision Validation Services archive
How to deploy the Decision Validation Services archive.
This step shows you how to deploy the Decision Validation Services archive. The archive must be deployed on the same server as the XU. We can use this procedure to deploy the default SSP archive packaged with the installer or any subsequent deployment of a repackaged archive. Deploy the default SSP EAR to check the availability of the feature. We can also deploy the default SSP EAR and use this to test your rules if you have an XML XOM. An XML XOM is included in the ruleset archive inside a RuleApp, and therefore the SSP EAR does not have to be repackaged to include the XOM.
If we are installing Decision Validation Services on z/OS, we can use customizable installation scripts to perform this task.
Procedure
To deploy an SSP archive:
Step 3: Checking the availability of Decision Validation Services
A specific testing URL is designed for you to check the rule session type, DAO factory class for trace persistence, the class used to cache the Decision Validation Services job, and the pool size for asynchronous execution.
To check the availability of Decision Validation Services:
Version The version of Decision Server used. Patch level patch level of Decision Server used. License information type of license of this version. RuleSession RuleSession type (POJO or J2SE). DAO Factory Class DAO (Data Access Object) Factory class used to persist the trace into the data warehouse. Job store class name of the class used to persist the Decision Validation Services job into a cache to free the memory during long computations. Job pool size size of the pool for the asynchronous execution. Started since time and date when the SSP started. Jobs currently running About screen provides information about the jobs currently running after you run Decision Validation Services in Decision Center: The report for the job is automatically downloaded by Decision Center at the end of the execution. If the scenario suite is run in the background, the user downloads the report by viewing the list of scenario suites, and then clicking the report link when it becomes available. After the report is viewed, the job is removed from the table. The job remains in the table until the report is downloaded.
Step 4: Packaging Decision Validation Services using Ant
We can configure Decision Validation Services archives using an Ant task.
This section is for users installing on Windows and other supported distributed platforms only.
We can configure Decision Validation Services archives by running the ssp-setup Ant file.
Procedure
What to do next
We can now deploy the testing archive.
Step 5: Redeploy the Decision Validation Services archive
How to redeploy the Decision Validation Services archive.
This step shows you how to redeploy the Decision Validation Services archive. The archive must be redeployed on the same server as the XU. We can use this procedure to redeploy the default SSP archive packaged with the installer or any subsequent deployment of a repackaged archive. Redeploy the default SSP EAR to check the availability of the feature. We can also redeploy the default SSP EAR and use this to test your rules if you have an XML XOM. An XML XOM is included in the ruleset archive inside a RuleApp, and therefore the SSP EAR does not have to be repackaged to include the XOM.
Procedure
To redeploy an SSP archive (an archive has already been deployed):
2.4.1.10. Troubleshooting
In case of problems or poor performance, we can allocate more memory to your applications.
Configure Rule Execution Server in shared mode
We can configure Rule Execution Server so that client applications can share the same deployed Execution Unit (XU) resource.
Procedure
What to do next
In the following figure, the components shown in green are not provided by ODM. Therefore, you need to develop those components. The Java EE rule session types are available and configure these components so that they integrate with the Execution Unit (XU).
The XU is deployed on the application server and shared by all the applications deployed to the server. It works in a similar way to installing a device driver on an operating system, in that the application server is globally enhanced with ruleset execution capabilities. We can easily upgrade, start, stop, and monitor the XU using the application server management console or other tools. You must deploy the XU onto all the nodes of a cluster.

Configure Rule Execution Server in scoped mode
We can configure Rule Execution Server so that it is scoped to a single Java EE application.
In this use case, Rule Execution Server is scoped exclusively to a single application. The Execution Unit (XU) is deployed within a single application. With this deployment option, we can deploy multiple applications to the same server.
If we package the Rule Execution Server XU resource archive (RAR) file in your enterprise application (EAR), applications that use a previous version of ODM or multiple applications that use the current version of ODM, or both, can coexist in the same Java Virtual Machine (JVM).
Procedure