Overview
This document provides an example of installing and configuring IBM Business Process Manager Advanced Edition V 8.5.0.1, for an Authoring environment, on Solaris, using IHS and Oracle database.
Prerequisites
- Platform
Solaris 5.11 11.1 sun4v sparc sun4v 64bit
- Memory
Minimum of 8 GB.
To determine the total amount of memory...
- /usr/sbin/prtconf | grep Mem
The result should be similar to...
- Memory size: 49152 Megabytes
- Disk space
Minimum of 25 GB.
- OS Run Level
To determine the version...
- who -r
The results should be similar to:
- run-level 3 Sep 4 23:17 3 0 S
- File System Requirements
The filesystem size should be 25 GB, and be owned by "bpmadmin"
Set permissions to 775.
To verify size...
-
df -k
| Product images | /opt/products/BPM |
| Installation Manager Āimage | /home/media/ibm_media/solaris/Sparc64/im/17/iml |
| Response file | /opt/products/BPM/responsefiles/BPM/bpmAdv_solaris_response_nonroot_64bit.xml |
| Fixpack Directory | /opt/products/ BPM/fixpacks |
| Dmgr root install | /opt/was85/bpm/ |
| Dmgr Profile root install | /opt/was85/bpm/profiles/dmgr |
| Node root install | /opt/bpm85/bpm/ |
| Node Profile root install | /opt/bpm85/ bpm/profiles/node01 |
| IHS root install | /opt/ihs85/bpm/ |
| IHS Response file | /opt/products/WP_Install/IHS/responsefiles/samples/bpm/WASv85.ihs.install.xml |
| Plugin root install | /opt/plugins85/bpm |
| PLG Response File | /opt/products/WP_Install/IHS/responsefiles/samples/bpm/WASv85.plg.install.xml |
| ToolBox root install | /opt/toolbox85/bpm |
| ToolBox Response File | /opt/products/WP_Install/IHS/responsefiles/samples/bpm/WASv85.wct.install.xml |
| WCT PLG Definition Response file on node01 | /opt/toolbox85/bpm/WCT/pct_responsefile.txt |
| WCT PLG Definition Response file on node02 | /opt/toolbox85/bpm/WCT/pct_responsefile.txt |
| IIM root install | /opt/iml |
| IIM Shared Lib | /opt/bpm85/BPMShared |
| BPM Backup Directory | /opt/bpm85/bpm_backup |
Install Installation Manager V7 on Dmgr node
-
umask 022
ulimit -n 8800
cd /home/media/ibm_media/solaris/Sparc64/im/17/iml
./IIM_Install
Verify installation...
-
/opt/iim_install.log
Install Business Process Center binaries on Dmgr
On each Dmgr server...
-
sudo su bpmadmin
umask 022
ulimit -n 8800
cd /opt/iml/eclipse/tools
./imcl -acceptLicense -showProgress input /opt/products/BPM/responsefiles/BPM/ bpmAdv_solaris_response_nonroot_64bit_DMGR.xml
Verify installation...
-
/opt/was85/bpm/logs/postinstall
You should find a message similar to...
<record>
    <date>2013-12-20T14:35:16</date>
    <millis>1387571716838</millis>
    <sequence>104</sequence>
    <logger>com.ibm.ws.install.configmanager.ConfigManager</logger>
    <level>INFO</level>
    <class>com.ibm.ws.install.configmanager.ConfigManager</class>
    <method>launch</method>
    <thread>10</thread>
    <message>Returning with return code:   INSTCONFSUCCESS</message>
</record>
Install WAS and BPM fixpack and interim fixes on Dmgr
Assuming fix pack and interim fixes have been downloaded and stored in the mount share directory...
-
/opt/products/BPM/fixpacks
Install the fixpack on Dmgr node.
cd /opt/iml/eclipse/tools
./imcl install com.ibm.bpm.ADV.v85_8.5.1.20131107_1830 com.ibm.websphere.ND.v85_8.5.5001.20131018_2242
       -acceptLicense
       -installationDirectory /opt/bpm85/bpm
       -repositories /opt/products/BPM/fixpack/repository.config,/opt/products/BPM/fixpack/repository.config
       -log bpm85_fp1SilentInstall.log
Verify installation...
/opt/was85/bpm/logs/postinstall/fixpack/
Run a version info...
-
cd /opt/was85/wpauth/bin
./versionInfo.sh
Create Dmgr profile using Process Center Dmgr profile template
cd /opt/was85/bpm/bin/
./manageprofiles.sh -create  \
                    -templatePath /opt/was85/bpm/profileTemplates/BPM/BpmDmgr \
                    -profileName dmgr \
                    -profilePath /opt/was85/bpm/profiles/dmgr \
                    -cellName bpmcell \
                    -nodeName dmgr \
                    -hostName host504.myco.txaccess.net \
                    -enableAdminSecurity true \
                    -adminUserName wasadmin \
                    -adminPassword password
Verify the installation...
-
/opt/was85/bpm/logs/manageprofiles
<record>
    <date>2013-12-31T18:55:32</date>
    <millis>1388537732678</millis>
    <sequence>4675</sequence>
    <logger>com.ibm.wsspi.profile.WSProfileCLI</logger>
    <level>INFO</level>
    <class>com.ibm.wsspi.profile.WSProfileCLI</class>
    <method>invokeWSProfile</method>
    <thread>10</thread>
    <message>Returning with return code:   INSTCONFSUCCESS </message>
 </record>
Start the Dmgr
-
cd /opt/was85/bpm/profiles/dmgr/bin
./startManager.sh
Verify server successfully started...
-
/opt/was85/bpm/profiles/dmgr/logs/dmgr
Login to the admin console...
-
https://host:port/ibm/console/
Install Business Process Center binaries on nodes
On node01 and node02 install the IIM...
-
sudo su - bpmadmin
umask 022
ulimit -n 8800
cd /home/media/ibm_media/solaris/Sparc64/im/17/iml
./IIM_Install
Verify installation successful...
-
/opt/iim_install.log
Ā On node01 and node02 install BPM binaries...
-
sudo su - bpmadmin
umask 022
ulimit -n 8800
cd /opt/iml/eclipse/tools
./imcl -acceptLicense -showProgress input /wasadmin/products/BPM/responsefiles/BPM/bpmAdv_solaris_response_nonroot_64bit.xml
Verify installation...
-
/opt/was85/bpm/logs/postinstall
You should find a message similar to below.
<record> Ā <date>2013-12-20T14:35:16</date> Ā <millis>1387571716838</millis> Ā <sequence>104</sequence> Ā <logger>com.ibm.ws.install.configmanager.ConfigManager</logger> Ā <level>INFO</level> Ā <class>com.ibm.ws.install.configmanager.ConfigManager</class> Ā <method>launch</method> Ā <thread>10</thread> Ā <message>Returning with return code: INSTCONFSUCCESS</message> </record>
Install WAS and BPM fixpack and interim fixes on nodes
cd /opt/iml/eclipse/tools
./imcl install com.ibm.bpm.ADV.v85_8.5.1.20131107_1830 com.ibm.websphere.ND.v85_8.5.5001.20131018_2242  \
       -acceptLicense  \
       -installationDirectory /opt/bpm85/bpm  \
       -repositories /opt/products/BPM/fixpack/repository.config,/opt/products/BPM/fixpack/repository.config  \
       -log bpm85_fp1SilentInstall.log
Verify installation successful...
-
/opt/bpm85/bpm/logs/postinstall/fixpack/
Create custom profile using Process Center profile template on node01
cd /opt/bpm85/bpm/bin/
./manageprofiles.sh -create  \
                    -templatePath /opt/bpm85/bpm/profileTemplates/BPM/BpmNode  \
                    -profileName node01  \
                    -profilePath /opt/bpm85/bpm/profiles/node01  \
                    -nodeName node01  \
                    -hostName host502.myco.txaccess.net
Verify installation successful...
-
/opt/bpm85/bpm/logs/manageprofiles
Create custom profile using Process Center profile template on node02
 cd /opt/bpm85/bpm/bin/
./manageprofiles.sh -create \
                    -templatePath /opt/bpm85/bpm/profileTemplates/BPM/BpmNode \
                    -profileName node02 \
                    -profilePath /opt/bpm85/bpm/profiles/node02 \
                    -nodeName node02 \
                    -hostName host506.myco.txaccess.net
Verify the installation is successful...
-
/opt/bpm85/bpm/logs/manageprofiles
Federate both node01 and node02 into Dmgr
Start the dmgr, then from node, run...
cd /opt/bpm85/bpm/bin
./addNode.sh host504.myco.txaccess.net 58880 -conntype SOAP
             -username wasadmin
             -password password
Verify the deferation is successful by viewing...
-
/opt/bpm85/bpm/profiles/node01/logs/nodeagent/addNode.log
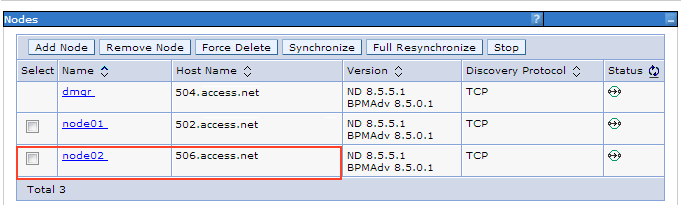
Verify that node01 is added to Dmgr...

Add node02 to Dmgr
cd /opt/bpm85/bpm/bin
addNode.sh host504.myco.txaccess.net 58880 -conntype SOAP \
           -username wasadmin \
           -password password
Verify the installation is successful...
-
/opt/bpm85/bpm/profiles/node02/logs/nodeagent/addNode.log
Verify that node01 is added to Dmgr...
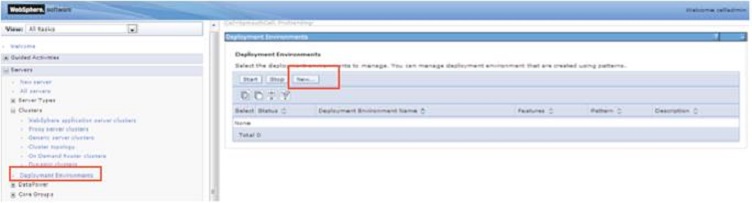
Create Deployment Environment and configure clusters on
- Log on to the WAS console, and go to...
-
Servers | Deployment Environment | New
- Enter the following information...
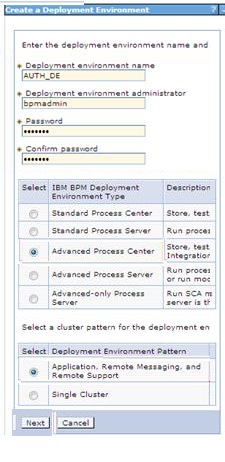
Deployment Environment name AUTH_DE Deployment Environment administrator bpmadmin Password password Confirmation password password BPM Deployment Environment type Advanced Process Center Deployment Environment pattern Application, Remote Messaging and Remote Support - Select both nodes

- Leave default value

- Enter the clusters name and members of clusters...
Application Cluster/Member name appCluster/appClone01/appClone02 Remote Messaging Cluster/Member name meCluster/meClone01/meClone02 Remote Support Cluster/ Member name supCluster/supClone01/supClone02 
- Enter the database information.

Select: Create Tables"
- Click Generate Deployment Environment

- When complete, click save changes to finish

- The Deployment Environment should look like this

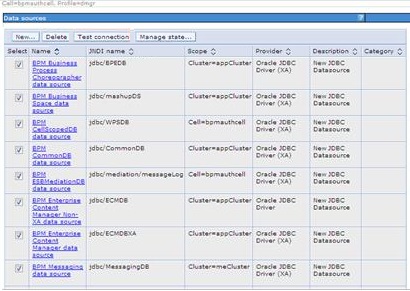
- Verify data sources...
-
Resources | JDBC |Data Sources | check box | Test Connection
- ĀStart each Cluster...
-
Servers | Clusters | WAS Cluster | meCluster | Start
Servers | Clusters | WAS Cluster | supCluster | Start
Servers | Clusters | WAS Cluster | appCluster | Start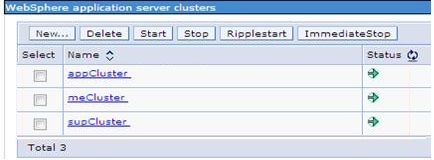
- Access the Process Center console...
http://ProcessCenterHost:15025/ProcessCenter/login.jsp
...and enter userid and password to login...
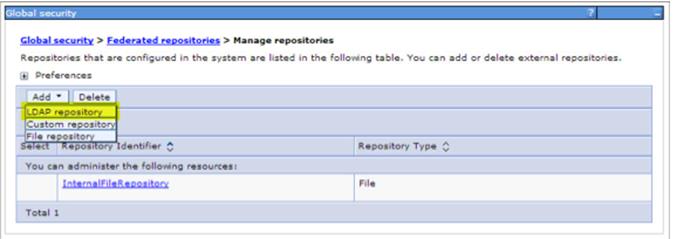
Add LDAP to the WebSphere federated repository
- Stop all BPM cluster members and node agents on all hosts. Only the deployment manager should be running.
- Logon to the WebSphere Integrated Solutions Console...
https://host:port/ibm/console
...and navigate to...
-
Security | Global Security | User account | Configure | Manage Repository
- In the Add dropdown list, select LDAP repository
- Provide a name for the new repository in the Repository identifier field. For example, using LDAP_BPM
Select an type of LDAP in the Directory type dropdown. For example, IBM Tivoli Directory server.
Specify LDAP server host name in the Primary host name filed.
Specify an LDAP port.
Specify an LDAP user and password in the Bind distinguished name and Bind password fields.
- In the Repository dropdown, select your repository, and set the base DN in the Unique distinguished name of the base entry in the federated repositories fields. Click Ok and Save
- Login to the WAS console, navigate to...
-
Users and Groups | Manage Users
...and verify you can see your LDAP users.
- Login to the BPM Process Admin Console of one of the nodes as BPM administrator (bpmadmin)...
https://host:port/ProcessAdmin
...then navigate to...
-
User Management | Group Management
- In the search field type "my_admins" then click add Users link.
In the popup windows type...
-
mywasbind
...then click "Add Selected". Repeat the same step for my_authors group.
- At this point you should be able to login to BPM Process Admin/ Portal using mywasbind
Install IBM Http Server for BPM on both nodes
-
umask 022
ulimit -n 8800
cd /opt/iml/eclipse/tools
./imcl -acceptLicense -showProgress input /opt/products/WP_Install/IHS/responsefiles/samples/bpm/WASv85.ihs.install.xml
./imcl -acceptLicense -showProgress input /opt/products/WP_Install/IHS/responsefiles/samples/bpm/WASv85.plg.install.xml
./imcl -acceptLicense -showProgress input /opt/products/WP_Install/IHS/responsefiles/samples/bpm/WASv85.wct.install.xml
Verify success...
-
/opt/iml/datalocation/logs/
Configure WCT and PLG on node01 and node2
umask 022
ulimit -n 8800
cd /opt/toolbox85/bpm/WCT/
./wctcmd.sh -tool pct
            -createDefinition
            -defLocName /opt/plugins85/bpm
            -defLocPathname /opt/plugins85/bpm
            -response /opt/toolbox85/bpm/WCT/pct_responsefile.txt
Verify the installation...
/opt/plugins85/bpm/logs/
Copy...
-
configurebpmWebServer1.sh
configurebpmWebServer2.sh
...from node01 and node02 to...
-
remote_dmgr:/opt/was85/bpm/bin
From each Dmgr...
-
cd /opt/was85/bpm/bin
./configurebpmWebServer[1-2].sh
At this point both Web servers should be integrated with Dmgr. Login to the Dmgr admin console and click...
-
Servers | Servers Type | Web Servers
Select both web servers and click start.