Protecting sensitive information in the cluster
Protect sensitive information in your Red Hat OpenShift on IBM Cloud cluster to ensure data integrity and to prevent your data from being exposed to unauthorized users.
We can create sensitive data on different levels in the cluster that each require appropriate protection.
- Cluster-level: Cluster configuration data is stored in the etcd component of our OpenShift master. Data in etcd is stored on the local disk of the OpenShift master and is backed up to IBM Cloud Object Storage. Data is encrypted during transit to IBM Cloud Object Storage and at rest. We can choose to enable encryption for the etcd data on the local disk of our OpenShift master by enabling a key management service provider for the cluster.
- App-level: When we deploy the app, do not store confidential information, such as credentials or keys, in the YAML configuration file, configmaps, or scripts. Instead, use Kubernetes secrets, such as an imagePullSecret for registry credentials. We can also encrypt data in Kubernetes secrets to prevent unauthorized users from accessing sensitive app information.
For more information about securing the cluster and personal information, see Security for Red Hat OpenShift on IBM Cloud and Storing personal information.
Overview of cluster encryption
The following image and description outline default and optional data encryption for Red Hat OpenShift on IBM Cloud clusters.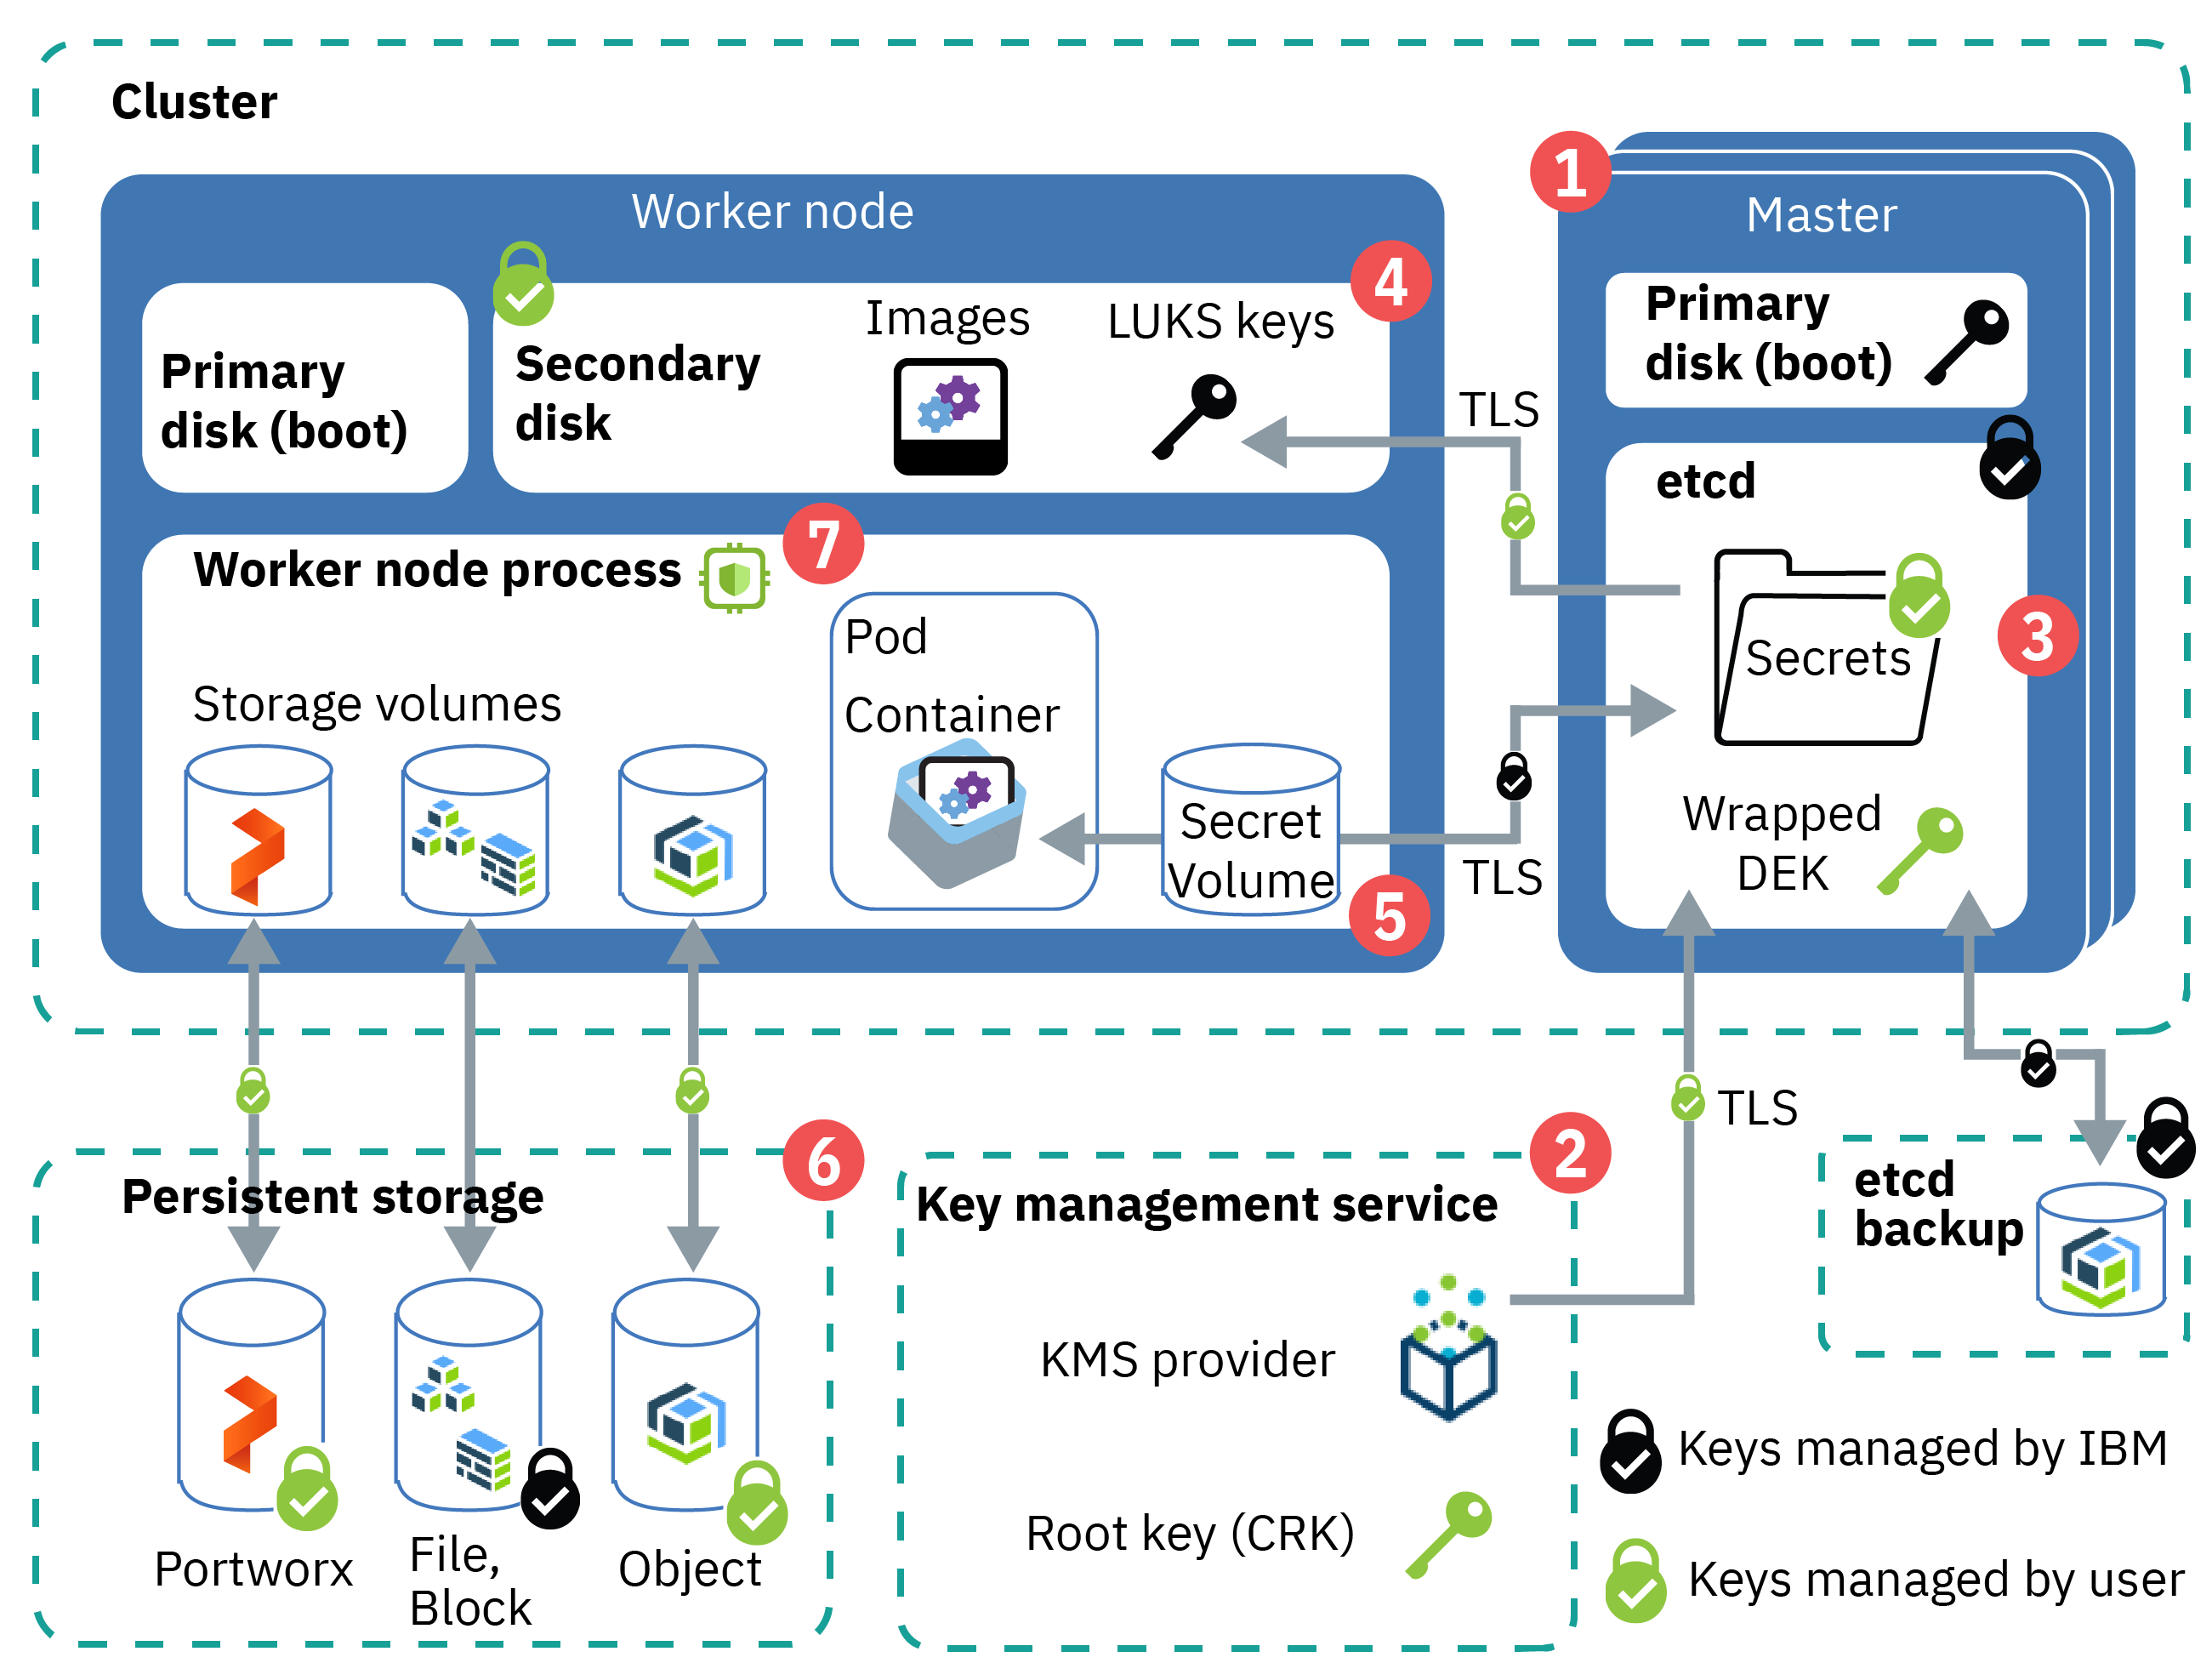
Figure: Overview of data encryption in a cluster
- Kubernetes master control plane startup: Components in the Kubernetes master, such as etcd, boot up on a LUKS-encrypted drive by using an IBM-managed key.
- Bring your own key (BYOK): When you enable a key management service (KMS) provider* in the cluster, we can bring your own root key to create data encryption keys (DEKs) that encrypt the secrets in the cluster. The root key is stored in the KMS instance that you control. For example, if you use IBM Key Protect, the root key is stored in a FIPS 120-3 Level 3 hardware security module (HSM).
- etcd data: Etcd is the component of the master that stores the configuration files of our Kubernetes resources, such as deployments and secrets. Data in etcd is stored on the local disk of the Kubernetes master and is backed up to IBM Cloud Object Storage. Data is encrypted during transit to IBM Cloud Object Storage and at rest. When you enable a KMS provider*, a wrapped data encryption key (DEK) is stored in etcd. The DEK encrypts the secrets in the cluster that store service credentials and the LUKS key. Because the root key is in your KMS instance, you control access to your encrypted secrets. To unwrap the DEK, the cluster uses the root key from your KMS instance. For more information about how key encryption works, see Envelope encryption.
- Worker node disks: The primary disk contains the kernel images that are used to boot your worker node, and is unencrypted. The secondary disk hosts the container file system, stores locally pulled images, and is encrypted
at rest in ways that vary by infrastructure provider.
 VPC only: The secondary disk is AES-256 bit encrypted at rest by the underlying VPC infrastructure provider.
We cannot manage the encryption on your own with a KMS provider.
VPC only: The secondary disk is AES-256 bit encrypted at rest by the underlying VPC infrastructure provider.
We cannot manage the encryption on your own with a KMS provider.
 Classic only: The secondary disk is AES 256-bit encrypted with an IBM-managed LUKS encryption
key that is unique to the worker node and stored as a secret in etcd. When you reload or update your worker nodes, the LUKS keys are rotated. If you enable a KMS provider, the etcd secret that holds the LUKS key is encrypted by the root
key and DEK of our KMS provider*.
Classic only: The secondary disk is AES 256-bit encrypted with an IBM-managed LUKS encryption
key that is unique to the worker node and stored as a secret in etcd. When you reload or update your worker nodes, the LUKS keys are rotated. If you enable a KMS provider, the etcd secret that holds the LUKS key is encrypted by the root
key and DEK of our KMS provider*.
- Cluster secrets: By default, Kubernetes secrets are base64 encoded. To manage encryption of the Kubernetes secrets in the cluster, we can enable a KMS provider*. The secrets are encrypted by KMS-provided encryption until their information is used. For example, if you update a Kubernetes pod that mounts a secret, the pod requests the secret values from the master API server. The master API server asks the KMS provider to use the root key to unwrap the DEK and encode its values to base64. Then, the master API server uses the KMS provider DEK that is stored in etcd to read the secret, and sends the secret to the pod by using TLS.
- Persistent storage encryption: We can choose to store data by setting up file, block, object, or software-defined Portworx persistent storage. If you store your data on file or block storage, your data is automatically encrypted at rest. If you use object storage, your data is also encrypted during transit. With Portworx, we can choose to set up volume encryption to protect your data during transit and at rest. The IBM Cloud infrastructure storage instances save the data on encrypted disks, so your data at rest is encrypted.
- Data-in-use encryption: For select, SGX-enabled classic worker node flavors, we can use IBM Cloud Data Shield to encrypt data-in-use within the worker node.
* OpenShift version 3.11 or version 4.4 clusters only: We can encrypt secrets in the cluster by using a key management service (KMS) provider only in version 3.11 or 4.4 clusters. KMS is not available for version 4.3 clusters.
Understand Key Management Service (KMS) providers
We can protect the etcd component in your Kubernetes master and Kubernetes secrets by using a Kubernetes key management service (KMS) provider that encrypts secrets with encryption keys that you control.KMS provider integration is available only in version 3.11 or 4.4 clusters, not for version 4.3 clusters.
What KMS providers are available by default? Can I add other providers?
Red Hat OpenShift on IBM Cloud version 3.11supports the following KMS providers:
- IBM® Key Protect for IBM Cloud for public cloud or on-prem environments.
- Hyper Protect Crypto Services for keep your own key (KYOK) crypto unit support.
Because adding a different KMS provider requires updating the managed master default configuration, we cannot add other KMS providers to the cluster.
Can I change the KMS provider?
We can have one KMS provider enabled in the cluster. We can switch the KMS provider, but we cannot disable KMS provider encryption after it is enabled. For example, if you enabled Key Protect
in the cluster, but want to use Hyper Protect Crypto Services instead, we can enable Hyper Protect Crypto Services as the KMS provider.
We cannot disable KMS provider encryption. Do not delete root keys in your KMS instance, even if you rotate to use a new key. If you delete a root key that a cluster uses, the cluster becomes unusable, loses all its data, and cannot be recovered.
Similarly,
if you disable a root key, operations that rely on reading secrets fail. Unlike deleting a root key, however, we can reenable a disabled key to make the cluster usable again.
With a KMS provider, do I control the encryption in my cluster?
Yes. When you enable a KMS provider in the cluster, your own KMS root key is used to encrypt data in etcd, including the LUKS secrets. Using your own encryption
root key adds a layer of security to your etcd data and Kubernetes secrets and gives you more granular control of who can access sensitive cluster information. For more information, see the overview and your KMS provider's
documentation, such as Key Protect envelope encryption.
Can I use all the features of the KMS provider with my cluster?
Review the following known limitations:
- Customizing the IP addresses that are allowed to connect to your Key Protect instance is not supported.
Encrypting the Kubernetes master's local disk and secrets by using a KMS provider
Enable a Kubernetes key management service (KMS) provider such as Key Protect to encrypt the Kubernetes secrets and etcd component of our Kubernetes master.To rotate your encryption key, repeat the CLI or console steps to enable KMS provider encryption with a new root key ID. The new root key is added to the cluster configuration along with the previous root key so that existing encrypted data is still protected. To encrypt the existing secrets with the new root key, we must rewrite the secrets.
KMS provider integration is available only in version 3.11 or 4.4 clusters, not for version 4.3 clusters.
Prerequisites
Before you enable a key management service (KMS) provider in the cluster, create a KMS instance and complete the following steps.- Create a KMS instance, such as Key Protect or Hyper Protect Crypto Services.
-
Create a customer root key (CRK) in your KMS instance, such as a Key Protect root key. By default, the root key is created without an expiration date.
Need to set an expiration date to comply with internal security policies? Create the root key by using the API and include the expirationDate parameter. Important: Before your root key expires, we must repeat these steps to update the cluster to use a new root key. Otherwise, we cannot decrypt your secrets.
-
Make sure that we have the correct permissions to enable KMS in the cluster.
- Ensure that we have the Administrator IBM Cloud IAM platform role for the cluster.
- Make sure that the API key that is set for the region that the cluster is in is authorized to use the KMS provider. For example, to create an instance and root key, we need at least the Editor platform and Writer service roles for Key Protect. To check the API key owner whose credentials are stored for the region, run ibmcloud oc api-key info -c <cluster_name_or_ID>.
Enabling or rotating KMS encryption through the CLI
We can enable a KMS provider or update the instance or root key that encrypts secrets in the cluster through the CLI.- Complete the prerequisite steps to create a KMS instance and root key.
- Get the ID of the KMS instance that you previously created.
ibmcloud oc kms instance ls
- Get the ID of the root key that you previously created.
ibmcloud oc kms crk ls --instance-id <KMS_instance_ID>
- Enable the KMS provider to encrypt secrets in the cluster. Fill in the flags with the information that you previously retrieved. The KMS provider's private service endpoint is used by default to download the encryption keys. To use
the public service endpoint instead, include the --public-endpoint flag. The enablement process can take some time to complete.
During the enablement, we might not be able to access the Kubernetes master such as to update YAML configurations for deployments.
ibmcloud oc kms enable -c <cluster_name_or_ID> --instance-id <kms_instance_ID> --crk <root_key_ID> [--public-endpoint]
-
Verify that the KMS enablement process is finished. The process is finished when that the Master Status is Ready.
ibmcloud oc cluster get -c <cluster_name_or_ID>
Example output when the enablement is in progress:
Name:                   <cluster_name>
ID:                     <cluster_ID>
...
Master Status:          Key Protect feature enablement in progress.
Example output when the master is ready:
Name:                   <cluster_name>
ID:                     <cluster_ID>
...
Master Status:          Ready (1 min ago)
After the KMS provider is enabled in the cluster, data in etcd and new secrets that are created in the cluster are automatically encrypted by using your root key.
-
To encrypt existing secrets with the root key, rewrite the secrets.
- Log in to your account. If applicable, target the appropriate resource group. Set the context for the cluster.
- With cluster-admin access, rewrite the secrets.
kubectl get secrets --all-namespaces -o json | kubectl replace -f -
- Optional: Verify that your secrets are encrypted.
Do not delete root keys in your KMS instance, even if you rotate to use a new key. If you delete a root key that a cluster uses, the cluster becomes unusable, loses all its data, and cannot be recovered.
Similarly, if you disable a
root key, operations that rely on reading secrets fail. Unlike deleting a root key, however, we can reenable a disabled key to make the cluster usable again.
Enabling or rotating KMS encryption through the console
We can enable a KMS provider or update the instance or root key that encrypts secrets in the cluster through the IBM Cloud console.- Complete the prerequisite steps to create a KMS instance and root key.
- From the Clusters console, select the cluster that we want to enable encryption for.
- From the Overview tab, in the Summary > Key management service section, click Enable. If you already enabled the KMS provider, click Update.
- Select the Key management service instance and Root key that we want to use for the encryption.
During the enablement, we might not be able to access the Kubernetes master such as to update YAML configurations for deployments.
- Click Enable (or Update).
-
Verify that the KMS enablement process is finished. From the Summary > Master status section, we can check the progress. Example output when the enablement is in progress:
Master status KMS feature enablement in progress.
Example output when the master is ready:
Master status Ready
After the KMS provider is enabled in the cluster, data in etcd and new secrets that are created in the cluster are automatically encrypted by using your root key.
-
If the cluster runs a version earlier than 4.4.16_1513_openshift: To encrypt existing secrets with the root key, rewrite the secrets.
- Log in to your account. If applicable, target the appropriate resource group. Set the context for the cluster.
- With cluster-admin access, rewrite the secrets.
kubectl get secrets --all-namespaces -o json | kubectl replace -f -
- Optional: Verify that your secrets are encrypted.
Do not delete root keys in your KMS instance, even if you rotate to use a new key. If you delete a root key that a cluster uses, the cluster becomes unusable, loses all its data, and cannot be recovered.
Similarly, if you disable a
root key, operations that rely on reading secrets fail. Unlike deleting a root key, however, we can reenable a disabled key to make the cluster usable again.
Verifying secret encryption
After you enable a KMS provider in the cluster, we can verify that the cluster secrets are encrypted by querying information that is in etcd in the master. If the returned information is encrypted, we know that the KMS provider works in the cluster.Before beginning: Access the OpenShift cluster.
- Install the etcd CLI (etcdctl) version 3 or higher.
- Download the release package for the operating system from the etcd project.
- Extract and move the etcdctl binary file to the location of our binary files, such as the following example.
mv Downloads/etcd-v3.4.6-darwin-amd64/etcdctl /usr/local/bin/etcdctl
- Verify that etcdctl is installed.
etcdctl version
- Set your terminal session context to use the appropriate etcdctl API version.
export ETCDCTL_API=3
- Run the ibmcloud oc cluster config command and include the --admin option, which downloads the etcd certificates and keys for the cluster, and the --output zip > <cluster_name_or_ID>.zip option, which saves the cluster configuration files to a compressed folder.
ibmcloud oc cluster config -c <cluster_name_or_ID> --admin --output zip > <cluster_name_or_ID>.zip
-
Unzip the compressed folder.
-
Get the server field for the cluster. In the output, copy only the master URL, without the https:// and node port. For example, in the following output, copy the c2.us-south.containers.cloud.ibm.com master URL only.
cat ./<cluster_name_or_ID>/kube-config.yaml | grep server
Example output:
server: https://c2.us-south.containers.cloud.ibm.com:30426
-
Get the etcdPort for the cluster.
ibmcloud oc cluster get -c <cluster_name_or_ID> --output json | grep etcdPort
Example output:
"etcdPort": "31593",
-
Get the name of a secret in the cluster.
oc get secrets [-n <namespace>]
-
Confirm that the Kubernetes secrets for the cluster are encrypted. Replace the secret_name, master_url, and etcd_port fields with the values that you previously retrieved, and replace <cluster_name_or_ID> with the name of the cluster in your compressed folder file path.
etcdctl get /kubernetes.io/secrets/<secret_namespace>/<secret_name> --endpoints https://<master_url>:<etcd_port> --key="./<cluster_name_or_ID>/admin-key.pem" --cert="./<cluster_name_or_ID>/admin.pem" --cacert="./<cluster_name_or_ID>/ca.pem"
The output is unreadable and scrambled, indicating that the secrets are encrypted. Example output of encrypted secrets:
k8s:enc:kms:v1:ibm:...=a?u???T?fE?pC?/?f|???'?z ?nI?a,)? 9??O?{2??]="g?۳o??\5 ?,a??AW??6Mx??x?5???7 dwX@DG8Dd??ۭ#??[Y?ρF??????a$??9????_ˌ??m??Ɵϭ8?7????????c4L??q1?$0? ??yfzgl?} ??Aynw#?$?J???p?x??pΝ???]ؖE6I?ө?o??t]??p?s?#0%BׇB?????k*֊ؖ??~?B??????V??If you see a context deadline exceeded error, we might have a temporary connectivity issue. Check that the local etcdctl version matches the remote etcd version. Run the etcdctl get command with the --debug=true flag to see any additional information. Then wait a few minutes and try again.
Encrypting data in classic clusters by using IBM Cloud Data Shield (beta)
IBM Cloud Data Shield is integrated with Intel® Software Guard Extensions (SGX) and Fortanix® technology so that the app code and data of our containerized workloads are protected in use. The app code and data run in CPU-hardened enclaves, which are trusted areas of memory on the worker node that protect critical aspects of the app, which helps to keep the code and data confidential and unmodified.![]() Applies to only classic clusters. VPC clusters cannot have bare metal worker nodes, which are required to use IBM
Cloud Data Shield.
Applies to only classic clusters. VPC clusters cannot have bare metal worker nodes, which are required to use IBM
Cloud Data Shield.
When it comes to protecting your data, encryption is one of the most popular and effective controls. But, the data must be encrypted at each step of its lifecycle for the data to be protected. During its lifecycle, data has three phases. It can be at rest, in motion, or in use. Data at rest and in motion are generally the area of focus when you think of securing your data. But, after an application starts to run, data that is in use by CPU and memory is vulnerable to various attacks. The attacks might include malicious insiders, root users, credential compromise, OS zero-day, network intruders, and others. Taking that protection one step further, we can now encrypt data in use.
If you or your company require data sensitivity due to internal policies, government regulations, or industry compliance requirements, this solution might help you to move to the cloud. Example solutions include financial and healthcare institutions, or countries with government policies that require on-premises cloud solutions.
To get started, provision an SGX-enabled bare metal worker cluster with a supported flavor for IBM Cloud Data Shield.